The Anderson squat is a barbell squat variation that starts from safety pins, straps, or supports instead of from the standing position. Unlike a regular back squat, you begin each rep from a dead stop, build tension under the bar, and drive upward without using the bounce from the lowering phase.
That makes the Anderson squat useful for building starting strength, improving weak squat positions, and training your legs and trunk to produce force from a difficult position. In this guide, you will learn how to set it up, how to perform it with proper form, which muscles it works, common mistakes to avoid, and how to use it in a workout.
What Is the Anderson Squat?
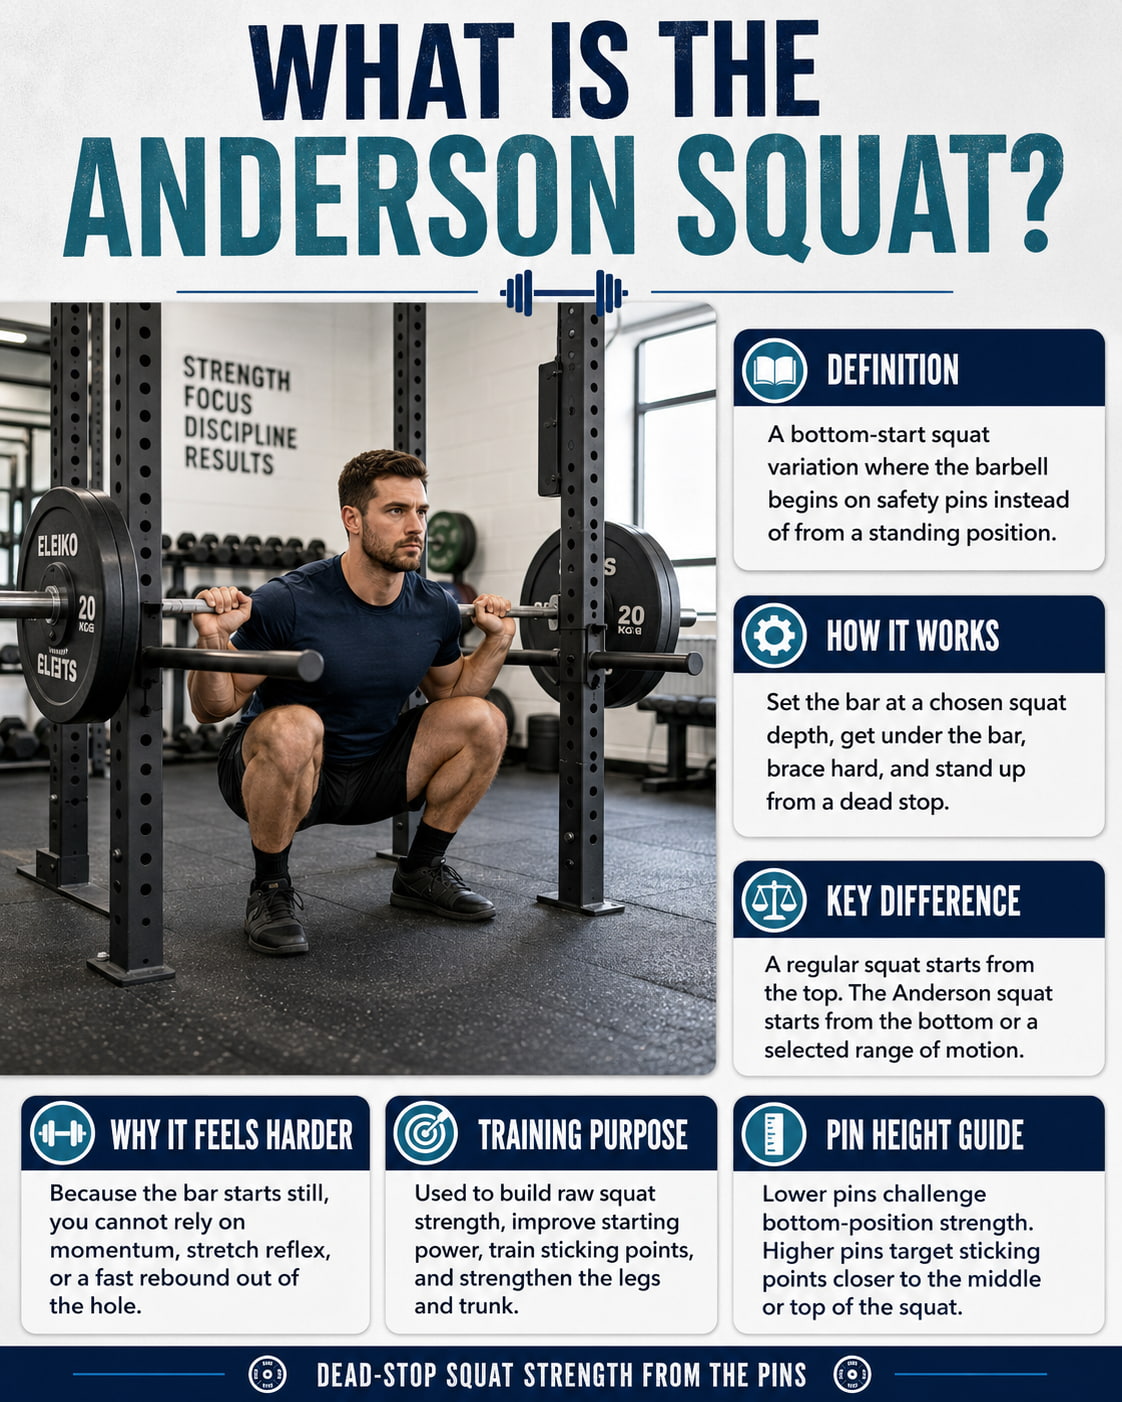
The Anderson squat is a bottom-start squat variation named after legendary strength athlete Paul Anderson. In most setups, the barbell rests on safety pins in a power rack. You get under the bar at a chosen squat depth, brace hard, and stand up from that position.
The key difference is the starting point.
A regular squat starts from the top. You lower the bar, reverse the movement, and stand back up. The Anderson squat starts from the bottom or from a selected range of motion. Because the bar begins from a dead stop, you cannot rely as much on momentum, stretch reflex, or a fast rebound out of the hole.
That is why many lifters use it to train raw strength at a specific squat depth. It can be set slightly below parallel, at parallel, or above parallel depending on the goal. A lower pin height usually challenges bottom-position strength. A higher pin height can target a sticking point closer to the middle or top of the squat.
The Muscle & Strength Anderson squat guide describes it as a squat variation that uses pins to limit range of motion, while Westside Barbell emphasizes its use for building lower-body, trunk, glute, hamstring, and back strength from a disadvantaged position.
Anderson Squat Exercise Overview
Best for: The Anderson squat is best for intermediate and advanced lifters who want to build starting strength, improve squat sticking points, and practice producing force from a dead stop.
Muscles worked: The main muscles worked are the quadriceps, glutes, hamstrings, adductors, spinal erectors, and deep core muscles. The upper back also works hard to keep the bar stable and the torso from collapsing forward.
Equipment needed: You need a power rack, barbell, weight plates, and properly set safety pins or safety straps. A safety squat bar can also be useful if a straight bar bothers your shoulders, wrists, or elbows.
Why it stands out: The Anderson squat removes much of the normal lowering-and-rebound effect of a regular squat. Every rep starts from stillness, so you must create tension before the bar moves. This makes the exercise valuable for lifters who struggle to stay tight at the bottom of a squat or lose power near a specific sticking point.
Suggested sets and reps: For most lifters, use 3–5 sets of 3–5 reps. For heavier strength work, use 3–6 sets of 1–3 reps. For technique practice, use 3–4 sets of 3–5 reps with a lighter load.
Beginners: True beginners should master bodyweight squats, goblet squats, box squats, and regular barbell squat mechanics first. If you are new to Anderson squats but already squat with control, start with an empty bar or light weight from a higher pin setting.
Intermediate: Use the Anderson squat as a secondary squat movement after your main squat work. Keep the load challenging but clean, usually around an RPE 7–8, with 1–3 reps left in reserve.
Advanced: Use it as a heavy strength variation, max-effort rotation, or targeted sticking-point lift. Advanced lifters can adjust pin height, bar type, stance, and loading to match a specific squat weakness.
Rest: Rest 2–4 minutes between working sets. For very heavy singles or triples, rest 3–5 minutes so each set starts with strong bracing and clean technique.
How to do it:
- Set the safety pins in a power rack at your chosen squat depth.
- Place the barbell on the pins and load it evenly.
- Step under the bar and position it on your upper back as you would for a back squat.
- Set your feet in your normal squat stance and pull your elbows into a strong position.
- Take a deep breath, brace your core, and create tension through your upper back.
- Drive your feet into the floor and push the bar up by extending your hips and knees together.
- Keep your torso strong as you stand fully upright.
- Lower the bar back to the pins with control.
- Let the bar settle, reset your brace, and repeat the next rep from a dead stop.
Common mistakes: The biggest mistakes are setting the pins too low, starting too heavy, letting the hips shoot up first, relaxing under the bar, bouncing off the pins, and turning the lift into a good morning. Another common mistake is treating the Anderson squat like a normal squat and rushing each rep instead of resetting.
Expert tip: Before adding weight, make sure the start position looks like the bottom position of your best squat. Your chest, pelvis, feet, and knees should already be organized before the bar leaves the pins.
Exercise variations: Useful variations include high-pin Anderson squats, below-parallel Anderson squats, safety bar Anderson squats, front squat Anderson squats, Zercher Anderson squats, and pause squats from a normal top-start position.
Easier variation: A box squat, goblet squat, or high-pin Anderson squat is easier because it reduces the demand of starting from a deep, disadvantaged position.
Harder variation: A below-parallel Anderson squat, front rack Anderson squat, or heavy low-pin Anderson squat is harder because it requires more bracing, mobility, and force from the bottom position.
Anderson Squat Muscles Worked
The Anderson squat trains the same major lower-body muscles as a squat, but the dead-stop start changes how the movement feels. Because you cannot rely on momentum, the legs and trunk must create force from a still position.
The NASM squat biomechanics breakdown describes the barbell squat as a compound, multi-joint movement involving the lower body and lumbo-pelvic-hip complex. The Anderson squat keeps that same general squat pattern, but places more focus on starting strength and positional control.
Quadriceps
The quadriceps extend the knees as you drive up from the pins. If the pins are set near parallel or below parallel, the quads must work hard to move the bar from a mechanically difficult position.
A more upright torso and slightly narrower stance may increase the feeling of quad involvement for many lifters. However, do not force a stance that makes your heels lift or knees cave inward.
Glutes
The gluteus maximus helps extend the hips as you stand up. The glutes are especially important when the Anderson squat starts from a deeper position, where the hips are flexed and the body must generate force without a bounce.
A strong glute drive helps the hips and chest rise together instead of letting the hips shoot up first.
Hamstrings
The hamstrings assist hip extension and help support the back side of the squat pattern. They are not usually the only limiting muscle in an Anderson squat, but they contribute to hip control and help keep the lift powerful.
Adductors
The adductors help stabilize the hips and assist hip extension, especially in deeper squat positions. Lifters who use a moderate or wider stance may feel more inner-thigh involvement.
A 2024 squat biomechanics review in the International Journal of Sports Physical Therapy explains that squat stance, depth, trunk angle, and lower-leg position can influence joint loading and muscle demand.
Core and Spinal Erectors
The core and spinal erectors are critical in the Anderson squat. They help keep the torso rigid so the bar does not fold you forward.
This is one reason the Anderson squat can feel much harder than it looks. You are not just standing up with your legs. You are also bracing hard from a dead stop while the bar is already loaded on your back.
Upper Back
The traps, rhomboids, rear delts, and other upper-back muscles help keep the bar secure. If your upper back relaxes at the start, your chest can drop and the rep can turn into a forward-leaning grind.
Anderson Squat Benefits
1. Builds Starting Strength
The main benefit of the Anderson squat is starting strength. Since the bar begins on pins, you must generate force without the help of a normal squat descent.
This can be useful for lifters who feel strong once the bar is moving but struggle to break through the first part of the ascent.
2. Trains Squat Sticking Points
The Anderson squat lets you choose the exact height where the bar starts. If you often miss a squat just above parallel, you can set the pins near that range and train force production there.
This does not mean you should only do Anderson squats. It works best as an accessory or variation alongside regular squats, pause squats, front squats, or other full-range lower-body work.
3. Improves Bracing Under Load
Starting under a loaded bar forces you to brace before movement begins. You have to create pressure, lock in your upper back, and connect your feet to the floor before the bar leaves the pins.
That makes the Anderson squat useful for learning how strong a rep should feel before it starts.
4. Reduces Momentum
In a regular squat, some lifters rely heavily on speed, bounce, or stretch reflex out of the bottom. The Anderson squat removes much of that advantage.
This can expose weak positions quickly. If you cannot stay tight, the bar will not move cleanly.
5. Builds Confidence in Hard Positions
A properly set Anderson squat can help you become more comfortable under the bar at a challenging depth. Since the pins support the bar before each rep, you can practice setting up in a hard position without having to unrack and walk out first.
This is especially helpful for lifters who lose confidence near the bottom of heavy squats.
6. Useful for Strength Athletes
Powerlifters, weightlifters, strongman athletes, and general strength trainees can use Anderson squats as a supplemental lift. BarBend highlights the Anderson squat as a way to train starting strength, rate of force development, positional weakness, and stubborn squat sticking points.
How to Set Up the Anderson Squat
Start with a power rack that has strong safety pins or safety straps. The setup matters because a poor pin height can make the exercise less useful or less safe.
For most lifters, a good starting point is around parallel or slightly above parallel. If you have excellent mobility and strong squat mechanics, you can experiment with slightly below parallel. If your torso collapses, hips shoot up, or pelvis tucks hard under the load, the pins are probably too low for your current ability.
Place the bar evenly on the pins. Get under the bar carefully and test the position before loading heavily. You should be able to brace, create upper-back tension, and drive the bar up without twisting, shifting, or forcing your body into a cramped position.
Use your normal squat stance at first. After you learn the exercise, you can adjust stance width or pin height based on your goal.
How to Do the Anderson Squat With Proper Form
Good Anderson squat form starts before the bar moves. You should not slide under the bar loosely and hope to fix your position on the way up.
Set your upper back first. Pull your shoulder blades into a stable position and grip the bar firmly. Brace your abs as if you are about to take a punch. Keep your ribs down, feet planted, and knees tracking in the same direction as your toes.
Drive into the floor and stand up with the chest and hips rising together. The goal is not to jerk the bar off the pins. The goal is to create enough tension that the bar moves smoothly and powerfully.
At the top, finish with your hips and knees extended. Then lower the bar under control until it settles back onto the pins. Do not crash the bar down. A controlled return protects your position, your equipment, and your next rep.
The ACE Fitness bodyweight squat guide emphasizes key squat principles such as keeping the heels down, knees aligned, and hips and torso rising together. Those same ideas matter when you add the dead-stop challenge of an Anderson squat.
Common Anderson Squat Mistakes
Setting the Pins Too Low
A deep start is not automatically better. If the pins are so low that you cannot brace or keep your torso position, the movement becomes sloppy.
Start with a height where you can create tension and lift with control. Lower the pins over time only if your form stays strong.
Going Too Heavy Too Soon
The Anderson squat can feel humbling. A weight you squat normally may feel much heavier when started from the pins.
Start lighter than expected. Add load only when every rep begins from a stable brace and finishes without your hips shooting up.
Letting the Hips Rise First
If your hips rise but your chest stays down, the lift turns into a good morning-style movement. This shifts more stress to the back and usually means the weight is too heavy, the pins are too low, or your brace is not strong enough.
Think “chest and hips together” as you drive up.
Relaxing on the Pins
The pins support the bar, but they should not make you passive. Before each rep, build full-body tension.
Grip the bar, brace your core, root your feet, and lock in your upper back before you push.
Bouncing Off the Pins
Each rep should start from a dead stop. Bouncing the bar off the pins defeats the purpose of the exercise and can be rough on the rack, bar, and your position.
Let the bar settle, reset, and lift again.
Using It as Your Only Squat
The Anderson squat is a useful variation, not a complete replacement for regular squats. Because it often trains a limited range of motion, you should still include full-range squat patterns that match your goal and ability.
Anderson Squat Sets, Reps, and Programming
The Anderson squat works best with lower reps because each rep requires a strong reset. High-rep sets can become messy once fatigue builds.
| Goal | Sets and Reps | Rest | Effort |
|---|---|---|---|
| Technique practice | 3–4 sets of 3–5 reps | 2–3 min | RPE 6–7 |
| Strength accessory | 3–5 sets of 3–5 reps | 2–4 min | RPE 7–8 |
| Heavy strength | 3–6 sets of 1–3 reps | 3–5 min | RPE 8–9 |
| Sticking-point work | 4–6 sets of 2–4 reps | 2–4 min | RPE 7–9 |
Most lifters should use Anderson squats once per week as an accessory or rotate them every few weeks as a main squat variation. Heavy Anderson squats are demanding, so avoid maxing them out too often.
The ACSM resistance training guidelines update emphasizes matching resistance training variables to the goal while keeping training consistent and sustainable. For the Anderson squat, that means choosing a load, rep range, and frequency that improves strength without making every set a form breakdown test.
How to Progress the Anderson Squat
Progression should be based on clean reps, not just more weight.
A simple plan is to keep the same pin height for 3–4 weeks. Start with a load you can control for 3–5 reps. When you can complete all sets with stable bracing, even foot pressure, and no hip shoot-up, increase the load slightly.
You can also progress by lowering the pins one level, but only if your squat position remains strong. A lower start is harder, so reduce the weight when changing pin height.
Good progression options include adding 5–10 pounds, adding one set, lowering the pins slightly, improving pause control on the pins, or moving from a high-pin version to a deeper start.
Anderson Squat Variations and Regressions
High-Pin Anderson Squat
The high-pin Anderson squat starts above parallel. It is useful for learning the setup, training heavier loads, or targeting a higher sticking point.
Below-Parallel Anderson Squat
This version starts slightly below parallel and is much more demanding. It requires strong mobility, bracing, and bottom-position control.
Safety Bar Anderson Squat
A safety squat bar can make the exercise more comfortable for lifters who struggle with shoulder position on a straight bar. It also challenges the upper back and trunk because the bar tends to pull the torso forward.
Front Squat Anderson Squat
The front squat version starts with the bar in the front rack. It strongly challenges the quads, upper back, and torso position. Use less weight than you would with the back squat version.
Box Squat
The box squat is a good regression because it teaches control, depth consistency, and sitting into a stable position without starting from a fully dead barbell.
Pause Squat
The pause squat is another strong regression. You still start from the top, but you pause at the bottom to reduce bounce and build tension.
Goblet Squat
The goblet squat is best for beginners who need to learn squat depth, bracing, and knee tracking before using a barbell variation from pins.
Anderson Squat vs Pin Squat
The terms Anderson squat and pin squat are sometimes used interchangeably. In many gyms, both mean a squat that uses safety pins to target a certain range of motion.
When lifters separate the two, the Anderson squat usually means starting from the pins at the bottom or at a selected depth. A pin squat may also refer to lowering from the top until the bar touches or settles on the pins, then driving back up.
The practical difference is the emphasis. The Anderson squat is usually more focused on starting strength from a dead stop. A top-start pin squat may feel more like a regular squat with a pause or stop at a specific point.
Both can be useful. Choose the version that matches your goal.
Sample Anderson Squat Workout
Use this workout after your warm-up and before higher-rep leg accessories.
| Exercise | Sets | Reps | Rest |
|---|---|---|---|
| Anderson Squat | 4 | 3 | 3 min |
| Romanian Deadlift | 3 | 6–8 | 2 min |
| Bulgarian Split Squat | 3 | 8 each leg | 90 sec |
| Hamstring Curl | 3 | 10–12 | 60–90 sec |
| Plank or Dead Bug | 3 | 30–45 sec | 60 sec |
Use a load that feels like RPE 7–8 on the Anderson squat. You should finish each set knowing you could do one or two more clean reps.
Run this workout once per week for 4 weeks. If all Anderson squat sets stay clean, add 5–10 pounds the next week or lower the pins slightly and reduce the load.
Who Should Use the Anderson Squat?
The Anderson squat is a good fit for lifters who already know how to squat and want a focused strength variation. It is especially useful for people who lose tightness at the bottom, struggle with a consistent sticking point, or want to practice producing force without momentum.
It may not be the best choice for brand-new lifters, people without access to a stable power rack, or anyone who cannot get into the start position without rounding, twisting, or losing balance.
If you feel sharp pain, numbness, dizziness, chest pain, or unusual symptoms during the exercise, stop the set and seek help from a qualified professional.
Frequently Asked Questions
Is the Anderson squat good for beginners?
The Anderson squat is usually better for intermediate lifters than true beginners. Beginners should first build a solid squat pattern with bodyweight squats, goblet squats, box squats, and regular barbell squats. If a beginner is already coached and technically sound, a light high-pin Anderson squat can be used for practice.
Is the Anderson squat better than a regular squat?
It is not better for every goal. The regular squat is better as a main full-range strength and muscle-building movement for most lifters. The Anderson squat is better as a targeted variation for dead-stop strength, sticking points, and bracing practice.
How heavy should Anderson squats be?
Start lighter than your normal back squat. Many lifters need to reduce the load because the movement starts from a dead stop. A good first target is a weight you can lift for 3–5 controlled reps with no hip shoot-up or loss of torso position.
How often should I do Anderson squats?
Most lifters can use Anderson squats once per week as an accessory exercise. Heavy lifters may rotate them every 4–8 weeks instead of doing them year-round. The harder you load them, the more recovery you need.
Should Anderson squats start below parallel?
They can, but they do not have to. Below-parallel starts are harder and require more mobility and bracing. Many lifters should begin around parallel or slightly above parallel, then adjust pin height based on form and training goals.
Can Anderson squats build muscle?
Yes, they can help build leg, glute, and trunk strength when programmed with enough volume and effort. However, because they are often performed for lower reps, they are usually best combined with other squat, lunge, hinge, and leg accessory exercises for a complete muscle-building plan.
Conclusion
The Anderson squat is a powerful squat variation for building strength from a dead stop. It teaches you to brace hard, drive from a difficult position, and stay tight without relying on bounce or momentum.
Use it as an accessory or rotating strength lift, not as your only squat. Start with a pin height you can control, keep the load honest, and progress only when your reps stay strong. Done well, the Anderson squat can help you build stronger legs, better trunk control, and more confidence under the bar.