
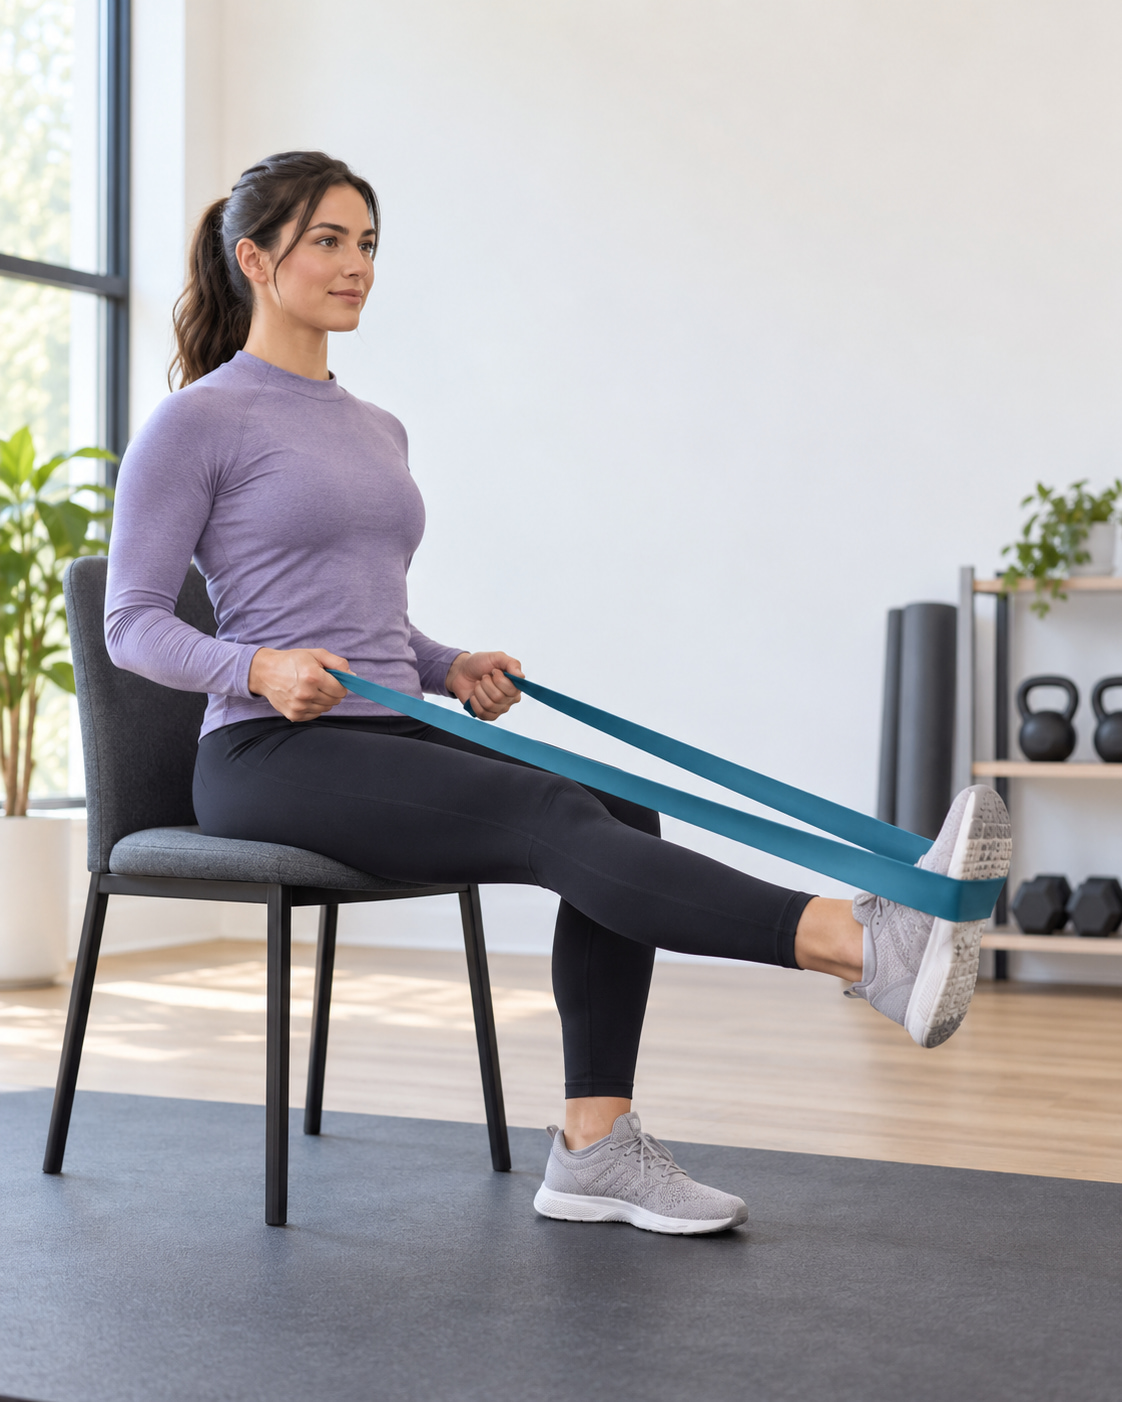
The resistance band leg press is a lower-body exercise that involves pressing your foot against a band while straightening your knee. This guide covers the seated single-leg version, using a chair and a band held in your hands. The movement includes a small thigh lift, a controlled press, and a return to the floor.
Below, you’ll learn how to set up securely, perform each repetition, choose suitable resistance, and include the exercise in a simple strength routine.
Before You Start
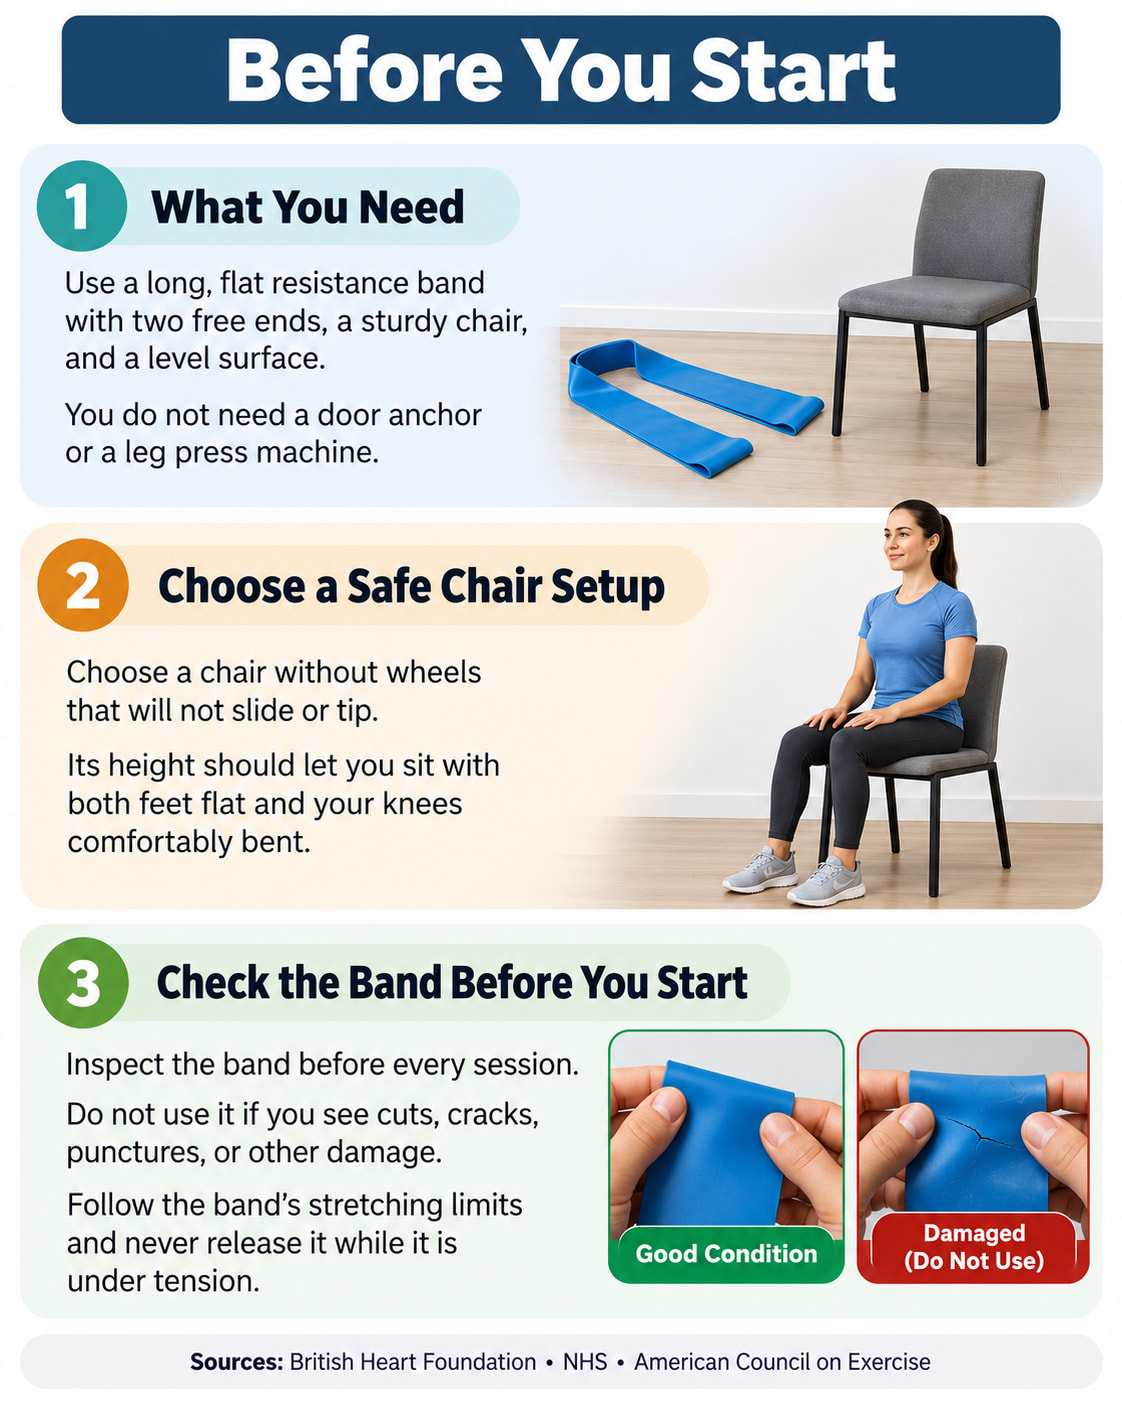
Use a long, flat resistance band with two free ends, a sturdy chair, and a level surface. You do not need a door anchor or a leg press machine. The band should be long enough to reach from your working foot to your hands without exceeding its stretching limit. The British Heart Foundation demonstrates this type of hand-held band setup for a seated leg press.
Choose a chair without wheels that will not slide or tip. Its height should let you sit with both feet flat and your knees comfortably bent. An armless chair gives your hands more room, following NHS guidance for chair-based strength exercises.
Inspect the band before every session. Discard it if you find cuts, cracks, punctures, or other damage. The American Council on Exercise recommends following the manufacturer’s stretching limits and never releasing a band while it is under tension.
How to Do the Resistance Band Leg Press With Proper Form
Best for: Home exercisers who want a seated lower-body exercise without getting down onto the floor.
The movement sequence below follows the Arthritis Foundation written leg-press guidance. In this version, you raise your thigh slightly rather than pulling your knee toward your chest.
Step-by-Step Instructions
- Sit securely. Keep your hips supported on the chair, your torso upright, and your shoulders relaxed. Position yourself so your working leg can move freely. Keep the other foot flat on the floor.
- Place the band under your foot. Position the middle of the flat band across the middle of your working foot’s sole. Hold one end in each hand beside your waist, using approximately equal working lengths.
- Prepare to press. With the working knee bent, lift your thigh slightly so your foot clears the floor. Adjust your grip before starting to remove excessive slack. Keep your wrists comfortable and your hands steady.
- Press your foot forward. Exhale as you straighten the working knee against the band. Reach a comfortable straight-leg position without snapping the knee backward or leaning your torso to finish the movement.
- Return under control. Bend your knee slowly and place your working foot back on the floor. Maintain your grip rather than letting the band pull the leg back suddenly.
- Repeat, then change sides. Complete your planned repetitions. With your foot supported, reduce the tension before repositioning the band on the other foot.
Keep breathing throughout the set. Your hands provide a steady holding point; avoid turning the movement into an arm pull. Controlled movement and normal breathing are more important than stretching the band as far as possible.
Muscles Worked and Main Benefits
Which Muscles Does It Work?
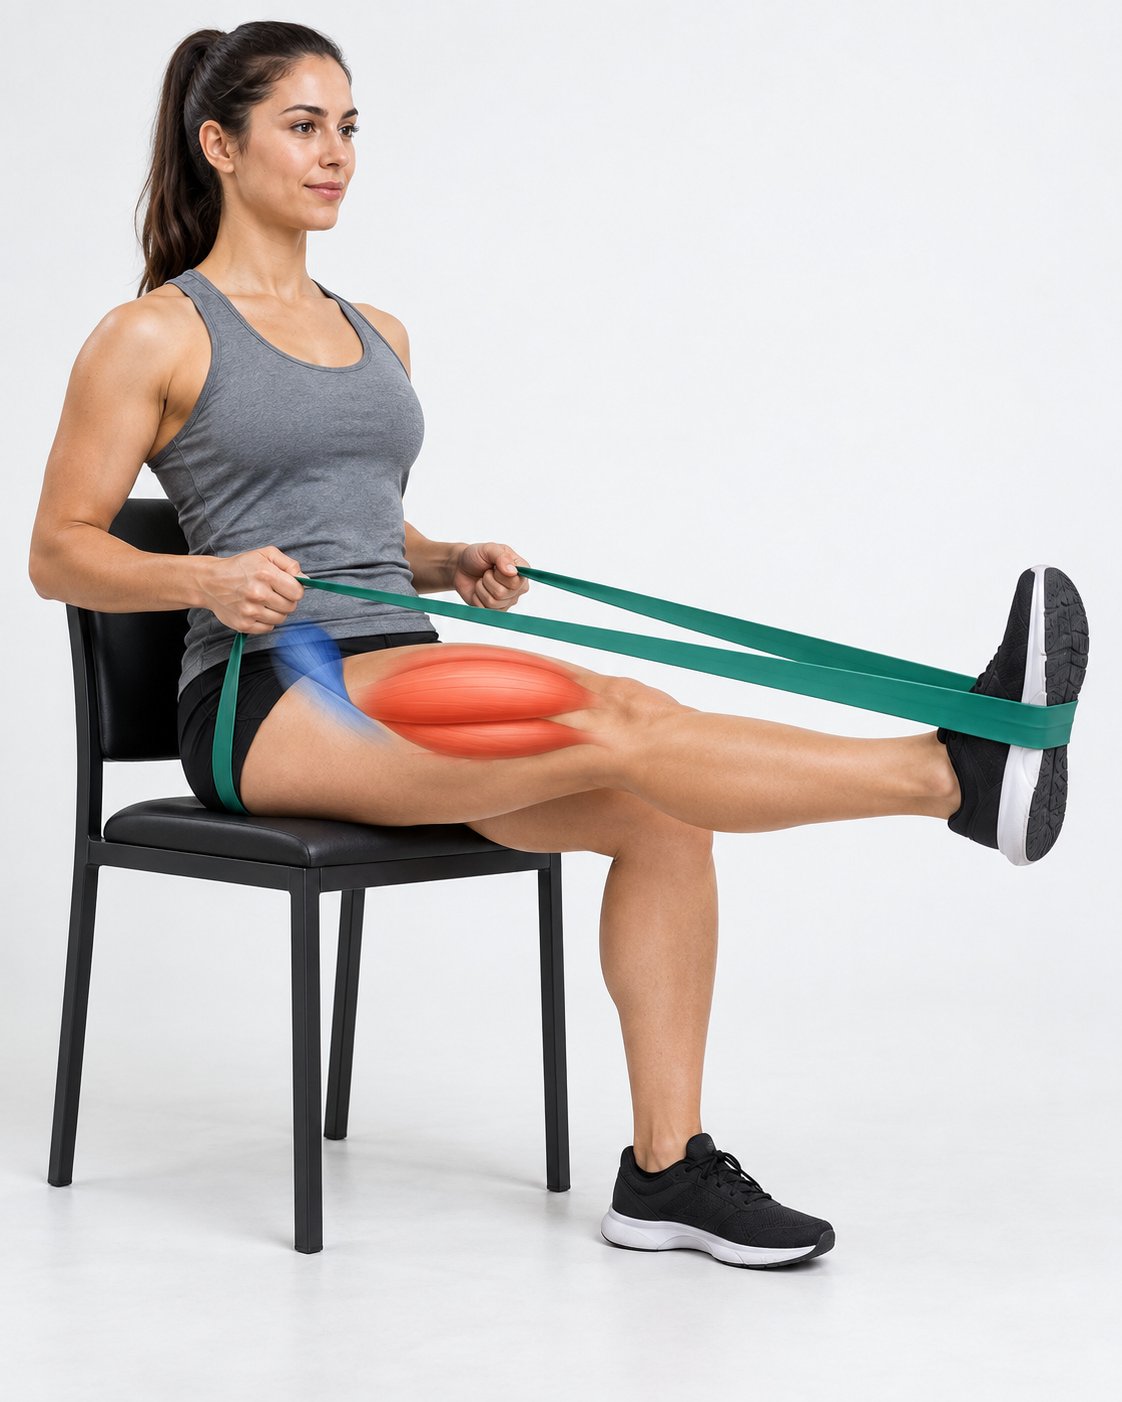
Because this version centers on straightening your knee against resistance, treat it as a quad-focused exercise. The quadriceps are the muscles at the front of your thigh, and knee extension is their main function, as explained by Cleveland Clinic.
Your hip flexors contribute when you lift your thigh into position. These muscles help raise the knee, while your hands hold the band and your torso remains steady. This is a movement-based explanation, not a measurement of how much each muscle works in this particular variation.
Use the exercise as one part of your lower-body training rather than assuming it provides a complete workout for your quads, glutes, hamstrings, and calves.
Why Include It in Your Routine?
The practical advantages are straightforward: the equipment takes up little space, the exercise can be performed from a chair, and you can work one leg at a time.
Resistance bands are also a legitimate strength-training tool. The American College of Sports Medicine recognizes elastic-band and home-based training as useful ways to improve strength, muscle size, and physical function in its 2026 guidance. That supports using bands within a consistent program—not claiming that this exact exercise is equivalent to every machine leg press.
Common Mistakes and How to Correct Them
Use these checks when a repetition feels awkward or becomes difficult to control.
| Mistake | What to change |
|---|---|
| The band moves toward the toes or slips around the foot. | Stop the set, support your foot, and reduce the tension before resetting the band across the middle of the sole. |
| Your hands move backward to help finish the press. | Keep them near your waist and try a lighter band. Let the leg perform the pressing movement. |
| You rock backward or lift the knee much higher with each repetition. | Reset your sitting position and use only the small thigh lift needed for this version. |
| The leg returns abruptly. | Slow the return and reduce resistance until you can bend the knee without being pulled back. |
These corrections apply the source guidance on secure foot placement, a small thigh lift, steady hand positioning, and controlled band movement.
Do not substitute a handle slipped over your foot for the flat-band setup. A band handle can slip from the foot and should not be used as a substitute for the flat-band positioning described here.
Sets, Reps, and a Simple Training Plan
The following is a practical starting template, not a prescribed rehabilitation program or a research-tested protocol for this exact exercise.
Train on two nonconsecutive days per week, such as Monday and Thursday. Begin each session with a few minutes of easy activity before using the band. Regular training with recovery between sessions can help make the exercise easier to progress consistently.
Seated Leg-Strength Block
| Part of the session | Suggested starting amount |
|---|---|
| Practice set | 5–8 repetitions per leg with very light resistance |
| Working sets | 1–2 sets of 10–15 repetitions per leg |
| Rest | Approximately 60–90 seconds between sets; take longer when needed |
| Effort | Finish while you could still perform about 2–3 more controlled repetitions |
Start with one working set while you learn the movement. Add the second when the exercise feels manageable and your technique stays consistent. The National Centre for Sport and Exercise Medicine recommends gradual repetition increases and 60–90 seconds of rest for its seated resistance-band workout.
This is a short exercise block, not a complete fitness program. Include it within a broader routine that trains all major muscle groups regularly. A balanced strength program should not rely on one lower-body movement alone.
Make It Easier Without Changing the Exercise
Use a lighter band or allow a longer working length between your hands and foot. Keep enough initial tension to prevent excessive slack, but do not shorten the band so much that you cannot complete the press comfortably.
Remember that band tension increases as the band stretches. Choose resistance you can control throughout the movement, not just at the beginning.
Progress One Variable at a Time
A useful coaching rule is to increase resistance only after you can complete the upper end of your repetition range with consistent technique for two sessions.
For example, once both legs can complete two sets of 15 controlled repetitions, try a slightly stronger band and return toward 10 repetitions per set. Keep your chair position, hand position, and movement consistent so the comparison is meaningful.
Avoid increasing band resistance, repetitions, and sets simultaneously. Change one variable, then check whether you can still complete the movement without losing control.
Safety: When to Stop or Get Advice
Ask a qualified healthcare professional for individual guidance before starting if you have an existing hip or knee problem, recent surgery, or exercise restrictions.
Stop and seek professional help for sharp pain, numbness, dizziness, chest pain, or unusual symptoms. Do not try to solve these symptoms by forcing more repetitions.
Chest pressure accompanied by severe breathlessness, fainting, or other possible heart-attack symptoms requires emergency medical help. MedlinePlus provides guidance on recognizing heart-attack warning signs and seeking emergency care.
Frequently Asked Questions
Can Resistance Band Leg Presses Replace a Leg Press Machine?
They can provide a home-based leg-training option, but they are not an identical replacement. A machine guides the movement along a fixed path, whereas the band setup depends on your hand position, band length, and control. Choose the exercise according to your equipment, goals, and ability to progress it comfortably.
Can This Exercise Help Build Muscle?
It may contribute when it provides a sufficient challenge and is performed consistently. Evidence supports muscle-building benefits from elastic resistance training generally, but that does not guarantee a particular result from this single exercise.
Does “10 Repetitions Per Leg” Mean 10 Total?
No. It means 10 repetitions with the right leg and 10 with the left. Count a repetition after you complete the press and controlled return.
How Do I Know Which Band Resistance to Choose?
Begin with a band that lets you complete the planned repetitions without moving your hands, leaning backward, or losing control of the return. The final repetitions should require effort without making proper technique impossible.
Do not choose resistance by color alone when switching brands because manufacturers may use different color systems.
The Bottom Line
Start the resistance band leg press with a secure chair, a light band, and controlled repetitions. Keep your hands steady, press with one leg, and return your foot to the floor without rushing.
Use the starting plan for your next two sessions. Record your band, repetitions, and technique before deciding whether to add resistance.
This content is for informational purposes only and is not a substitute for medical advice.