
Resistance band exercises for seniors can build strength in the legs, hips, back, chest, and arms without requiring heavy weights. A useful routine combines manageable resistance, controlled movements, and gradual progression—not simply the lightest band or the highest number of repetitions.
The American College of Sports Medicine recognizes elastic bands and home-based workouts as effective resistance-training options.
The exercises below include eight seated movements and three standing or sit-to-stand options. None requires getting down on the floor. You will also find a starter workout and guidance on choosing resistance, avoiding common mistakes, and making progress.
Before You Start
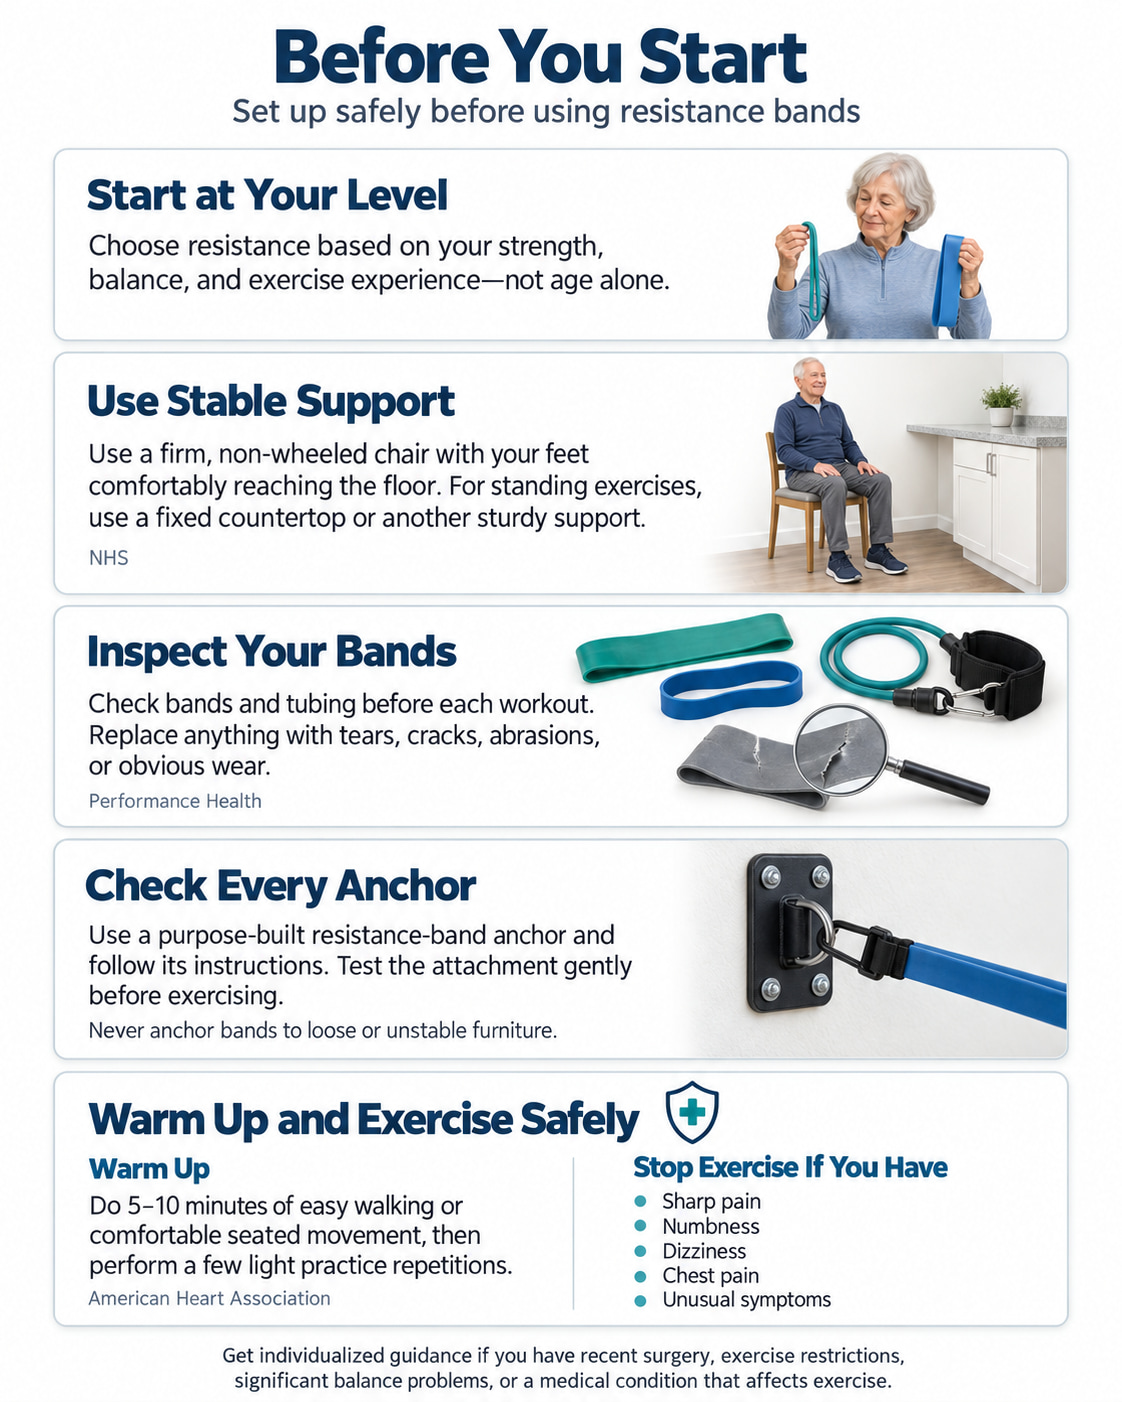
Choose your starting level according to your strength, balance, and exercise experience—not age alone.
- Use a stable chair and support. Choose a firm, non-wheeled chair with enough space to move your arms. Your feet should reach the floor comfortably. For standing exercises, use a fixed countertop or another support that cannot slide or tip. The NHS emphasizes using a solid, stable chair for seated exercise.
- Check your bands. A long flat band works for most exercises; a light loop band is useful for the hips. The hamstring curl described below uses resistance tubing with a secure ankle loop. Performance Health recommends inspecting resistance bands and replacing ones with tears, cracks, abrasions, or other signs of wear.
- Secure external anchors properly. The row and Pallof press require a fixed anchor. Follow the anchor manufacturer’s instructions, check the attachment gently before exercising, and prevent anyone from opening an anchored door. Do not improvise with loose furniture.
Warm up with 5–10 minutes of easy walking or comfortable seated movement, followed by a few light practice repetitions. The American Heart Association recommends gradually warming up before more demanding exercise.
If you have recent surgery, exercise restrictions, significant balance difficulties, or a medical condition that affects exercise, get individualized guidance before starting. Stop for sharp pain, numbness, dizziness, chest pain, or unusual symptoms. Seek professional help; new chest pain or severe breathing difficulty may require emergency care.
11 Resistance Band Exercises for Seniors
These exercises cover upper-body pushing and pulling, lower-body strength, and trunk control. Start with the short routine later in this guide rather than doing all 11 immediately.
Starting sets and rest: Perform one set of each selected exercise using the repetition ranges below. Rest approximately 60–90 seconds between sets or exercises, taking up to two minutes when needed. Add a second set once the first is consistently manageable.
1. Seated Resistance Band Row
Best for: Building upper-back strength through a controlled pulling movement.
Muscles worked: Lats, rhomboids, middle trapezius, and assisting biceps.
Equipment: Long band, stable chair, and secure anchor in front.
Starting repetitions: 8–12.
How to do it:
- Secure the band in front of your chair at approximately knee height.
- Sit upright with your feet flat. Hold one end in each hand, palms facing each other, and begin with your arms reaching forward.
- Pull your elbows back beside your torso, bringing your hands toward your lower ribs. Let your shoulder blades move gently toward each other.
- Slowly straighten your arms without rounding your back or letting the band pull you forward.
The seated-row setup follows exercise guidance from Physitrack, including maintaining an upright position and controlling the pulling and return phases.
Common mistakes: Rocking backward, shrugging, bending the wrists, and releasing the band too quickly.
Make it easier: Use a lighter band or reduce the starting tension. Keep the chair stationary throughout the set.
2. Seated Resistance Band Chest Press
Best for: Strengthening the muscles used in pushing.
Muscles worked: Chest, triceps, and front shoulders.
Equipment: Long flat band and chair.
Starting repetitions: 8–12.
How to do it:
- Sit upright and place the band across your upper back, below your armpits—not around your neck or the chair.
- Hold an end in each hand near the sides of your chest, with elbows bent and knuckles facing forward.
- Press both hands forward until your arms are nearly straight, keeping your shoulders comfortable and torso still.
- Bend your elbows slowly to return without allowing the band to pull your arms excessively behind you.
The British Heart Foundation demonstrates and describes this body-anchored resistance band chest press along with several other band exercises.
Common mistakes: Arching the lower back, shrugging, locking the elbows forcefully, or letting the band ride upward.
Make it easier: Choose a lighter band rather than leaning backward to finish the press.
3. Seated Resistance Band Biceps Curl
Best for: Strengthening the front of the upper arms.
Muscles worked: Biceps and other elbow-flexing muscles; forearms help maintain the grip.
Equipment: Long band and chair.
Starting repetitions: 8–12.
How to do it:
- Sit upright with the middle of the band secured beneath both feet. Keep your feet planted throughout.
- Hold an end in each hand with your palms facing upward and upper arms beside your torso.
- Bend your elbows to bring your hands toward your shoulders without swinging or lifting your upper arms forward.
- Lower slowly until your elbows are comfortably straight.
Common mistakes: Leaning backward, curling the wrists, and allowing the feet to lift off the band.
Make it easier: Use a lighter band or begin with fewer repetitions. Do not shorten the movement simply to keep using excessive resistance.
4. Seated Band Shoulder External Rotation
Best for: Strengthening the shoulder’s external rotators without overhead lifting.
Muscles worked: Primarily the infraspinatus and teres minor, which are part of the rotator cuff.
Equipment: Light flat band and chair.
Starting repetitions: 8–12.
How to do it:
- Sit upright with your elbows bent about 90 degrees and resting close to your sides.
- Hold the band between your hands with a small amount of tension and your wrists straight.
- Move your hands apart by rotating through your shoulders. Keep your elbows beside your body rather than lifting them outward.
- Return slowly without allowing your shoulders to roll forward.
Common mistakes: Flaring the elbows, arching the back, shrugging, or trying to force a large range.
Make it easier: Use a very light band and a smaller comfortable movement. This exercise will usually need less resistance than a row or leg exercise.
5. Resistance Band Sit-to-Stand
Best for: Progressing from an ordinary chair rise to a resisted lower-body exercise.
Muscles worked: Quadriceps and glutes.
Equipment: Long band and stable chair.
Starting repetitions: 5–8.
How to do it:
- Sit toward the front of the chair with your feet about hip-width apart and slightly behind your knees.
- Secure the middle of the band beneath both feet. Hold its ends at waist height, keeping your hands there throughout.
- Lean forward from your hips, press through your whole feet, and stand upright.
- Push your hips back and bend your knees to sit down slowly. Keep your knees moving in the same general direction as your toes.
Common mistakes: Dropping onto the seat, lifting the heels, pulling the band with the arms, or adding resistance before controlling a bodyweight chair rise.
Make it easier: Remove the band. Use a higher stable seat or appropriate arm support when necessary. Add resistance only when standing and sitting are controlled.
6. Seated Resistance Band Leg Press
Best for: Training the legs while seated, including when resisted chair rises are too demanding.
Muscles worked: Quadriceps, with glutes assisting as the hip extends.
Equipment: Long flat band and chair.
Starting repetitions: 8–12 per leg.
How to do it:
- Sit upright with one foot planted. Place the middle of the band securely beneath the other foot and hold the ends beside your hips.
- Begin with the working knee bent and the foot slightly lifted.
- Press that foot forward and slightly downward, straightening the leg through a comfortable range while keeping your torso still.
- Bend the knee and bring the foot back slowly.
Common mistakes: Rounding the back, pulling the knee forcefully toward the chest, locking the knee, or allowing the band to slide toward the toes.
Make it easier: Use less resistance and a shorter controlled range. Stop and reset immediately if the band shifts.
7. Seated Band Hip Abduction
Best for: Adding outer-hip strengthening without a standing balance challenge.
Muscles worked: Hip abductors and assisting gluteal muscles.
Equipment: Light loop band and chair.
Starting repetitions: 10–15.
How to do it:
- Sit upright with a loop band around your thighs, just above—not directly over—your knees.
- Place your feet flat and approximately hip-width apart.
- Move your knees a small distance apart against the band while keeping your pelvis steady.
- Return slowly without letting the band pull your knees inward abruptly.
Common mistakes: Rocking the torso, forcing the knees excessively wide, or rolling onto the outer edges of the feet.
Make it easier: Choose a lighter loop and use a smaller movement. Sit down to put the band on and take it off.
8. Supported Standing Band Hip Extension
Best for: Strengthening the glutes while practicing an upright, supported stance.
Muscles worked: Gluteus maximus, with hamstrings assisting.
Equipment: Light loop band and fixed support.
Starting repetitions: 8–12 per leg.
How to do it:
- Place a light loop around your thighs, above the knees, then stand facing a countertop.
- Hold the support and shift your weight onto one leg, keeping that knee softly bent.
- Move the other leg a small distance backward without leaning forward or arching your lower back.
- Bring the leg back under control, complete your repetitions, and switch sides.
Kingston and Richmond NHS Foundation Trust includes supported hip kickbacks in its falls-prevention exercise guidance and describes adding resistance as a progression.
Common mistakes: Turning the movement into a back bend, swinging the leg, or rotating the pelvis.
Make it easier: Remove the band and practice the same small movement with both hands supported. Keep the support when adding resistance.
9. Supported Standing Band Hamstring Curl
Best for: Directly strengthening the back of the thighs.
Muscles worked: Hamstrings.
Equipment: Resistance tubing with a secure ankle loop and stable support.
Starting repetitions: 8–12 per leg.
How to do it:
- Fit the ankle loop while seated. Use only an attachment arrangement permitted by the tubing manufacturer.
- Stand beside a wall or counter. Place the opposite end of the tubing beneath your nonworking foot, keeping it firmly planted.
- Hold the support and bend the working knee, bringing your heel backward toward your buttock while keeping the thigh relatively still.
- Lower slowly, complete the set, and switch sides.
The Mayo Clinic describes this self-anchored resistance-tubing hamstring curl and emphasizes controlled knee flexion.
Common mistakes: Moving the knee forward, leaning, swinging the leg, or allowing the anchoring foot to lift.
Make it easier: Practice without resistance. Do not substitute a loose handle around your ankle for a secure ankle attachment.
10. Seated Resistance Band Calf Press
Best for: Training the calf muscles without standing on tiptoe.
Muscles worked: Gastrocnemius and soleus.
Equipment: Long flat band and chair.
Starting repetitions: 10–15 per foot.
How to do it:
- Sit upright and extend one leg comfortably forward, keeping a slight bend in the knee.
- Position the band across the ball of that foot, not just the toes. Hold the ends low near your lap.
- Press the forefoot away from you, as though gently pressing a pedal.
- Slowly let the ankle return without pulling forcefully on the band.
Common mistakes: Repeatedly bending and straightening the knee, curling the toes instead of moving the ankle, or allowing the band to slip.
Make it easier: Reduce band tension. Unlike the leg press, the movement should happen mainly at the ankle.
11. Seated Resistance Band Pallof Press
Best for: Training the trunk to resist unwanted rotation.
Muscles worked: Abdominal and other trunk-stabilizing muscles; shoulders and arms maintain the pressing position.
Equipment: Light band, stable chair, and secure side anchor.
Starting repetitions: 6–10 facing each direction.
How to do it:
- Anchor the band at approximately chest height when seated. Position the chair side-on to the anchor with both feet firmly supported.
- Hold the band with both hands together in front of your chest. Begin with light tension.
- Press your hands forward while keeping your chest and pelvis facing straight ahead.
- Pause briefly, return your hands to your chest, and repeat. Turn the chair around to train the opposite direction.
FOX Rehabilitation describes the seated Pallof press as an anti-rotation exercise in which the goal is to resist the band’s sideways pull rather than twisting against it.
Common mistakes: Rotating, leaning away from the anchor, holding the breath, or using enough resistance to shift the chair.
Make it easier: Reduce resistance or shorten the forward reach. Stop if the chair moves or you cannot maintain a stable seated position.
A Simple Resistance Band Workout for Seniors
Treat these routines as starting templates, not requirements. The appropriate workload depends on your current capacity and how you recover.
Beginner Seated Routine
Start with one set of each exercise, twice weekly on nonconsecutive days.
| Exercise | Repetitions | Rest afterward |
|---|---|---|
| Seated band row | 8–12 | 60–90 seconds |
| Seated chest press | 8–12 | 60–90 seconds |
| Seated leg press | 8–12 per leg | 60–90 seconds |
| Seated hip abduction | 10–15 | 60–90 seconds |
| Seated calf press | 10–15 per foot | 60–90 seconds |
Use resistance that makes the final repetitions noticeable but leaves approximately two or three controlled repetitions in reserve. In other words, stop before you would need to strain, swing, or change your technique.
Take additional rest between sides whenever necessary. A first session can contain fewer exercises or fewer repetitions than the table.
Progressing Beyond the Starter Routine
When the starter session feels manageable and recovery is comfortable, add a second set to selected exercises before expanding the entire workout.
For readers who can stand safely, replace the leg press with the band sit-to-stand. Then add a supported hamstring curl or hip extension. The biceps curl, shoulder external rotation, and Pallof press can be added selectively rather than all at once.
The Centers for Disease Control and Prevention recommends that older adults include muscle-strengthening activity on at least two days per week, along with aerobic and balance activity. A seated band workout contributes to strength training, but it does not replace walking or appropriate balance practice.
How to Choose Resistance and Progress
Choose a Band You Can Control
The right band lets you complete the exercise without compensating. It is too demanding when you have to lean, swing, shorten every repetition substantially, or lose your grip.
Do not assume one resistance level will suit your whole workout. Shoulder external rotation may need a very light band, while your legs can tolerate more.
Band tension increases as the material stretches. Judge difficulty through the whole repetition, especially near the end—not only in the starting position.
Increase One Thing at a Time
First, build toward the top of the suggested repetition range with consistent technique. Once that becomes manageable across consecutive sessions, increase resistance modestly and return toward the lower end of the range.
For example, progress from eight controlled rows toward 12. After 12 becomes comfortable, try the next small resistance increase and begin again near eight.
Record the band used, repetitions, and approximate grip or anchor distance. Keep your setup consistent so that progress reflects greater strength—not an accidentally easier arrangement.
Keep Breathing and Control the Return
Exhale during the effort and inhale as you return. Avoid prolonged breath-holding.
Do not let the band snap you back into the starting position. The return is part of the exercise, not a break between repetitions.
If soreness or fatigue interferes with ordinary movement or has not settled before the next session, reduce the workload. Persistent or worsening symptoms need professional assessment rather than harder training.
Frequently Asked Questions
Can seniors build muscle with resistance bands?
Yes. Bands can provide a meaningful strength-training stimulus when resistance and effort are sufficient.
An introductory light-band routine is a starting point. Continuing to improve usually requires gradually increasing the challenge.
Can I do resistance band exercises every day?
Avoid training the same muscles hard every day when beginning. Start with two nonconsecutive strength sessions and allow recovery between them.
Walking, comfortable mobility work, and appropriately selected balance activity can fit between strength workouts.
Can the entire workout be done sitting down?
The five-exercise starter routine is seated, and eight exercises in the full list use a chair. The sit-to-stand, hip extension, and hamstring curl require standing.
Seated exercises are useful options, but someone who can safely train standing does not need to remain seated solely because of age.
What resistance band should a beginner use?
Choose the band that allows controlled repetitions with a few good repetitions still possible at the end. Use the manufacturer’s resistance information as a starting guide, then adjust according to the exercise.
Do not choose a particular color solely because it is marketed for seniors.
Are resistance bands better than weights?
Neither is automatically better for everyone. Bands are portable and offer many seated options; weights may make load increases easier to measure.
Choose equipment you can set up securely, control confidently, and progress consistently. Bands and weights can also be used in the same training program.
Conclusion
Resistance band exercises for seniors work best when the setup is secure, the movements are controlled, and the resistance gradually becomes more challenging.
Begin with the seated starter routine twice weekly. Track your repetitions, keep a little effort in reserve, and add resistance or exercises only when your technique and recovery support the change.
This content is for informational purposes only and is not a substitute for medical advice.