Back exercises for beginners should build strength, improve posture, and teach good movement without throwing you into complex lifts too early. The best starting point is a mix of simple rowing patterns, lat-focused pulling, and trunk-stability work so you can train the back from more than one angle while keeping technique under control, as explained by ACE.

A good beginner back plan should help you learn how to brace, keep a neutral spine, move your shoulder blades well, and strengthen the muscles that support your upper and lower back. In this guide, you will learn the best beginner-friendly back exercises, which muscles they work, how to do them correctly, common mistakes to avoid, and how to turn them into a practical workout.
Why beginners should start with simple back exercises
Your back is not one single muscle. It includes larger pulling muscles like the lats, upper-back muscles like the traps and rhomboids, and spinal-support muscles that help you stay stable while your arms and legs move. That is why a good beginner program should not rely on only one exercise. A variety of movements works better. The ACE evidence-based back training overview makes this point clearly, and the latest ACSM resistance training guidance also emphasizes that consistency and training all major muscle groups at least twice per week matter more than chasing a perfect or complicated routine.
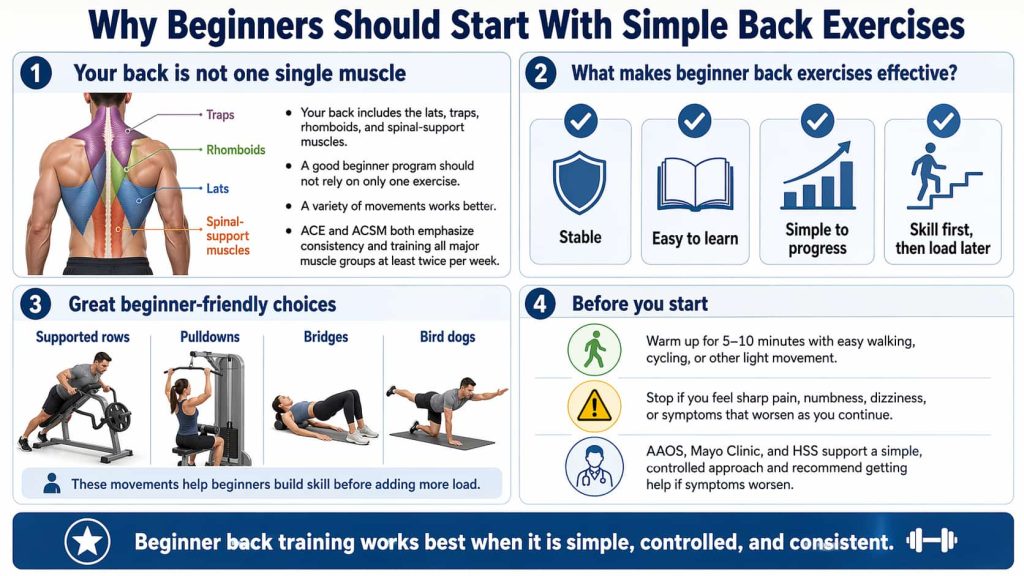
For beginners, the best back exercises usually share three traits: they are stable, easy to learn, and simple to progress. That is why supported rows, pulldowns, bridges, and bird dogs make so much sense early on. They let you build skill first, then load the movement later.
Before you start, do a short warm-up of 5 to 10 minutes with easy walking, cycling, or other light movement. If an exercise causes sharp pain, numbness, dizziness, or symptoms that clearly get worse as you continue, stop and get individual advice from a qualified clinician. Guidance from AAOS, Mayo Clinic, and HSS supports a simple, controlled approach and recommends getting help if symptoms worsen.
How to choose the best back exercises for beginners
The easiest way to choose back exercises is to cover three jobs:

- Learn to brace and keep your spine steady.
- Build strength through horizontal pulls like rows.
- Add a vertical pull or upper-back move to round out the program.
If you train at home, bodyweight drills and resistance bands can work well. If you train in a gym, machines like the seated row and lat pulldown can make the learning process even easier because they give you more support and a more repeatable path of motion. ACSM notes that bodyweight, bands, and more traditional gym equipment can all be effective when you apply them consistently.
10 Best Back Exercises for Beginners
Build a stronger back with these beginner-friendly exercises that improve posture, stability, and pulling strength without adding unnecessary complexity. This list covers simple moves, proper form, and practical progressions to help you train safely and build confidence from the start.
1. Abdominal Bracing
Best for: Learning how to control your trunk before you start rows, pulldowns, and bridges. This is a foundational exercise for beginners who struggle to keep their ribs down, avoid over-arching the lower back, or stay stable during other lifts.
Muscles worked: Deep abdominal muscles with support from the broader core system that helps stabilize the spine.
Equipment needed: None.
Why it stands out: Abdominal bracing is simple, but it teaches one of the most important back-training skills: keeping the trunk stable while the limbs move or while you handle resistance. If you cannot brace well, many beginner pulling exercises become harder to control.
Suggested sets and reps: 2 to 3 sets of 5 reps, holding each rep for about 10 to 15 seconds.
How to do it:
- Lie on your back with your knees bent and feet flat.
- Let your arms rest at your sides.
- Gently tighten your stomach muscles as if preparing for a light punch.
- Keep breathing while maintaining the tension.
- Hold, then relax and repeat.
Common mistakes: Holding your breath, pushing through your feet too hard, or flattening the low back by force instead of creating a controlled brace.
Coaching cue: “Tighten your midsection without losing your breath.”
Exercise variations:
- Easier variation: shorter holds.
- Harder variation: add marching one foot at a time while staying braced.
How to use in a workout: Put this at the start of your session as a prep drill before bird dogs, rows, or pulldowns.
2. Bird Dog
Best for: Building back-friendly stability and coordination. This is one of the best beginner moves for learning to resist unwanted twisting and low-back movement.
Muscles worked: Back extensors, erector spinae, glutes, and core stabilizers.
Equipment needed: None.
Why it stands out: The bird dog teaches you how to keep the trunk stable while the arm and opposite leg move. That makes it a smart beginner drill for improving control before heavier rowing or hinging work.
Suggested sets and reps: 2 to 3 sets of 5 to 8 reps per side, with a brief pause on each rep.
How to do it:
- Start on your hands and knees with your shoulders over your hands and hips over your knees.
- Tighten your abs.
- Reach one arm straight forward to shoulder height.
- Extend the opposite leg straight back.
- Pause while keeping your back flat.
- Return to the start and switch sides.
Common mistakes: Arching the lower back, reaching too high with the leg, rotating the hips, or rushing the movement.
Coaching cue: “Reach long, not high.”
Exercise variations:
- Easier variation: move only the arm or only the leg.
- Harder variation: add a 2- to 3-second pause at full reach.
How to use in a workout: Use it in your warm-up or as your first core-focused back-support exercise.
3. Plank
Best for: Building total trunk stiffness that supports better posture and better form during rows and pulldowns.
Muscles worked: Abdominals, back extensors, quadratus lumborum, glutes, and other trunk stabilizers.
Equipment needed: None.
Why it stands out: A plank is not a classic rowing move, but it helps beginners learn how to keep the body straight and resist sagging through the lower back. That skill carries over to almost every strength exercise.
Suggested sets and reps: 2 to 3 sets of 15 to 30 seconds.
How to do it:
- Lie face down and place your forearms on the floor with elbows under your shoulders.
- Tighten your abs.
- Lift your hips off the floor.
- Squeeze your glutes and keep your body in a straight line.
- Hold, then lower with control.
Common mistakes: Letting the hips sag, lifting the hips too high, holding the breath, or pushing the head forward.
Coaching cue: “Make a straight line from shoulders to heels.”
Exercise variations:
- Easier variation: knees-down plank.
- Harder variation: slightly longer holds.
How to use in a workout: Pair it with bird dogs or bridges in the first half of the workout.
4. Modified Side Plank
Best for: Building side-to-side core stability that supports the lower back and pelvis.
Muscles worked: Obliques and quadratus lumborum, with support from the broader trunk stabilizers.
Equipment needed: None.
Why it stands out: Beginners often focus only on straight-ahead exercises. The modified side plank adds frontal-plane stability, which is useful for posture, balance, and trunk control.
Suggested sets and reps: 2 to 3 sets of 10 to 20 seconds per side.
How to do it:
- Lie on your side with your bottom elbow under your shoulder.
- Bend the bottom leg slightly and keep the top leg straight.
- Tighten your abs.
- Lift your hips off the floor.
- Hold the position, then lower slowly.
- Repeat on the other side.
Common mistakes: Letting the shoulder collapse, rolling backward, or shortening the hold by losing tension too early.
Coaching cue: “Lift the floor away with your side waist.”
Exercise variations:
- Easier variation: shorter holds.
- Harder variation: straighten both legs when you are ready.
How to use in a workout: Use it after planks or at the end of your core section.
5. Hip Bridge
Best for: Improving posterior-chain strength for beginners who need better glute involvement and less low-back compensation.
Muscles worked: Glutes, hamstrings, lower back extensors, and core support muscles.
Equipment needed: None.
Why it stands out: Strong glutes help support better spinal mechanics. The hip bridge is a beginner-friendly way to strengthen the back side of the body without loading the spine heavily.
Suggested sets and reps: 2 to 3 sets of 8 to 12 reps.
How to do it:
- Lie on your back with knees bent and feet flat.
- Tighten your abs lightly.
- Press through your feet.
- Lift your hips until your body forms a straight line from shoulders to knees.
- Pause briefly.
- Lower under control.
Common mistakes: Hyperextending the lower back, pushing through the toes instead of the whole foot, or flaring the ribs up at the top.
Coaching cue: “Lift with your glutes, not your low back.”
Exercise variations:
- Easier variation: shorter range of motion.
- Harder variation: longer pause at the top or single-leg bridge later on.
How to use in a workout: Place it early in the session after bracing or bird dogs.
6. Seated Row
Best for: Learning a simple horizontal pulling pattern with a stable torso.
Muscles worked: Mid-back, lats, rhomboids, rear shoulders, and biceps.
Equipment needed: Cable row station or resistance band.
Why it stands out: The seated row is one of the easiest ways for beginners to learn how to pull with the back instead of shrugging everything into the neck. ACE lists it as a beginner exercise and notes that band or cable versions can work well.
Suggested sets and reps: 2 to 3 sets of 8 to 12 reps.
How to do it:
- Sit tall and grasp the handles.
- Brace your abs.
- Start with your shoulders down and away from your ears.
- Pull the handles toward your torso.
- Squeeze your shoulder blades together without overextending your back.
- Return slowly to the start.
Common mistakes: Rounding the shoulders forward, yanking with momentum, leaning too far back, or shrugging up as you pull.
Coaching cue: “Pull your elbows back, then control the return.”
Exercise variations:
- Easier variation: lighter resistance band or cable load.
- Harder variation: pause for 1 second at the fully contracted position.
How to use in a workout: This can be your main beginner back strength exercise.
7. Seated High Back Row
Best for: Targeting the upper back and postural muscles with extra support.
Muscles worked: Upper back, rear shoulders, mid traps, rhomboids, and supporting arm muscles.
Equipment needed: Seated cable or machine high-row setup.
Why it stands out: This variation shifts emphasis a bit higher on the back and can be useful for beginners who want more upper-back work without complicated setup.
Suggested sets and reps: 2 to 3 sets of 8 to 12 reps.
How to do it:
- Sit tall with your chest supported or your torso upright, depending on the machine.
- Grip the handles around shoulder height.
- Brace your abs.
- Pull the elbows back and slightly outward.
- Pause when the handles reach your upper torso area.
- Return with control.
Common mistakes: Shrugging, jutting the chin forward, pulling with the wrists, or letting the shoulders round.
Coaching cue: “Lead with the elbows and keep your chest tall.”
Exercise variations:
- Easier variation: lighter machine load.
- Harder variation: slower lowering phase.
How to use in a workout: Use this after your main row or rotate it in as your primary row on another day.
8. Seated Lat Pulldown
Best for: Building vertical pulling strength before you are ready for pull-ups or assisted pull-ups.
Muscles worked: Lats, upper back, rear shoulders, and biceps.
Equipment needed: Lat pulldown machine.
Why it stands out: The lat pulldown gives beginners a stable way to train the lats and upper back without the full-body challenge of pull-ups.
Suggested sets and reps: 2 to 3 sets of 8 to 12 reps.
How to do it:
- Sit in the machine and secure your thighs under the pad.
- Grip the bar with a comfortable overhand grip.
- Brace your abs and keep your torso mostly upright.
- Pull the bar down toward the upper chest.
- Pause briefly.
- Let the bar rise back up under control.
Common mistakes: Leaning back too far, pulling behind the neck, shrugging, or turning the exercise into a swing.
Coaching cue: “Pull your elbows down toward your sides.”
Exercise variations:
- Easier variation: lighter load.
- Harder variation: slower lowering phase or a short pause at the bottom.
How to use in a workout: Pair this with a row to cover both vertical and horizontal pulling.
9. Supported Single-Arm Dumbbell Row
Best for: Building unilateral back strength while keeping the body stable.
Muscles worked: Lats, rhomboids, mid-back, rear shoulders, and biceps.
Equipment needed: Dumbbell and bench.
Why it stands out: The bench-supported setup reduces balance demands and makes it easier to focus on a clean pulling path. It is a great next step once you have learned basic bracing and row mechanics.
Suggested sets and reps: 2 to 3 sets of 8 to 12 reps per side.
How to do it:
- Place one hand and the same-side knee on a bench.
- Hold a dumbbell in the other hand.
- Keep your back flat and head aligned with your spine.
- Let the dumbbell hang straight down.
- Pull the elbow up toward your hip.
- Lower slowly and repeat before switching sides.
Common mistakes: Twisting the torso, jerking the dumbbell, shrugging at the top, or pulling the elbow too high.
Coaching cue: “Row toward your hip, not your shoulder.”
Exercise variations:
- Easier variation: lighter dumbbell.
- Harder variation: small pause at the top.
How to use in a workout: Use this after machine or cable rows or as your main dumbbell-based back exercise at home.
10. Incline Reverse Fly
Best for: Strengthening the upper back and rear shoulders with support from the bench.
Muscles worked: Rear delts, upper back, mid traps, rhomboids, and other scapular stabilizers.
Equipment needed: Incline bench and light dumbbells.
Why it stands out: Many beginners need more upper-back and rear-shoulder work to balance pressing volume and improve posture. The bench support helps reduce cheating and makes the movement easier to feel in the upper back.
Suggested sets and reps: 2 to 3 sets of 10 to 15 reps with light weights.
How to do it:
- Set a bench to a moderate incline and lie chest-down against it.
- Hold light dumbbells with your arms hanging down.
- Brace your abs and keep your neck neutral.
- Raise the arms out to the sides with a soft bend in the elbows.
- Pause briefly.
- Lower slowly.
Common mistakes: Using too much weight, shrugging the shoulders, swinging the arms, or losing contact with the bench.
Coaching cue: “Move the weights wide, not high.”
Exercise variations:
- Easier variation: very light dumbbells or shorter range.
- Harder variation: slightly longer pause at the top.
How to use in a workout: Put this toward the end of your session as accessory upper-back work.
Common mistakes beginners make with back training
The biggest beginner mistake is trying to load the movement before you can control the position. If your ribcage flares, your lower back arches hard, or your shoulders ride up toward your ears on every rep, the load is probably too heavy or the exercise is too advanced right now. Beginners usually make faster progress by using stable setups and cleaner reps first.
Another common mistake is building a whole workout around only one pattern. Rows are excellent, but your back training will usually feel more complete if you combine a row, a vertical pull or upper-back move, and one or two trunk-stability exercises. That matches the broader evidence-based message from ACE and ACSM: variety and consistency beat overcomplication.
Beginner Back Workout Routine
A beginner does not need all 10 exercises in one day. Choose 4 to 6 movements that cover stability, horizontal pulling, and vertical pulling or upper-back work. Train them consistently for a few weeks, then add reps, load, or a slightly harder variation when the movements feel solid. ACSM supports a simple plan built around regular resistance training and hitting major muscle groups at least twice per week.
Beginner option
Start with abdominal bracing, bird dog, seated row, seated lat pulldown, and hip bridge. Do 2 sets of each exercise. Use 8 to 12 reps for the strength movements and 10 to 30 seconds for the holds. Rest about 45 to 75 seconds between sets.
Intermediate option
Once your form is consistent, move to 3 sets per exercise and add the supported single-arm dumbbell row plus the incline reverse fly. Keep most sets in the 8 to 12 rep range, and use 10 to 15 reps for reverse flies.
Accessory finisher option
Finish with 1 to 2 rounds of plank, modified side plank, and incline reverse fly. This works well after a larger upper-body workout when you want extra trunk and upper-back volume without complicated loading.
FAQ
How often should beginners train back?
Two well-planned sessions per week is a strong starting point for most beginners. That fits the latest ACSM guidance that training all major muscle groups at least twice weekly matters more than chasing a complicated perfect plan.
Are bodyweight back exercises enough for beginners?
They can be. Bird dogs, planks, side planks, bridges, and bracing drills are useful starting points, especially if you are learning control and stability. Over time, many beginners also benefit from adding rows or pulldowns with bands, cables, dumbbells, or machines for more progressive overload.
What is the best first back exercise to learn?
Bird dog and abdominal bracing are two of the best first options because they teach spinal control without much complexity. After that, the seated row is one of the easiest pulling movements to learn well.
Can back exercises help posture?
They can help improve the strength and control needed for better posture, especially when you strengthen the upper back, lats, and trunk stabilizers and practice better positioning during daily life. Exercises like rows, reverse flies, planks, and bird dogs are useful for that goal.
Should beginners train through back pain?
No. Mild muscle effort and normal training fatigue are one thing, but sharp pain, numbness, dizziness, or symptoms that get worse are signs to stop and get individual guidance. AAOS, Mayo Clinic, and HSS all recommend caution if symptoms worsen or if pain appears during exercise.
When should I add more weight?
Add weight when you can complete all planned reps with good control, stable posture, and no need to cheat the movement. Small increases work well. You can also progress by adding a rep, an extra set, or a short pause before jumping to much heavier loads.
Final takeaway
The best back exercises for beginners are the ones you can perform with control, repeat consistently, and progress gradually. Start with 3 to 5 movements that cover bracing, stability, a row, and a pulldown or upper-back accessory. Train them twice per week, focus on clean reps, and build from there.
References
- American College of Sports Medicine (ACSM) — Updated Resistance Training Guidelines
- American Council on Exercise (ACE) — A Back-to-School Program: An Evidence-Based Approach to Training the Back
- American Academy of Orthopaedic Surgeons (AAOS) — Spine Conditioning Program
- Mayo Clinic — Back Exercises in 15 Minutes a Day
- Hospital for Special Surgery (HSS) — Back Exercises to Strengthen and Stretch, From a PT
- ACE — Seated Row Exercise Library
- ACE — Seated Lat Pulldown Exercise Library
- ACE — Bird Dog Exercise Library