The Jefferson squat is a straddle-position barbell exercise that trains your legs, glutes, adductors, grip, and core stability in one unusual but effective movement. Unlike a regular back squat or conventional deadlift, the Jefferson squat places the bar between your legs and challenges you to lift from a staggered stance without twisting through your torso.
This guide explains how to do the Jefferson squat with proper form, which muscles it works, the main benefits, common mistakes, easier variations, harder progressions, and how to use it in a real workout.
What Is the Jefferson Squat?

The Jefferson squat is a lower-body strength exercise where you straddle a barbell, grip it with one hand in front of your body and one hand behind, then stand up by driving through your legs.
It is often grouped with the Jefferson lift or straddle deadlift because the bar starts on the floor and travels between the legs. The USAWA describes this straddle setup with one hand gripping in front of the lifter and the other gripping behind.
In practical gym training, the difference comes down to your movement style. If you stay more upright, bend the knees more, and use a deeper squat-like pattern, it feels more like a Jefferson squat. If you hinge more at the hips and keep the movement closer to a pull from the floor, it feels more like a Jefferson deadlift.
The goal is not to force the exercise to look exactly the same for every lifter. Your hip structure, stance width, limb length, and mobility will affect how it feels. A squat biomechanics review published in the International Journal of Sports Physical Therapy also supports adjusting squat variables such as stance, trunk position, tibia position, and depth based on the lifter and the training goal. The best version is the one that lets you keep control, brace your core, drive through your feet, and lift without twisting or discomfort.
Jefferson Squat Muscles Worked
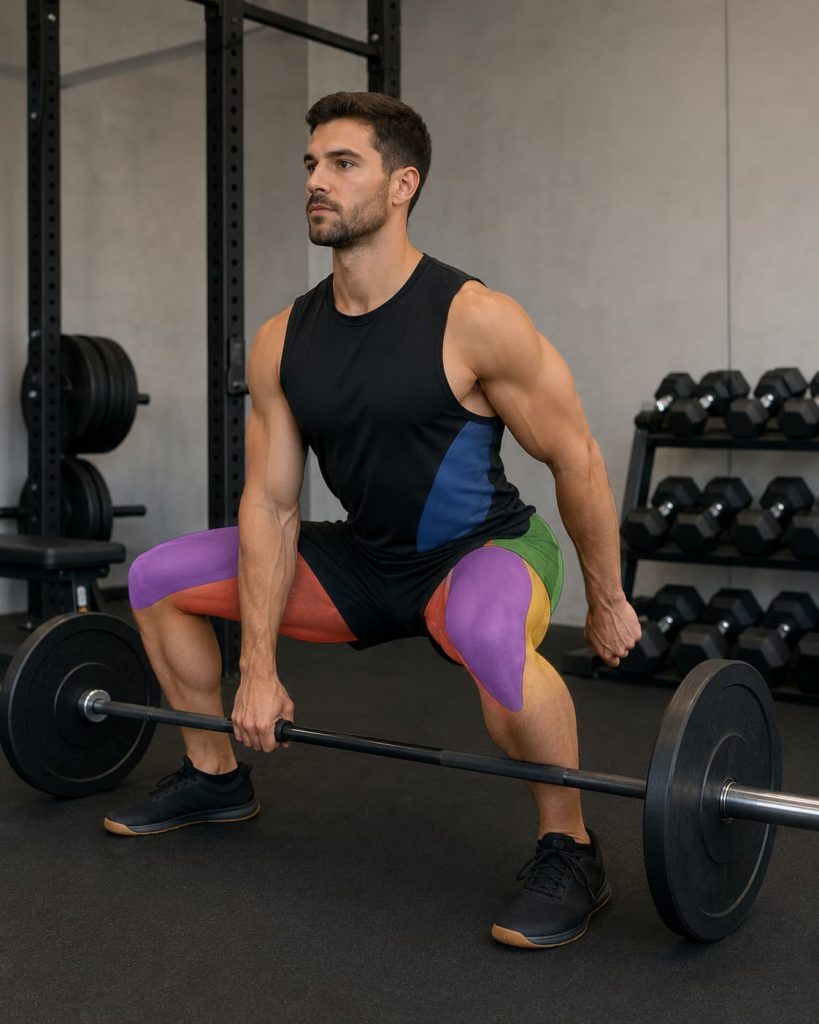
The Jefferson squat works several major lower-body muscles at once. It also challenges the trunk and grip because the bar is loaded between the legs in an asymmetrical position.
Quadriceps
Your quadriceps work hard to straighten the knees as you stand up. The more upright your torso is and the more knee bend you use, the more squat-dominant the movement becomes. This is why many lifters use the Jefferson squat as a quad-focused accessory after squats or leg presses.
Glutes
Your glutes help extend the hips as you rise from the bottom position. They also help control the pelvis and keep the lower body stable during the lift. If you sit slightly back and push the floor away with both legs, you should feel your glutes contribute strongly without turning the exercise into a pure hinge.
Adductors
Your adductors, or inner-thigh muscles, help stabilize the legs and assist hip extension from the straddle stance. Because your feet are separated around the bar, the adductors play a larger role than they do in many narrow-stance squat variations.
Hamstrings
The hamstrings assist with hip extension and help control the lowering phase. They are usually not the main target if you perform the Jefferson squat with a more upright torso, but they still contribute throughout the movement.
Core, Upper Back, and Grip
The Jefferson squat challenges your obliques, deep abdominal muscles, spinal stabilizers, upper back, and forearms. Because the bar and grip can create a slight rotational demand, your core has to resist twisting. ACE Fitness explains anti-rotation training as resisting asymmetrical or unbalanced forces, which is exactly why this lift can feel different from standard bilateral squats.
Jefferson Squat Benefits
1. Builds Lower-Body Strength
The Jefferson squat trains the quads, glutes, adductors, and hamstrings with one loaded movement. It can be useful as an accessory lift for building stronger legs without relying only on back squats, front squats, or leg presses.
2. Trains Core Stability Against Rotation
Because the bar is between your legs and your hands are split in front and behind the body, the lift creates a unique stability challenge. Your job is to keep your ribs, hips, and shoulders controlled while the weight tries to pull you out of position.
3. Adds Variety to Leg Training
If your lower-body training feels repetitive, the Jefferson squat gives you a different stimulus. It changes your stance, grip, loading position, and coordination demand. This can be useful for intermediate and advanced lifters who already understand basic squats and hinges.
4. Can Feel More Centered Than a Conventional Deadlift
In a conventional deadlift, the bar sits in front of your body. In the Jefferson squat, the load is closer to your center line because the bar is between your legs. Some lifters find this position easier to control, while others find it awkward. That is why setup and stance testing matter.
5. Useful for Adductors and Hip Stability
The straddle stance makes the inner thighs and hip stabilizers work hard to keep the knees and pelvis controlled. This does not mean the exercise fixes hip problems, but it can be a useful strength variation for lifters who tolerate the movement well.
6. Supports Multiplanar Strength
Most classic barbell lifts happen mainly in the sagittal plane, which means forward-and-back movement. The Jefferson squat still involves squatting and standing, but the staggered position adds more demand on frontal and transverse plane control. NASM explains that training across different planes can help build more complete movement capacity.
How to Do the Jefferson Squat With Proper Form
Muscles worked: The main muscles worked are the quadriceps, glutes, and adductors. The hamstrings, obliques, transverse abdominis, erector spinae, upper back, and forearms assist and stabilize the lift.
Equipment needed: You need a barbell, weight plates, and collars. Beginners can also practice with an unloaded barbell, a light dumbbell, or a kettlebell before using heavier barbell loads.
Why it stands out: The Jefferson squat stands out because the bar sits between your legs instead of on your back or in front of your shins. This creates a different lower-body strength challenge while forcing your core to resist rotation.
Suggested sets and reps: Start with 2–3 sets of 6–8 reps per side using a light load. For muscle-building work, use 3–4 sets of 8–12 reps per side. For heavier accessory strength work, use 3–5 sets of 4–6 reps per side with clean form and 1–3 reps in reserve.
Beginners: Beginners should start with a light dumbbell, kettlebell, or empty barbell. Focus on stance comfort, knee tracking, bracing, and smooth reps before adding weight.
Intermediate: Intermediate lifters can use the Jefferson squat after their main squat or deadlift work. Use moderate loads, controlled reps, and switch your lead leg each set to keep the training balanced.
Advanced: Advanced lifters can use heavier Jefferson squats as a secondary strength lift, but it should still be controlled. Do not chase a max if the bar twists, the knees collapse, or the spine position changes.
Rest: Rest 60–90 seconds for light technique sets, 90–120 seconds for hypertrophy sets, and about 2 minutes for heavier accessory sets.
How to do it:
- Place a barbell on the floor and stand over it with one foot on each side of the bar.
- Set your feet in a comfortable staggered stance, with enough room for the bar to travel without hitting your inner thighs.
- Turn your feet slightly out as needed so your knees can track in the same direction as your toes.
- Hinge and squat down to grip the bar with one hand in front of your body and one hand behind.
- Brace your core, pull your shoulders down and back, and keep your chest lifted.
- Push through your whole foot and stand up by extending your knees and hips together.
- Keep the bar close to your center line and avoid letting your torso twist as you rise.
- Squeeze your glutes at the top without leaning back.
- Lower the bar with control until the plates touch the floor or reach your chosen range of motion.
- Repeat for the target reps, then switch your stance and grip for the other side.
Common mistakes: The most common mistakes are standing too wide, letting the bar hit the thighs, rounding the lower back, twisting through the torso, letting the knees cave inward, starting too heavy, and forgetting to switch sides.
Expert tip: Think “stand tall through both legs” instead of “pull with the arms.” Your hands hold the bar, but your legs should drive the movement.
Exercise variations: Useful variations include the dumbbell Jefferson squat, kettlebell Jefferson squat, block Jefferson squat, pause Jefferson squat, tempo Jefferson squat, and Jefferson deadlift.
Easier variation: The easiest variation is the dumbbell or kettlebell Jefferson squat because the load is lighter, easier to position, and less awkward than a barbell.
Harder variation: The pause Jefferson squat is harder because you stop briefly near the bottom while keeping your brace, knee position, and torso control.
Common Jefferson Squat Mistakes to Avoid
Standing Too Wide
A very wide stance may look powerful, but it often makes the bar scrape the inner thighs and forces the hips into an awkward position. Start with a moderate stance, then adjust a few inches at a time until the bar can move cleanly.
Letting the Knees Cave In
Your knees should track in the same direction as your toes. If one knee collapses inward, reduce the load, adjust your foot angle, or shorten the range of motion. General squat guidance from ACE Fitness emphasizes keeping the knees aligned with the toes during squat patterns.
Rounding the Lower Back
The Jefferson squat should not become a rounded-back pull. Brace before you lift, keep your chest lifted, and stop the set if you cannot maintain a controlled spine position. Depth should match your mobility and control, not someone else’s video.
Twisting at the Top
A small amount of bar movement can happen, but your torso should not rotate aggressively. Keep your ribs and hips square, squeeze the bar evenly, and switch sides so one position does not dominate your training.
Starting Too Heavy
This lift feels unusual at first. Heavy loading before you understand the bar path can turn the exercise into a messy pull. Start light, film a few reps if possible, and only add weight when the movement looks controlled.
Forgetting to Train Both Sides
Because the stance and grip are asymmetrical, you should switch your lead leg and hand position. This helps keep the movement balanced and reduces the chance of always loading one side the same way.
Jefferson Squat Variations and Regressions
Dumbbell Jefferson Squat
The dumbbell Jefferson squat is a beginner-friendly regression. Hold one dumbbell with both hands between your legs and use the same straddle stance. This version helps you learn the lower-body pattern without managing a long barbell.
Kettlebell Jefferson Squat
The kettlebell version works well for home gyms and warm-ups. The handle is easy to grip, the load stays centered, and you can focus on depth, knee tracking, and posture.
Block Jefferson Squat
A block Jefferson squat starts with the bar elevated on blocks or low safety pins. This reduces the range of motion and can help lifters who cannot reach the floor without losing position.
Pause Jefferson Squat
The pause Jefferson squat adds a short stop near the bottom of the rep. Use a 1–2 second pause while keeping your brace tight and your knees stable. This variation improves control and makes lighter loads feel more challenging.
Tempo Jefferson Squat
A tempo Jefferson squat uses a slow lowering phase, usually around 3 seconds down. This is useful for learning control, building tension, and preventing the lift from turning into a rushed pull.
Goblet Squat
The goblet squat is a better starting point if the Jefferson squat feels too awkward. It teaches bracing, squat depth, knee tracking, and foot pressure with a simpler setup.
Sumo Deadlift
The sumo deadlift is a good alternative if you like the wider stance but do not like straddling the bar. It still trains the hips, legs, adductors, and grip, but the setup is more familiar.
Jefferson Squat vs. Jefferson Deadlift
The Jefferson squat and Jefferson deadlift are closely related, and many people use the names interchangeably. The setup is similar because both involve straddling the bar.
The Jefferson squat is usually more knee-dominant. You stay more upright, bend the knees more, and try to make the movement feel like a squat. This version tends to emphasize the quads more.
The Jefferson deadlift is usually more hip-dominant. You hinge more, keep the hips higher, and lift the bar more like a pull from the floor. This version tends to involve more posterior-chain effort from the glutes, hamstrings, and back.
Neither version is automatically better. Choose the one that matches your goal and allows better control.
How to Program the Jefferson Squat
The Jefferson squat works best as an accessory lift, not as the main lift of every leg day. Use it after your primary squat, deadlift, leg press, or lower-body strength movement.
For general strength training, the American College of Sports Medicine recommends muscle-strengthening activity at least two days per week. That does not mean you need Jefferson squats twice weekly. It means your overall program should train the major muscle groups consistently.
| Goal | Sets and reps | Rest | Effort |
|---|---|---|---|
| Learn the movement | 2–3 sets of 6–8 reps per side | 60–90 seconds | Easy to moderate |
| Build muscle | 3–4 sets of 8–12 reps per side | 90–120 seconds | 1–3 reps in reserve |
| Strength accessory | 3–5 sets of 4–6 reps per side | About 2 minutes | 1–3 reps in reserve |
| Core and control finisher | 2–3 sets of 10–12 reps per side | 60–90 seconds | Light and controlled |
Progress slowly. Add reps first, then add small weight jumps. If your stance, brace, or bar path breaks down, the weight is too heavy for your current skill level.
Sample Jefferson Squat Workout
Beginner Jefferson Squat Skill Workout
Use this workout once per week after a warm-up and after practicing bodyweight squats or goblet squats.
Goblet squat: 3 sets of 8 reps with 60–90 seconds rest.
Dumbbell Jefferson squat: 2–3 sets of 6 reps per side with 60–90 seconds rest.
Glute bridge: 2 sets of 10–12 reps with 60 seconds rest.
Side plank: 2 sets of 20–30 seconds per side.
Keep the effort around 5–6 out of 10. The goal is to learn the stance and stay controlled.
Intermediate Lower-Body Accessory Workout
Use this after your main squat or deadlift.
Back squat or front squat: 3–4 sets of 4–6 reps.
Jefferson squat: 3 sets of 8–10 reps per side.
Romanian deadlift: 3 sets of 8–10 reps.
Split squat: 2–3 sets of 8 reps per side.
Farmer carry: 3 carries of 30–40 yards.
Keep 1–3 reps in reserve on the Jefferson squat. Do not take it to failure.
Advanced Jefferson Squat Strength Accessory
Use this version only if your technique is already solid.
Main squat or deadlift: 3–5 working sets.
Jefferson squat: 4 sets of 4–6 reps per side.
Pause Jefferson squat back-off set: 2 sets of 6 reps per side.
Hamstring curl or glute-ham raise: 3 sets of 8–12 reps.
Pallof press: 3 sets of 10–12 reps per side.
This workout is demanding, so keep the Jefferson squat crisp. Stop the set if you feel yourself twisting, rushing, or losing foot pressure.
Who Should Use the Jefferson Squat?
The Jefferson squat can be useful for intermediate lifters who want a lower-body accessory that challenges the legs, hips, grip, and core in a different way. It may also work well for lifters who enjoy old-school barbell lifts or want a squat variation that does not load the bar on the back.
It is not mandatory. You can build strong legs with squats, deadlifts, lunges, leg presses, split squats, step-ups, and other lower-body exercises. The Jefferson squat is an option, not a requirement.
Who Should Be Careful With the Jefferson Squat?
Be careful with the Jefferson squat if you have current hip, knee, back, pelvic, or groin pain. The straddle stance can feel awkward if your hips do not tolerate the position. The mixed grip and asymmetrical setup can also be uncomfortable for some lifters.
Start with a light variation and a short range of motion. Stop if you feel sharp pain, numbness, dizziness, chest pain, or unusual symptoms. If you are unsure whether this lift is appropriate for you, get guidance from a qualified coach or healthcare professional.
Jefferson Squat Form Cues
Keep your stance comfortable. Your feet should be wide enough to clear the bar, but not so wide that your hips feel jammed.
Brace before every rep. Think about locking your ribs over your pelvis before the weight leaves the floor.
Push through the whole foot. Do not roll onto your toes or let your heels float up during regular gym training.
Keep the bar close. If the bar drifts or swings, reduce the weight and slow down.
Switch sides. Train both lead-leg positions so the exercise does not become one-sided.
FAQ
What is the Jefferson squat good for?
The Jefferson squat is good for training lower-body strength, especially the quads, glutes, and adductors. It also challenges grip and core stability because the bar is held between the legs with an asymmetrical grip.
Is the Jefferson squat better for quads or glutes?
It can train both. A more upright torso and deeper knee bend usually make it feel more quad-focused. A more hip-dominant setup will involve the glutes and hamstrings more. Your stance and body position decide the emphasis.
Is the Jefferson squat safe?
The Jefferson squat can be safe when it is loaded appropriately and performed with control. It can also feel awkward if your stance, grip, or mobility does not fit the movement. Start light, keep your torso controlled, and stop if the exercise causes pain or unusual symptoms.
Should beginners do the Jefferson squat?
Complete beginners should usually learn simpler squat and hinge patterns first, such as goblet squats, Romanian deadlifts, and split squats. Once those feel solid, a beginner can try a light dumbbell or kettlebell Jefferson squat before using a barbell.
How heavy should I go on Jefferson squats?
Use a weight that lets you keep your knees tracking, spine controlled, and torso steady. For most lifters, the Jefferson squat works best with moderate accessory loads rather than true max-effort attempts.
What is the difference between the Jefferson squat and Jefferson deadlift?
The Jefferson squat is usually performed with more knee bend and a more upright torso. The Jefferson deadlift usually uses more hip hinge and feels more like a pull from the floor. The setup is similar, but the training emphasis changes.
Conclusion
The Jefferson squat is a unique lower-body accessory lift that can build strength in your quads, glutes, adductors, grip, and core. The key is to treat it as a skill-based movement first. Start light, find a stance that fits your body, keep your torso from twisting, and switch sides evenly.
Use it after your main lower-body lift, progress gradually, and keep the reps controlled. When done well, the Jefferson squat can add a useful new challenge to your leg training without replacing your main squats or deadlifts.
This content is for informational purposes only and is not a substitute for professional medical advice.
References
- USAWA — Jefferson Lift Technique
- ACE Fitness — How to Squat Properly: Body Type Breakdown and Anatomy Considerations
- ACE Fitness — The Buzz About Anti-Rotation Core Training
- International Journal of Sports Physical Therapy — A Biomechanical Review of the Squat Exercise
- American College of Sports Medicine — Physical Activity Guidelines