The ATG Split Squat is a deep split squat variation that builds single-leg strength, quad control, hip mobility, ankle mobility, and balance through a large range of motion. It is usually performed with one foot forward and one foot back while the front knee travels forward over the toes under control.
The key word is control. The ATG Split Squat is not about forcing maximum depth on day one. It works best when you scale the range of motion, use support when needed, and progress slowly from an easier version to a stronger, deeper version.
In this guide, you will learn what the ATG Split Squat is, which muscles it works, how to do it with proper form, the most common mistakes, beginner regressions, harder progressions, and how to add it to a lower-body workout.
What Is the ATG Split Squat?
The ATG Split Squat is a split squat variation performed with a deep range of motion. The front foot stays planted, the front knee bends deeply, and the rear leg moves behind you into a strong hip flexor stretch.
“ATG” is commonly used in training to describe a very deep range of motion. In this exercise, that usually means the front hamstring moves close to the calf while the front knee travels forward and the back knee lowers toward the floor.
Unlike a standard split squat, the ATG Split Squat places more emphasis on deep knee flexion, ankle mobility, front-leg quad strength, rear-leg hip extension, and full-body balance. It can be done with bodyweight, hand support, a front-foot elevation, heel elevation, dumbbells, or a kettlebell.
Official ATG Online Coaching guidance explains that the movement can be scaled by using a higher front foot, assistance, or less load. That matters because every lifter has a different starting point for strength, balance, and mobility.
ATG Split Squat Muscles Worked
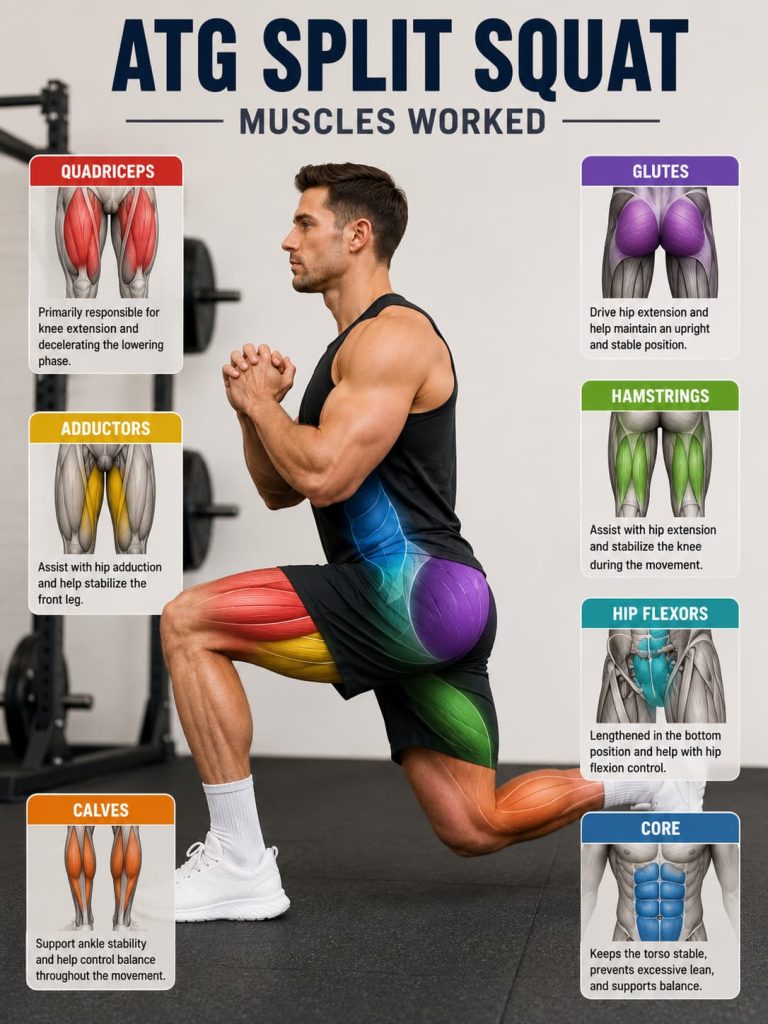
The ATG Split Squat mainly trains the lower body, but it also challenges the core because you must control your torso and pelvis on one leg.
| Muscle group | Role in the ATG Split Squat |
|---|---|
| Quadriceps | Extend the front knee and control the deep lowering phase |
| Glutes | Help extend the hip and stabilize the pelvis |
| Adductors | Assist with hip control and lower-body stability |
| Hamstrings | Support hip control and help stabilize the knee |
| Calves | Help control the ankle and foot position |
| Hip flexors | The rear-leg hip flexors are lengthened in the bottom position |
| Core | Helps keep the torso stable and balanced |
The front-leg quadriceps usually do the most work because the exercise uses deep knee bending. A more upright torso and forward knee position can increase the demand on the knee extensors. A 2024 squat biomechanics review in the International Journal of Sports Physical Therapy explains that tibia and trunk position can change how much demand is placed on the knee and hip extensors during squat patterns.
ATG Split Squat Benefits
1. Builds Single Leg Strength
The ATG Split Squat trains one leg at a time, which makes it useful for building strength on both sides of the body. This can help you notice side-to-side differences that may be hidden during regular squats, leg presses, or deadlifts.
The ACE Fitness guide to unilateral training explains that single-side exercises can help improve balance, core involvement, and training symmetry. The ATG Split Squat fits that category because each leg must control its own range of motion.
2. Trains the Quads Through a Deep Range
The front knee bends deeply during the ATG Split Squat. This gives the quadriceps a strong challenge in a stretched, knee-bent position.
That does not mean you need to chase the deepest version immediately. The better goal is to use the deepest range you can control while keeping the front foot stable, the knee tracking well, and the movement smooth.
3. Improves Active Mobility
The ATG Split Squat is often used to build active mobility because you are not just holding a passive stretch. You are moving in and out of a deep position with strength and control.
The front ankle, front knee, front hip, rear hip flexor, and rear quad all need to cooperate. Over time, a scaled version may help you become more comfortable in deep split-stance positions.
4. Strengthens Knee Control
The front knee travels forward during the exercise, which increases the need for controlled knee flexion and extension. This can be useful for athletes, lifters, and general fitness training when progressed gradually.
The important point is that knee-over-toes movement should be earned, not forced. Your knee should track in line with your toes, your front heel should stay grounded, and you should stop if you feel sharp pain or unusual symptoms.
5. Builds Balance and Coordination
The ATG Split Squat challenges balance because you are working in a long split stance with a large range of motion. Your hips, feet, ankles, and core must work together to keep you stable.
Beginners can use a rack, wall, straps, or dowel for support. Using assistance does not make the exercise less useful. It often makes the exercise better because you can focus on clean movement instead of fighting for balance.
How to Do the ATG Split Squat With Proper Form
Equipment needed: Bodyweight is enough for beginners. A wedge, slant board, weight plate, low box, rack, straps, dumbbells, or kettlebell can be used depending on your level.
Suggested sets and reps: Start with 2 to 3 sets of 5 to 8 reps per side. Use slow, controlled reps and stop each set with 1 to 3 reps in reserve. More advanced lifters can use 3 to 4 sets of 6 to 10 reps per side.
Beginners: Use hand support and elevate the front foot on a low box, step, or stacked plates. Keep the range of motion smooth and pain-free. Do not worry about reaching full depth right away.
Intermediate: Reduce the front-foot elevation, use less hand support, and add a pause at the bottom. You can also hold a light dumbbell or kettlebell once bodyweight reps feel stable.
Advanced: Use a full range of motion with little or no assistance. Add dumbbells, a goblet hold, slow eccentrics, pauses, or controlled loaded reps. Increase load only after your depth, balance, and knee tracking stay consistent.
Rest: Rest 60 to 120 seconds between sets. Use longer rest if you are loading the exercise heavily or training it for strength.
How to do it:
- Stand in a long split stance with one foot forward and one foot back.
- Keep your front foot flat and place your weight through the heel, big toe base, and little toe base.
- Hold a stable support if needed.
- Brace your core and keep your chest tall.
- Slowly bend the front knee and let it travel forward in line with your toes.
- Lower until you reach the deepest position you can control without sharp pain or balance loss.
- Keep the back leg active as the rear knee moves down and back.
- Pause briefly at the bottom without bouncing.
- Push through the front foot to return to the starting position.
- Complete all reps on one side, then switch legs.
Common mistakes: The biggest mistakes are forcing full depth too soon, letting the front heel lift, allowing the knee to cave inward, bouncing out of the bottom, using too much load, and turning the movement into a balance test instead of a controlled strength exercise.
Expert tip: Think “slow down, stay tall, and own the bottom.” If you cannot pause briefly in the bottom position, the range of motion is probably too deep or the load is too heavy.
Exercise variations: Useful variations include assisted ATG Split Squat, front-foot-elevated ATG Split Squat, heel-elevated ATG Split Squat, bodyweight ATG Split Squat, goblet ATG Split Squat, dumbbell ATG Split Squat, and paused ATG Split Squat.
Easier variation: The easiest version is an assisted front-foot-elevated ATG Split Squat. Use a higher platform for the front foot and hold a rack or straps for balance.
Harder variation: A loaded ATG Split Squat with dumbbells, a slow lowering phase, and a pause at the bottom is a strong advanced progression.
Common ATG Split Squat Mistakes
Forcing Full Depth Too Soon
Full depth is not required for the exercise to be useful. If you force depth before your body is ready, you may lose control, lift the front heel, twist the knee, or collapse into the bottom.
Start with the range you can control. Then gradually lower the front-foot elevation or increase depth over time.
Letting the Front Knee Cave Inward
Your knee does not need to point perfectly straight, but it should generally track in the same direction as your toes. If the knee dives inward, reduce the range, slow down, or use support.
A simple cue is to keep the kneecap moving toward the second or third toe.
Bouncing Out of the Bottom
The bottom position should be controlled. Bouncing can hide poor strength and make the exercise harder to manage.
Pause for one second at the bottom. If you cannot pause, use a smaller range of motion.
Lifting the Front Heel
The front foot should stay grounded. If your heel lifts, your stance may be too short, your ankle mobility may be limited, or you may be going too deep too soon.
Use a front-foot elevation, heel wedge, or reduced depth until you can keep the foot stable.
Loading Before You Own the Movement
Adding dumbbells too early often turns the ATG Split Squat into a sloppy lunge. Earn the movement first with bodyweight, assistance, and a controlled tempo.
A good rule is simple: increase range before load. Then increase load only when your reps look the same from start to finish.
ATG Split Squat Progressions and Regressions
Beginner Regressions
The best beginner version is the assisted front-foot-elevated ATG Split Squat. Place your front foot on a low step or weight plate and hold a rack, wall, or straps. This reduces the mobility demand and lets you focus on form.
You can also use partial reps. Lower only as far as you can keep the front foot planted, the knee controlled, and the torso stable.
Another helpful option is a slow eccentric rep. Take 3 to 5 seconds to lower, then use your hands for help on the way up. This builds control without forcing you to grind through the hardest part.
Intermediate Progressions
Once the beginner version feels smooth, reduce the height of the front-foot elevation. Use less hand support. Add a one-second pause in the bottom position.
You can also add light load with a goblet hold or one dumbbell. Keep the weight light enough that your knee tracking, balance, and depth do not change.
Advanced Progressions
Advanced lifters can perform the ATG Split Squat from the floor with no hand support. From there, add dumbbells, a kettlebell, a slower tempo, or a longer pause.
A strong advanced version is 3 to 4 sets of 6 to 8 reps per side with a 3-second lowering phase and a 1-second pause at the bottom.
Do not rush to make it harder. The best progression is the one that keeps the movement clean.
How to Program the ATG Split Squat
The ATG Split Squat works well as an accessory exercise after squats, deadlifts, sled work, step-ups, lunges, or athletic training. It can also be used earlier in a session if your main goal is mobility, single-leg strength, or knee-dominant control.
| Goal | Sets and reps | Rest | Effort |
|---|---|---|---|
| Beginner practice | 2 to 3 sets of 5 to 8 reps per side | 60 to 90 seconds | Easy to moderate |
| Strength | 3 to 5 sets of 4 to 6 reps per side | 90 to 150 seconds | 1 to 3 reps in reserve |
| Muscle building | 3 to 4 sets of 8 to 12 reps per side | 60 to 120 seconds | 1 to 3 reps in reserve |
| Mobility and control | 2 to 3 sets of 5 to 8 slow reps per side | 60 to 90 seconds | Smooth and controlled |
| Finisher | 1 to 2 sets of 10 to 15 reps per side | 45 to 75 seconds | Moderate burn, no sloppy reps |
For most people, 1 to 3 times per week is enough. The CDC adult activity guidelines recommend muscle-strengthening activities on at least 2 days per week for adults. The ATG Split Squat can be one part of that plan, but it should not be the only lower-body exercise you do.
The ACSM 2026 resistance training update emphasizes that consistency matters more than chasing a perfect program. For this exercise, that means choosing a version you can repeat with good form and gradually progress.
Sample ATG Split Squat Workout
Use this routine 1 to 2 times per week as part of a lower-body or full-body training plan.
| Exercise | Sets | Reps | Rest |
|---|---|---|---|
| Bodyweight squat or goblet squat | 2 | 8 to 10 | 60 seconds |
| Assisted ATG Split Squat | 3 | 6 to 8 per side | 60 to 90 seconds |
| Romanian deadlift | 3 | 8 to 10 | 90 seconds |
| Step-up or reverse lunge | 2 | 8 per side | 60 to 90 seconds |
| Standing calf raise | 2 | 12 to 15 | 45 to 60 seconds |
Start with a version that feels controlled. When you can complete all sets with stable balance, good knee tracking, and no sharp pain, make the movement slightly harder by lowering the front-foot elevation, using less support, adding a pause, or adding light load.
ATG Split Squat vs Regular Split Squat
A regular split squat usually uses a more moderate range of motion. The front knee bends, the back knee lowers, and the torso stays controlled, but the front knee may not travel as far forward.
The ATG Split Squat uses a deeper range. The front knee travels farther forward, the front leg bends more, and the rear hip flexor gets a stronger stretch.
Use a regular split squat if you want a simpler lower-body strength exercise. Use the ATG Split Squat if you want more range of motion, more quad demand, and more mobility challenge.
ATG Split Squat vs Bulgarian Split Squat
The Bulgarian split squat uses an elevated rear foot. This usually increases the balance challenge and places strong demand on the front leg.
The ATG Split Squat usually keeps the back foot on the floor while the front leg moves through deep knee flexion. The goal is not just to load the front leg. The goal is to combine deep range, strength, and mobility.
The NASM Bulgarian split squat exercise library and ACE Bulgarian split squat guide are useful references for split squat mechanics, but the ATG version has its own setup and progression style.
Safety Tips for the ATG Split Squat
The ATG Split Squat should feel challenging, but it should not feel reckless. A strong stretch and muscular effort are normal. Sharp pain, numbness, dizziness, chest pain, or unusual symptoms are not normal training signals.
Use these safety guidelines:
Start with assistance if balance limits your form. Elevate the front foot if your ankle, knee, or hip cannot control the full range yet. Keep the front foot planted. Move slowly. Avoid bouncing. Do not add weight until bodyweight reps feel smooth.
If you have current knee pain, a recent injury, a surgery history, or a medical condition that affects training, get guidance from a qualified professional before pushing deep ranges of motion.
Frequently Asked Questions
What does ATG mean in ATG Split Squat?
ATG usually refers to a very deep range of motion. In the ATG Split Squat, it means the front leg bends deeply while the back leg moves into a stretched position behind you.
Is the ATG Split Squat good for beginners?
Yes, but beginners should scale it. Start with hand support, a front-foot elevation, and a comfortable range of motion. You do not need to perform the full version right away.
Should my knee go over my toes?
Your front knee can travel over your toes if you can control it. The knee should track in line with the toes, the front foot should stay planted, and the movement should not cause sharp pain.
How deep should I go?
Go only as deep as you can control. A good depth is one where your front foot stays stable, your knee tracks well, your torso stays controlled, and you can pause briefly without collapsing.
How often should I do ATG Split Squats?
Most people can train them 1 to 3 times per week depending on recovery and training goals. Beginners may start with 1 to 2 times per week.
Can I do ATG Split Squats with dumbbells?
Yes. Dumbbells are a good progression after you can perform bodyweight reps with clean form. Start light and keep the same depth and control you had before loading.
What is the best beginner variation?
The assisted front-foot-elevated ATG Split Squat is usually the best beginner variation. It reduces the mobility demand and lets you practice the movement safely with more control.
Conclusion
The ATG Split Squat is a powerful lower-body exercise when it is scaled correctly. It can build single-leg strength, train the quads through a deep range, improve balance, and support active hip and ankle mobility.
Start with the easiest version you can control. Use assistance, elevate the front foot, move slowly, and progress only when your reps look clean. The best ATG Split Squat is not the deepest or heaviest version. It is the version you can perform with control, consistency, and confidence.
This content is for informational purposes only and is not a substitute for professional medical advice.
References
- ATG Online Coaching: History of the ATG Split Squat
- ATG Online Coaching: The Beginner’s ATG Lifting Program
- ATG Online Coaching: ATG Phys Ed Series 2 of 10
- ACE Fitness: The Benefits of Unilateral Training
- NASM: Bulgarian Split Squat Exercise Library
- ACE Fitness: Bulgarian Split Squat Exercise Library
- International Journal of Sports Physical Therapy: A Biomechanical Review of the Squat Exercise
- CDC: Adult Physical Activity Guidelines
- ACSM: 2026 Resistance Training Guidelines Update