
Chair exercises for seniors are low-impact movements done seated or with chair support to help build strength, mobility, balance, posture, and daily movement confidence. They are useful for older adults who want a safer way to exercise at home, especially if standing workouts feel difficult, tiring, or unstable.
This guide covers the best chair exercises for seniors, how to do each one with proper form, which muscles they work, common mistakes to avoid, and how to combine them into a simple routine.
What Are Chair Exercises for Seniors?

Chair exercises are movements performed while sitting on a sturdy chair or using a chair for balance. They can train the legs, hips, core, back, shoulders, arms, ankles, and posture without requiring a gym or complex equipment.
Some chair exercises are fully seated, such as seated marches, leg extensions, arm raises, and torso twists. Others use the chair for support while standing, such as sit-to-stands or chair-supported hip abductions.
For older adults, the chair acts as a stable base. It can reduce the fear of losing balance while still allowing the body to move, strengthen muscles, and practice useful everyday patterns.
Benefits of Chair Exercises for Seniors
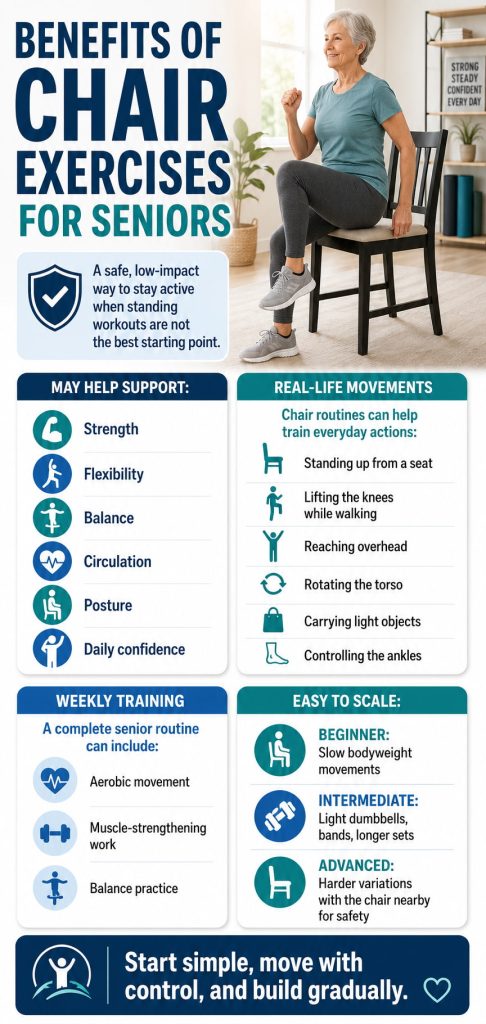
Chair exercises may help seniors stay more active when regular standing workouts are not the best starting point. They can support strength, flexibility, balance, circulation, posture, and confidence with daily tasks.
A good chair routine can help train movements used in real life, such as standing up from a seat, lifting the knees while walking, reaching overhead, rotating the torso, carrying light objects, and controlling the ankles. The CDC older adult activity guidelines recommend weekly aerobic activity, muscle-strengthening activity, and balance work for adults 65 and older.
Chair-based training is also easy to scale. Beginners can use slow bodyweight movements. Intermediate exercisers can add light dumbbells, resistance bands, longer sets, or slower tempo. Advanced seniors can use harder variations while still keeping the chair nearby for safety.
Safety Tips Before You Start
Use a sturdy chair with a firm seat and back support. Avoid rolling chairs, soft couches, unstable stools, and chairs with wheels. The Cleveland Clinic chair exercise guide recommends a steady chair with a back and firm bottom.
Sit tall with your feet flat on the floor when possible. The NHS sitting exercises guide also recommends sitting with the feet flat and knees bent at roughly right angles.
Keep the effort moderate. A good target is about 4 to 6 out of 10 effort, where the exercise feels useful but not forced. Breathe normally and avoid holding your breath.
Stop and seek professional help if you feel sharp pain, chest pain, dizziness, numbness, unusual shortness of breath, or symptoms that feel wrong for your body. Check with a qualified healthcare professional before starting if you have a heart condition, recent surgery, major balance issues, or a medical concern that may affect exercise.
13 Best Chair Exercises for Seniors
The exercises below are organized to train the full body. Start with fewer exercises if needed, then build up gradually.
1. Seated March
Best for: Warming up, hip flexor strength, gentle cardio, and lower-body coordination.
Muscles worked: Hip flexors, quadriceps, core, glutes, and lower legs.
Equipment needed: Sturdy chair.
Why it stands out: The seated march is one of the easiest chair exercises for seniors because it raises the heart rate gently while training the hips and thighs. It also prepares the body for harder leg exercises later in the routine.
Suggested sets and reps: Perform 2 to 3 sets of 20 to 40 total marches.
Beginners: Lift each foot only a few inches from the floor and hold the sides of the chair for support.
Intermediate: March for 30 to 45 seconds while keeping the torso tall and controlled.
Advanced: Add a slower tempo or light ankle weights if approved and comfortable.
Rest: Rest 30 to 60 seconds between sets.
How to do it:
- Sit tall near the front half of a sturdy chair.
- Place both feet flat on the floor about hip-width apart.
- Brace your core lightly and keep your chest lifted.
- Lift one knee as high as comfortable without leaning back.
- Lower the foot with control.
- Repeat on the other side and continue alternating.
Common mistakes: Leaning backward, rushing the reps, slapping the feet down, or letting the shoulders round forward.
Expert tip: Think “lift tall, lower quiet.” A quiet foot landing usually means better control.
Exercise variations: Try alternating marches, same-side marches, or slow marches with a two-second pause at the top.
Easier variation: Reduce the range of motion and lift just the heel instead of the whole foot.
Harder variation: March without holding the chair, or add a light resistance band around the thighs.
2. Seated Leg Extension
Best for: Quadriceps strength, knee control, and easier standing from a chair.
Muscles worked: Quadriceps, hip flexors, and core.
Equipment needed: Sturdy chair.
Why it stands out: This exercise directly trains the front of the thigh. Stronger quadriceps can support walking, stair climbing, and standing up from a seated position.
Suggested sets and reps: Perform 2 to 3 sets of 8 to 12 reps per leg.
Beginners: Extend the leg only halfway and focus on smooth control.
Intermediate: Straighten the knee fully if comfortable and pause for one second at the top.
Advanced: Add a slow three-second lowering phase or light ankle weight.
Rest: Rest 30 to 60 seconds between sets.
How to do it:
- Sit tall with both feet flat on the floor.
- Hold the sides of the chair if needed.
- Slowly straighten one knee until the leg is extended.
- Keep the thigh still and avoid locking the knee aggressively.
- Pause briefly at the top.
- Lower the foot back to the floor with control.
- Complete all reps, then switch sides.
Common mistakes: Kicking too fast, leaning back, locking the knee forcefully, or letting the foot drop quickly.
Expert tip: Point the kneecap toward the ceiling and keep the movement smooth from start to finish.
Exercise variations: Use alternating reps, single-leg sets, or a longer pause at the top.
Easier variation: Use a shorter range of motion.
Harder variation: Add a resistance band around the ankles or use a slow tempo.
3. Sit-to-Stand
Best for: Functional leg strength, balance confidence, and daily independence.
Muscles worked: Quadriceps, glutes, hamstrings, calves, and core.
Equipment needed: Sturdy chair.
Why it stands out: Sit-to-stand training closely matches one of the most important daily movements: getting up from a chair. The CDC lists standing from a sitting position as an example of balance-related activity for older adults.
Suggested sets and reps: Perform 2 to 3 sets of 5 to 10 reps.
Beginners: Use your hands on the chair or thighs for assistance.
Intermediate: Cross the arms over the chest or reach forward for balance.
Advanced: Lower more slowly, pause lightly above the chair, or hold a light weight at the chest.
Rest: Rest 60 to 90 seconds between sets.
How to do it:
- Sit near the front edge of the chair with feet flat.
- Place your feet about hip-width apart.
- Lean forward slightly from the hips while keeping the chest lifted.
- Press through the whole foot to stand tall.
- Squeeze the glutes gently at the top.
- Push the hips back and slowly sit down with control.
Common mistakes: Rocking too aggressively, collapsing into the chair, letting the knees cave inward, or pushing only through the toes.
Expert tip: Use the cue “nose over toes” before standing. It helps shift your weight forward safely.
Exercise variations: Try assisted sit-to-stand, slow sit-to-stand, or sit-to-stand with a light dumbbell.
Easier variation: Use a higher chair or place a firm cushion on the seat.
Harder variation: Use a slower lowering phase or reduce hand assistance.
4. Seated Heel and Toe Raises
Best for: Ankle mobility, lower-leg strength, and circulation-friendly movement breaks.
Muscles worked: Calves, tibialis anterior, ankles, and feet.
Equipment needed: Sturdy chair.
Why it stands out: The ankles play a major role in walking, balance, and foot control. This simple exercise trains both the front and back of the lower leg.
Suggested sets and reps: Perform 2 to 3 sets of 10 to 20 reps.
Beginners: Move slowly and keep both feet close to the floor.
Intermediate: Pause at the top of each heel raise and toe raise.
Advanced: Perform one leg at a time or add a longer hold.
Rest: Rest 30 seconds between sets.
How to do it:
- Sit tall with both feet flat on the floor.
- Lift your heels while keeping the balls of the feet down.
- Squeeze the calves gently at the top.
- Lower the heels with control.
- Lift the toes while keeping the heels down.
- Lower the toes and repeat.
Common mistakes: Rushing, rolling the ankles outward, lifting the hips off the chair, or using a tiny range of motion without control.
Expert tip: Move through the biggest comfortable range without pain or cramping.
Exercise variations: Try heel raises only, toe raises only, alternating heel-toe raises, or single-leg raises.
Easier variation: Perform fewer reps and keep the range small.
Harder variation: Hold each top position for three seconds.
5. Seated Arm Raises
Best for: Shoulder mobility, posture, and light upper-body strength.
Muscles worked: Deltoids, upper back, rotator cuff, and core.
Equipment needed: Sturdy chair; optional light dumbbells or water bottles.
Why it stands out: Seated arm raises help seniors practice reaching overhead or out to the sides with better control. They can also help improve awareness of shoulder position.
Suggested sets and reps: Perform 2 sets of 8 to 12 reps.
Beginners: Use no weight and lift only to shoulder height.
Intermediate: Add light hand weights if the movement stays smooth.
Advanced: Slow the lowering phase to three seconds.
Rest: Rest 45 to 60 seconds between sets.
How to do it:
- Sit tall with arms by your sides.
- Keep your shoulders relaxed and ribs stacked over your hips.
- Raise both arms forward or out to the sides.
- Stop at shoulder height or a comfortable range.
- Lower the arms slowly.
- Repeat without shrugging.
Common mistakes: Shrugging the shoulders, arching the lower back, lifting too high, or using momentum.
Expert tip: Keep the neck long and imagine sliding the shoulder blades gently down your back.
Exercise variations: Try front raises, lateral raises, or alternating arm raises.
Easier variation: Raise one arm at a time.
Harder variation: Use light dumbbells or pause for one second at shoulder height.
6. Seated Biceps Curl
Best for: Arm strength, carrying ability, and daily pulling tasks.
Muscles worked: Biceps, brachialis, forearms, and grip muscles.
Equipment needed: Sturdy chair; light dumbbells, resistance band, or water bottles.
Why it stands out: Biceps curls are simple, joint-friendly, and useful for building basic arm strength. They can help with tasks such as carrying groceries, lifting small objects, or pulling items closer.
Suggested sets and reps: Perform 2 to 3 sets of 8 to 15 reps.
Beginners: Use no weight or very light objects.
Intermediate: Use light dumbbells with a controlled lowering phase.
Advanced: Use a resistance band under the feet or slow tempo curls.
Rest: Rest 45 to 75 seconds between sets.
How to do it:
- Sit tall with arms at your sides.
- Hold light weights with palms facing forward.
- Keep elbows close to your ribs.
- Curl the weights toward your shoulders.
- Pause briefly without leaning back.
- Lower the weights slowly to the start position.
Common mistakes: Swinging the arms, lifting the elbows forward, bending the wrists, or leaning back to finish the rep.
Expert tip: Keep your upper arms still. The movement should come mostly from bending and straightening the elbows.
Exercise variations: Try alternating curls, hammer curls, or band curls.
Easier variation: Use one arm at a time.
Harder variation: Use a three-second lowering phase or slightly heavier resistance.
7. Seated Overhead Press
Best for: Shoulder strength, arm strength, and overhead reaching ability.
Muscles worked: Shoulders, triceps, upper back, and core.
Equipment needed: Sturdy chair; optional light dumbbells, resistance band, or water bottles.
Why it stands out: This exercise trains the shoulders and arms in a practical reaching pattern. It should feel controlled, not forced.
Suggested sets and reps: Perform 2 sets of 6 to 12 reps.
Beginners: Use no weight and press only through a comfortable range.
Intermediate: Use light dumbbells or water bottles.
Advanced: Use a slow press and slow lowering phase while keeping the ribs down.
Rest: Rest 60 seconds between sets.
How to do it:
- Sit tall with feet flat on the floor.
- Hold light weights near shoulder height.
- Keep the elbows slightly in front of the body.
- Press the weights upward without shrugging.
- Stop before the shoulders feel strained.
- Lower the weights back to shoulder height with control.
Common mistakes: Arching the back, holding the breath, pressing too heavy, or letting the shoulders shrug toward the ears.
Expert tip: Keep your ribs down as your arms move up. This protects the lower back from taking over.
Exercise variations: Try one-arm presses, alternating presses, or band overhead presses.
Easier variation: Press without weights or reduce the range of motion.
Harder variation: Add light resistance and slow the lowering phase.
8. Seated Row With Resistance Band
Best for: Posture, upper-back strength, and shoulder control.
Muscles worked: Upper back, lats, rear shoulders, biceps, and core.
Equipment needed: Sturdy chair and resistance band.
Why it stands out: Many seniors spend a lot of time sitting, which can make the upper back feel rounded or weak. Seated rows help train the muscles that pull the shoulders back and support upright posture.
Suggested sets and reps: Perform 2 to 3 sets of 8 to 15 reps.
Beginners: Use a light band and small range of motion.
Intermediate: Pause when the elbows reach the ribs.
Advanced: Use a stronger band or slower tempo.
Rest: Rest 60 seconds between sets.
How to do it:
- Sit tall with legs extended slightly or feet planted.
- Loop a resistance band around the feet or a secure anchor.
- Hold one end of the band in each hand.
- Start with arms extended and shoulders relaxed.
- Pull the elbows back toward your ribs.
- Squeeze the shoulder blades gently.
- Return to the start with control.
Common mistakes: Rounding the back, jerking the band, shrugging the shoulders, or pulling the elbows too far behind the body.
Expert tip: Think “elbows to back pockets” instead of yanking with the hands.
Exercise variations: Try a wide row, close row, or one-arm band row.
Easier variation: Use a lighter band or sit closer to the anchor.
Harder variation: Use a stronger band or hold the squeezed position for two seconds.
9. Seated Chest Press With Resistance Band
Best for: Chest, shoulder, and triceps strength.
Muscles worked: Chest, front shoulders, triceps, and core.
Equipment needed: Sturdy chair and resistance band.
Why it stands out: The seated chest press trains a pushing pattern that supports daily tasks such as pushing doors, getting up with arm assistance, or moving light objects forward.
Suggested sets and reps: Perform 2 to 3 sets of 8 to 12 reps.
Beginners: Use a light band and press through a short range.
Intermediate: Press to full arm extension without locking the elbows hard.
Advanced: Use a stronger band or slow tempo.
Rest: Rest 60 seconds between sets.
How to do it:
- Sit tall with the band wrapped behind your upper back.
- Hold one end of the band in each hand.
- Start with hands near chest height.
- Keep wrists straight and shoulders relaxed.
- Press both hands forward until the arms are almost straight.
- Return slowly to the starting position.
Common mistakes: Letting the band slide too high on the neck, shrugging, flaring the ribs, or snapping the arms back too quickly.
Expert tip: Press forward as if you are gently pushing a door closed.
Exercise variations: Try one-arm chest presses, alternating presses, or a lighter band for higher reps.
Easier variation: Use a thinner band or reduce the press distance.
Harder variation: Use a stronger band and pause briefly with the arms extended.
10. Seated Torso Twist
Best for: Core control, spinal mobility, and posture.
Muscles worked: Obliques, deep core muscles, upper back, and spinal stabilizers.
Equipment needed: Sturdy chair.
Why it stands out: Rotation is used in daily life when turning to reach, look behind, or move objects from side to side. This exercise trains gentle rotation without needing to stand.
Suggested sets and reps: Perform 2 sets of 5 to 8 reps per side.
Beginners: Use a small range of motion and move slowly.
Intermediate: Hold each side for one to two seconds.
Advanced: Hold a light object at the chest if posture stays tall.
Rest: Rest 30 to 45 seconds between sets.
How to do it:
- Sit tall with feet flat on the floor.
- Cross your arms over your chest or place hands lightly on your shoulders.
- Brace your core gently.
- Rotate your torso to one side as far as comfortable.
- Keep your hips facing forward.
- Return to the center.
- Repeat on the other side.
Common mistakes: Twisting too far, forcing the neck, moving the hips, or slumping through the lower back.
Expert tip: Rotate from your upper back, not by yanking your shoulders or neck.
Exercise variations: Try hands-on-shoulders twists, arms-crossed twists, or slow side-to-side rotations.
Easier variation: Keep the hands on the thighs and rotate only slightly.
Harder variation: Add a light medicine ball or slow five-second rotation.
11. Seated Knee Lift
Best for: Core strength, hip flexor control, and lower-abdominal engagement.
Muscles worked: Hip flexors, lower abdominals, quadriceps, and deep core.
Equipment needed: Sturdy chair.
Why it stands out: The seated knee lift is more controlled than a march. It helps seniors practice lifting one leg while keeping the trunk stable.
Suggested sets and reps: Perform 2 to 3 sets of 6 to 10 reps per side.
Beginners: Hold the sides of the chair and lift only slightly.
Intermediate: Pause for one second at the top.
Advanced: Lift both feet one at a time without holding the chair, if balance and control are strong.
Rest: Rest 45 to 60 seconds between sets.
How to do it:
- Sit tall near the front half of the chair.
- Place feet flat and hands on the chair if needed.
- Brace your core without holding your breath.
- Lift one knee toward your chest.
- Stop before the lower back rounds.
- Lower the foot slowly.
- Repeat on the other side.
Common mistakes: Leaning backward, pulling with the arms, rounding the lower back, or lifting too high.
Expert tip: Keep the movement small enough that your posture stays strong.
Exercise variations: Try alternating knee lifts, same-side knee lifts, or knee lifts with a pause.
Easier variation: Lift the heel instead of the whole foot.
Harder variation: Add a slow three-second lower or a light resistance band around the thighs.
12. Seated Cat-Cow
Best for: Spinal mobility, posture awareness, and gentle warm-up work.
Muscles worked: Spinal stabilizers, core, upper back, and breathing muscles.
Equipment needed: Sturdy chair.
Why it stands out: Seated cat-cow helps move the spine through gentle flexion and extension. It can be useful before strength exercises because it encourages controlled posture and breathing.
Suggested sets and reps: Perform 1 to 2 sets of 6 to 10 slow reps.
Beginners: Keep the movement small and pain-free.
Intermediate: Coordinate each movement with slow breathing.
Advanced: Add a longer pause in each position without forcing the range.
Rest: Rest as needed.
How to do it:
- Sit tall with feet flat on the floor.
- Place hands on your thighs.
- Inhale and gently lift your chest.
- Let the shoulder blades move slightly back.
- Exhale and gently round your upper back.
- Return to a tall neutral posture.
- Repeat slowly.
Common mistakes: Forcing the lower back, moving too fast, shrugging, or holding the breath.
Expert tip: Make this a breathing exercise as much as a mobility exercise.
Exercise variations: Try small-range cat-cow, hands-on-thighs cat-cow, or seated spinal waves.
Easier variation: Move only through the upper back.
Harder variation: Add a slower five-second inhale and five-second exhale.
13. Chair-Supported Hip Abduction
Best for: Hip stability, side-hip strength, and balance support.
Muscles worked: Gluteus medius, gluteus minimus, gluteus maximus, outer thighs, and core.
Equipment needed: Sturdy chair.
Why it stands out: The side hips help control the pelvis during walking and standing. This chair-supported exercise strengthens the hips while giving the hands a stable place for balance.
Suggested sets and reps: Perform 2 to 3 sets of 8 to 12 reps per side.
Beginners: Use both hands on the chair and lift the leg only a few inches.
Intermediate: Pause briefly at the top without leaning.
Advanced: Add a light resistance band above the knees or around the ankles if control is strong.
Rest: Rest 45 to 75 seconds between sets.
How to do it:
- Stand behind a sturdy chair and hold the backrest.
- Keep your chest tall and feet hip-width apart.
- Shift your weight slightly onto one leg.
- Lift the other leg out to the side.
- Keep the toes pointing forward.
- Pause briefly, then lower with control.
- Complete all reps, then switch sides.
Common mistakes: Leaning the torso, turning the toes outward, swinging the leg, or lifting too high.
Expert tip: Keep the movement small and clean. The side hip should work more than the lower back.
Exercise variations: Try standing hip abduction, band hip abduction, or alternating side leg lifts.
Easier variation: Reduce the range of motion and keep both hands firmly on the chair.
Harder variation: Add a resistance band or slow the lowering phase.
Beginner Chair Exercise Routine for Seniors
This routine uses simple movements from the list above. It trains the full body without requiring you to get on the floor.
| Exercise | Sets and reps | Rest |
|---|---|---|
| Seated March | 2 sets of 30 seconds | 30 seconds |
| Seated Heel and Toe Raises | 2 sets of 12 reps | 30 seconds |
| Seated Leg Extension | 2 sets of 8 reps per leg | 45 seconds |
| Seated Arm Raises | 2 sets of 8 reps | 45 seconds |
| Seated Row With Band | 2 sets of 10 reps | 60 seconds |
| Sit-to-Stand | 2 sets of 5 reps | 60 to 90 seconds |
| Seated Torso Twist | 2 sets of 5 reps per side | 30 seconds |
| Seated Cat-Cow | 1 set of 6 slow reps | As needed |
Start with 2 days per week. If your body feels good and recovery is easy, build toward 3 days per week. Keep the effort around 4 to 6 out of 10. You should finish feeling like you did useful work, not like you pushed to exhaustion.
To progress, add one or two reps per set, add a second or third set, slow down the lowering phase, or use light resistance. Only change one thing at a time.
How Often Should Seniors Do Chair Exercises?
Many seniors can do gentle mobility-based chair exercises most days, especially short movements like seated marches, heel and toe raises, cat-cow, and torso twists. Strength-focused exercises such as sit-to-stands, rows, presses, curls, and leg extensions are often best done 2 to 3 times per week with rest between harder sessions.
The British Heart Foundation chair exercise routine suggests starting slowly and building gradually. That is a smart approach. Consistency matters more than doing too much at once.
A simple weekly plan could include chair strength training on Monday, Wednesday, and Friday, with light walking or gentle mobility on other days if tolerated.
Common Mistakes to Avoid
The first mistake is using the wrong chair. A soft couch, rolling chair, or unstable seat can make the exercises less safe. Choose a firm, steady chair.
The second mistake is rushing. Chair exercises work best when the reps are controlled. Move slowly enough that you can feel the target muscles working.
The third mistake is holding your breath. Breathe naturally during each rep, especially during sit-to-stands, presses, and band exercises.
The fourth mistake is ignoring pain or unusual symptoms. Mild muscle effort is normal. Sharp pain, chest pain, dizziness, numbness, or unusual shortness of breath is not something to push through.
The fifth mistake is never progressing. Once a routine feels too easy, add a small challenge. More reps, slower tempo, or light resistance can make the same exercise more effective.
FAQ
Do chair exercises really work for seniors?
Yes, chair exercises can be useful when they are done consistently and with good form. They may help support strength, mobility, balance, posture, and daily movement ability. A review on chair-based exercise and physical function in older adults found benefits across several physical function measures, including balance, gait speed, and grip strength.
Can seniors build strength with chair exercises?
Yes. Chair exercises can build strength when the muscles are challenged enough. Exercises like sit-to-stands, leg extensions, band rows, band chest presses, overhead presses, and biceps curls can all be progressed with more reps, slower tempo, extra sets, or light resistance.
What is the best chair exercise for seniors?
The best overall chair exercise is often the sit-to-stand because it trains a movement seniors use every day. For beginners or people with limited mobility, seated marches and seated leg extensions are good starting points.
Are chair exercises safe to do every day?
Gentle mobility exercises may be safe for many people to do daily. Harder strengthening exercises usually need recovery time, so 2 to 3 sessions per week is a better starting point. The right frequency depends on fitness level, health status, soreness, and recovery.
What equipment do seniors need for chair exercises?
A sturdy chair is the main piece of equipment. Light dumbbells, water bottles, and resistance bands are optional. Start without extra equipment if form, balance, or confidence is still developing.
Should chair exercises replace walking?
Chair exercises should not automatically replace walking if walking is safe and comfortable for you. They can work alongside walking by adding strength, mobility, and balance practice. If walking is difficult, chair exercises can be a useful way to stay active while building capacity gradually.
Conclusion
Chair exercises for seniors are a practical way to build strength, improve mobility, support balance, and stay active at home. Start with simple seated movements, use a sturdy chair, move with control, and progress gradually.
For the best results, choose exercises that train the legs, hips, core, back, shoulders, and arms. A short routine done consistently can be more valuable than a long workout done only once in a while.
This content is for informational purposes only and is not a substitute for professional medical advice.