Pilates board exercises are low-impact, reformer-inspired moves that use a sliding board and resistance cords to train your core, glutes, legs, back, chest, shoulders, and arms at home. They are useful for building full-body strength because they combine controlled movement, balance, resistance, and core stability in one compact setup.
A Pilates board is not the same as a studio reformer. A reformer uses a carriage, springs, pulleys, and a larger frame, while most Pilates boards use a smaller sliding surface and resistance cords. Still, the training idea is similar: move with control, keep your body aligned, and use resistance to challenge your muscles through a smooth range of motion. Balanced Body describes reformer Pilates as controlled, precise movement that can support strength, flexibility, balance, and full-body muscle engagement.
In this guide, you will learn the best Pilates board exercises for full-body strength, how to do each move with proper form, common mistakes to avoid, and how to turn the exercises into a safe beginner or intermediate workout.
What Are Pilates Board Exercises?
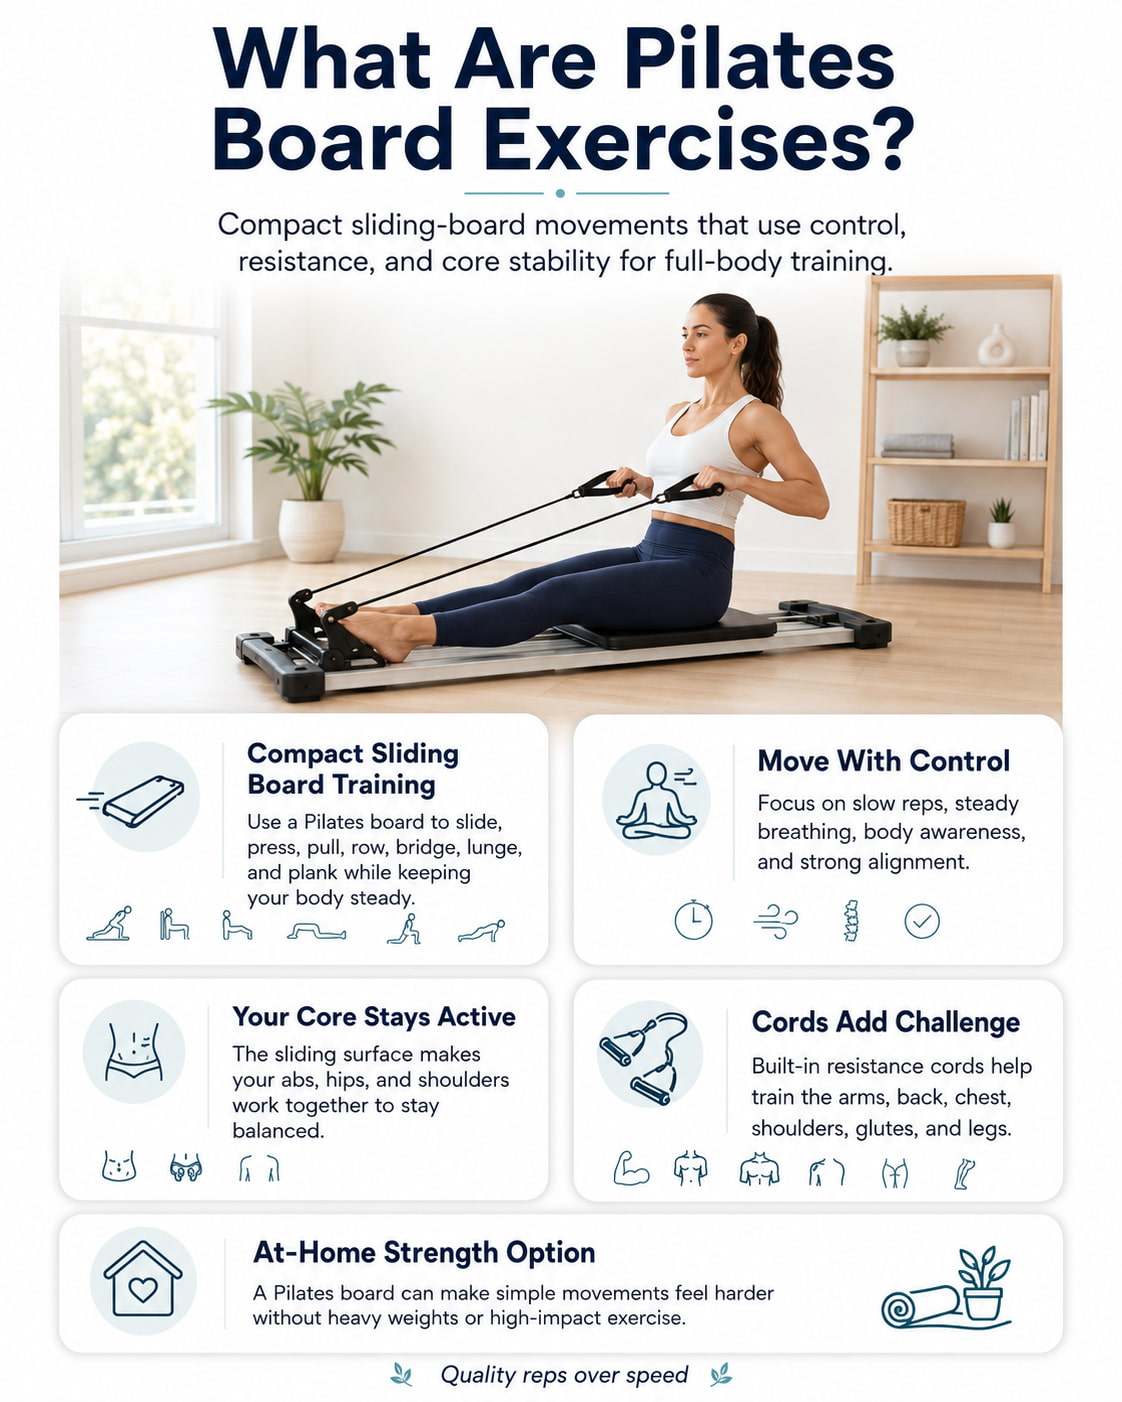
Pilates board exercises are movements performed on a compact sliding board, usually with built-in resistance cords or handles. The board lets you slide, press, pull, row, bridge, lunge, and plank while your core works to keep your body steady.
Most exercises use slow, controlled movement instead of speed. That fits the main idea of Pilates: quality reps, steady breathing, body awareness, and strong alignment. Cleveland Clinic explains that Pilates uses concentration, core engagement, flowing movement, precision, and breath control.
Pilates board training can be useful if you want a low-impact home workout that still challenges your muscles. The board can make simple movements feel harder because your body has to control the sliding surface, resist the cords, and stay stable at the same time.
Benefits of Pilates Board Exercises
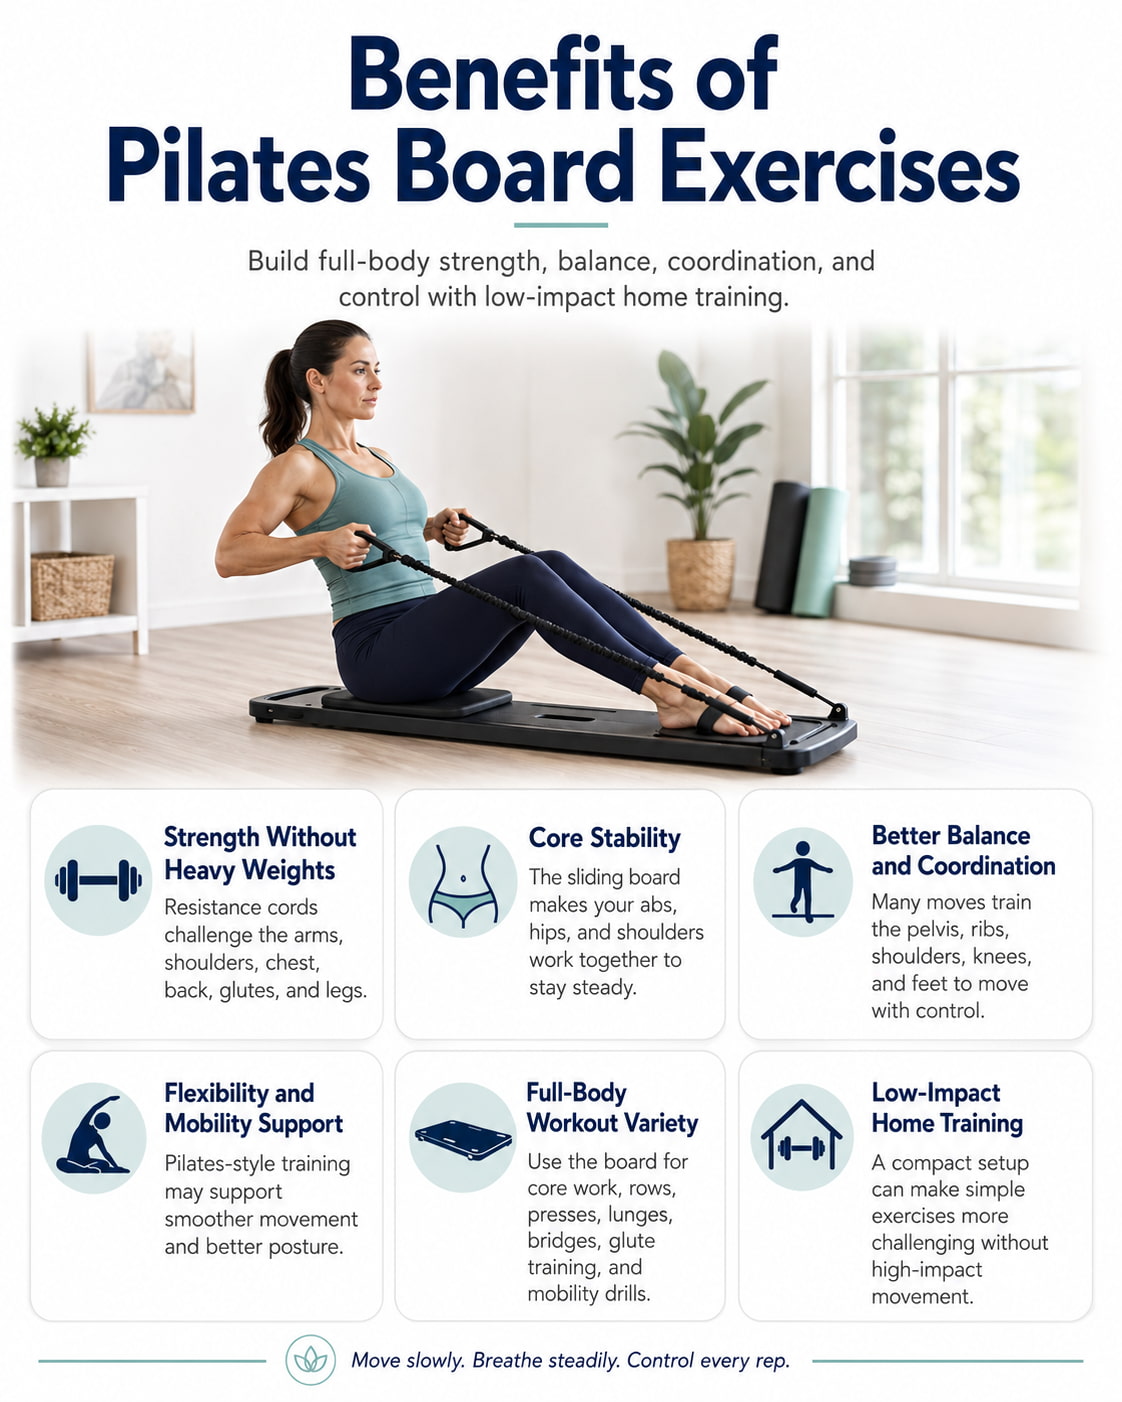
Pilates board exercises can help build strength without heavy weights. The resistance cords challenge your arms, shoulders, chest, and back, while the sliding board challenges your core, hips, glutes, hamstrings, and quads.
They may also help improve balance and coordination because many moves require you to control your pelvis, rib cage, shoulders, knees, and feet together. ACE describes Pilates as a low-intensity, muscle-strengthening workout that can support flexibility, mobility, and posture.
Another benefit is workout variety. You can use a Pilates board for core training, upper-body resistance work, lower-body strength, glute training, and mobility-focused movement. That makes it easier to build a full-body session without needing a large amount of equipment.
How to Use a Pilates Board Safely
Start with simple movements before advanced plank glides, long lunges, or heavy resistance-cord exercises. Your first goal is to control the board, not to chase the hardest variation.
Keep your movements slow. If the board snaps back, your hips twist, your lower back arches, or your shoulders shrug toward your ears, the exercise is too hard for your current setup. Reduce the range of motion, lighten the resistance, or choose the easier variation.
For lower-body exercises, keep your knees tracking in the same direction as your toes. For core exercises, keep your ribs stacked over your pelvis and avoid letting your lower back sag. Merrithew’s equipment-based Pilates guidance emphasizes stable pelvis position, stable shoulders and torso, and proper knee and ankle tracking during lower-body movement.
Stop exercising and seek professional help if you feel sharp pain, numbness, dizziness, chest pain, unusual shortness of breath, or symptoms that do not feel normal for you. Mayo Clinic notes that dizziness, unusual shortness of breath, chest pain, or irregular heartbeat can be signs to stop exercise, especially for people with heart-related concerns.
12 Pilates Board Exercises for Full Body Strength
The exercises below are arranged to train your full body. You will find core work, lower-body strength, glute and hamstring exercises, upper-body pulling, pressing, and posture-supporting movements.
1. Pilates Board Footwork Press Out
Best for: Lower-body strength, knee tracking, ankle control, and learning how to press through the feet with control.
Muscles worked: Quads, glutes, hamstrings, calves, inner thighs, hip stabilizers, and core.
Equipment needed: Pilates board with a sliding platform or foot support.
Why it stands out: This is one of the best beginner Pilates board exercises because it teaches controlled pressing without needing to stand. It is similar in concept to reformer footwork, but simplified for a compact board.
Suggested sets and reps: Perform 2 to 3 sets of 10 to 15 reps.
Beginners: Use a short range of motion and move slowly. Keep both feet flat and avoid locking your knees at the end.
Intermediate: Increase the range of motion slightly and pause for one second at the fully pressed position.
Advanced: Use slower tempo, single-leg support if your board allows it, or added cord resistance only when your alignment stays clean.
Rest: Rest 30 to 60 seconds between sets.
How to do it:
- Lie on your back or sit in the board’s supported position, depending on your model.
- Place your feet hip-width apart on the foot area.
- Brace your core and keep your pelvis steady.
- Press the platform away by extending your knees and hips.
- Stop before your knees fully lock.
- Return slowly and keep both knees tracking over your toes.
Common mistakes: The most common mistakes are letting the knees cave inward, locking the knees hard, rushing the return, or letting the pelvis rock side to side.
Expert tip: Think about pressing evenly through your heel, big toe, and little toe so your foot stays balanced.
Exercise variations: Try parallel feet, slightly turned-out feet, or heel-raised calf-focused reps if your board setup allows them safely.
Easier variation: Reduce the sliding distance and use no added resistance.
Harder variation: Add a three-second return or pause halfway back to increase control.
2. Kneeling Pilates Board Roll Out
Best for: Core strength, anti-extension control, shoulder stability, and learning how to resist lower-back arching.
Muscles worked: Rectus abdominis, transverse abdominis, obliques, lats, shoulders, chest, triceps, and hip flexors.
Equipment needed: Pilates board with handles or a sliding carriage.
Why it stands out: The roll-out challenges your core because your body has to stay long and stable while the board moves away from you. It is excellent for teaching control through the trunk.
Suggested sets and reps: Perform 2 to 3 sets of 6 to 10 reps.
Beginners: Keep the range very short. Only slide as far as you can while keeping your ribs down and hips stable.
Intermediate: Increase the glide distance and use a slower return.
Advanced: Add a pause in the extended position or use a longer range while keeping perfect form.
Rest: Rest 45 to 75 seconds between sets.
How to do it:
- Kneel behind the board with your hands on the handles or sliding platform.
- Keep your knees under your hips and your ribs stacked over your pelvis.
- Brace your core and gently squeeze your glutes.
- Slide the board forward slowly.
- Stop before your lower back arches.
- Pull the board back under control and return to the start.
Common mistakes: Avoid reaching too far, dropping your hips, flaring your ribs, shrugging your shoulders, or using momentum to pull back.
Expert tip: Make the movement smaller than you think at first. A short, clean roll-out is better than a long rep with a sagging back.
Exercise variations: Use a forearm version, a straight-arm version, or a pause variation.
Easier variation: Place a folded towel under your knees and shorten the glide.
Harder variation: Add a slow four-second lowering phase before pulling back.
3. Forearm Plank Glide
Best for: Deep core control, shoulder stability, and full-body tension.
Muscles worked: Abs, obliques, transverse abdominis, shoulders, serratus anterior, glutes, quads, and hip flexors.
Equipment needed: Pilates board with a sliding surface.
Why it stands out: This move turns a regular plank into a moving core exercise. Your body has to resist both forward-backward sliding and unwanted hip movement.
Suggested sets and reps: Perform 2 to 3 sets of 6 to 12 controlled glides.
Beginners: Start on your knees or keep the glide very small.
Intermediate: Use a full forearm plank and glide slowly.
Advanced: Add a pause at the farthest point or alternate small circles if your board moves smoothly.
Rest: Rest 45 to 75 seconds between sets.
How to do it:
- Place your forearms on the board and step into a plank.
- Keep your elbows under your shoulders.
- Brace your abs and squeeze your glutes lightly.
- Slide your forearms forward a few inches.
- Pull the board back without lifting your hips.
- Keep your neck long and your breathing steady.
Common mistakes: The main mistakes are sagging the lower back, hiking the hips, holding the breath, or letting the shoulders collapse.
Expert tip: Imagine pulling your elbows toward your toes without actually moving them. This helps turn on your lats and core.
Exercise variations: Try knee plank glides, full plank glides, or small side-to-side glides.
Easier variation: Perform the move from your knees.
Harder variation: Use a longer glide or slow each rep to a five-second count.
4. Pilates Push Up on Board Handles
Best for: Chest, shoulders, triceps, and core strength.
Muscles worked: Chest, anterior deltoids, triceps, serratus anterior, abs, glutes, and quads.
Equipment needed: Pilates board handles or stable hand grips.
Why it stands out: The handles can create a comfortable hand position, while the unstable board setup forces your core and shoulders to stay active.
Suggested sets and reps: Perform 2 to 4 sets of 6 to 12 reps.
Beginners: Start with knees down or hands elevated if your setup allows it.
Intermediate: Use a full plank push-up with a controlled lowering phase.
Advanced: Add a slow tempo or pause near the bottom.
Rest: Rest 60 to 90 seconds between sets.
How to do it:
- Place your hands on the board handles.
- Step into a plank or kneeling plank.
- Keep your body in a straight line from head to knees or head to heels.
- Bend your elbows and lower your chest with control.
- Keep your elbows about 30 to 45 degrees from your body.
- Press back up without letting your hips sag.
Common mistakes: Avoid flaring your elbows straight out, dropping your hips, craning your neck, or bouncing out of the bottom.
Expert tip: Push the handles away from you at the top to keep your shoulder blades active.
Exercise variations: Use kneeling push-ups, full push-ups, slow eccentric push-ups, or close-grip push-ups.
Easier variation: Perform the push-up from your knees.
Harder variation: Add a three-second lower and one-second pause at the bottom.
5. Seated Resistance Band Row
Best for: Back strength, posture-supporting muscles, and shoulder control.
Muscles worked: Lats, rhomboids, middle traps, rear delts, biceps, forearms, and core.
Equipment needed: Pilates board resistance cords or bands.
Why it stands out: Many home workouts overuse pressing and core moves. Rows balance the program by strengthening the upper back and improving pulling strength.
Suggested sets and reps: Perform 2 to 4 sets of 10 to 15 reps.
Beginners: Sit tall and use light resistance. Focus on smooth shoulder blade movement.
Intermediate: Increase cord tension or pause with the elbows pulled back.
Advanced: Use a slower return and keep your torso perfectly still.
Rest: Rest 45 to 75 seconds between sets.
How to do it:
- Sit tall on or near the board with the cords in your hands.
- Extend your arms forward with your shoulders relaxed.
- Brace your core and keep your chest lifted.
- Pull your elbows back toward your ribs.
- Squeeze your shoulder blades gently.
- Return slowly until your arms are straight again.
Common mistakes: Avoid leaning back to finish the rep, shrugging your shoulders, jerking the cords, or letting the bands snap forward.
Expert tip: Lead with your elbows, not your hands. This helps your back do more work.
Exercise variations: Try a neutral-grip row, wide row, single-arm row, or high row.
Easier variation: Use lighter resistance and sit closer to the anchor point.
Harder variation: Add a two-second squeeze at the end of each rep.
6. Kneeling Resistance Band Chest Press
Best for: Chest, shoulder, triceps, and core strength.
Muscles worked: Chest, anterior deltoids, triceps, serratus anterior, abs, obliques, and glutes.
Equipment needed: Pilates board resistance cords.
Why it stands out: This exercise trains pressing strength without needing dumbbells. The kneeling position also teaches your core to resist arching and twisting.
Suggested sets and reps: Perform 2 to 3 sets of 8 to 12 reps.
Beginners: Use light resistance and keep your ribs down.
Intermediate: Press with stronger resistance while keeping your torso still.
Advanced: Use a half-kneeling position to add an anti-rotation challenge.
Rest: Rest 45 to 75 seconds between sets.
How to do it:
- Kneel facing away from the cord anchor.
- Hold one handle in each hand at chest height.
- Brace your core and keep your glutes lightly engaged.
- Press both handles forward until your arms are almost straight.
- Keep your shoulders down and your ribs from flaring.
- Return slowly to the starting position.
Common mistakes: Avoid arching your back, letting the cords pull your arms behind your shoulders, shrugging, or pressing too fast.
Expert tip: Keep your sternum quiet. Your arms should move while your torso stays steady.
Exercise variations: Try tall-kneeling, half-kneeling, single-arm, or alternating-arm chest presses.
Easier variation: Use lighter cord tension and a shorter pressing range.
Harder variation: Use half-kneeling single-arm presses to challenge core stability.
7. Standing Band Squat
Best for: Lower-body strength, full-body coordination, and beginner-friendly resistance training.
Muscles worked: Quads, glutes, hamstrings, calves, core, upper back, and shoulders.
Equipment needed: Pilates board resistance cords.
Why it stands out: The squat trains the legs while the cords add upper-body tension. This makes it a simple full-body strength move.
Suggested sets and reps: Perform 2 to 4 sets of 8 to 15 reps.
Beginners: Use a shallow squat and light cord tension.
Intermediate: Squat lower while maintaining control and a stable torso.
Advanced: Add a press at the top if your shoulders stay comfortable and controlled.
Rest: Rest 60 to 90 seconds between sets.
How to do it:
- Stand on the board or stable foot area with your feet about hip-width apart.
- Hold the cords near your shoulders or at your sides.
- Brace your core and keep your chest lifted.
- Bend your knees and hips to lower into a squat.
- Keep your knees tracking over your toes.
- Drive through your feet to stand tall again.
Common mistakes: Avoid knees collapsing inward, heels lifting, rounding your back, or pulling the cords with your arms instead of controlling the squat.
Expert tip: Think about sitting between your heels instead of folding forward from your chest.
Exercise variations: Try a squat to row, squat to press, tempo squat, or narrow-stance squat.
Easier variation: Perform a partial squat with no added arm movement.
Harder variation: Add a slow three-second lower or a press at the top.
8. Reverse Lunge Glide
Best for: Glutes, quads, balance, hip control, and single-leg strength.
Muscles worked: Glutes, quads, hamstrings, calves, adductors, hip stabilizers, and core.
Equipment needed: Pilates board with sliding platform.
Why it stands out: The sliding reverse lunge trains one leg at a time while reducing impact. It is especially useful for building control through the hips and knees.
Suggested sets and reps: Perform 2 to 3 sets of 8 to 12 reps per side.
Beginners: Use a short glide and hold a stable support if needed.
Intermediate: Use a longer glide and keep your front foot planted.
Advanced: Add resistance cords or a slower lowering phase.
Rest: Rest 45 to 75 seconds between sides.
How to do it:
- Stand with one foot stable and the other foot on the sliding board.
- Brace your core and keep your chest tall.
- Slide the moving foot backward into a reverse lunge.
- Keep your front knee tracking over your toes.
- Stop at a range you can control.
- Pull the back foot forward and return to standing.
Common mistakes: Avoid pushing the front knee inward, leaning too far forward, letting the back leg slide too far, or losing control on the return.
Expert tip: Most of the work should happen in the front leg. Use the sliding leg for guidance, not momentum.
Exercise variations: Try supported reverse lunges, alternating lunges, tempo lunges, or reverse lunge to knee drive.
Easier variation: Hold a wall, chair, or stable surface and use a smaller glide.
Harder variation: Add a two-second pause at the bottom or use light cord resistance.
9. Lateral Lunge Glide
Best for: Inner thighs, glutes, side-to-side strength, and hip mobility.
Muscles worked: Glutes, quads, adductors, hamstrings, calves, hip abductors, and core.
Equipment needed: Pilates board with sliding platform.
Why it stands out: Many workouts focus only on forward and backward movement. The lateral lunge glide trains side-to-side control, which is important for balanced lower-body strength.
Suggested sets and reps: Perform 2 to 3 sets of 8 to 12 reps per side.
Beginners: Keep the glide short and bend the standing leg only slightly.
Intermediate: Increase the side glide while keeping your hips back.
Advanced: Add a slower return or light resistance if your board allows it.
Rest: Rest 45 to 75 seconds between sides.
How to do it:
- Stand with one foot stable and the other foot on the sliding board.
- Keep your chest lifted and core braced.
- Slide the moving leg out to the side.
- Bend the standing knee and sit your hips back.
- Keep the moving leg mostly straight.
- Pull the sliding foot back under control.
Common mistakes: Avoid collapsing into the standing knee, rounding your back, shifting onto the toes, or sliding farther than your hips can control.
Expert tip: Keep the standing foot rooted and imagine dragging the floor back in with your inner thigh.
Exercise variations: Try supported lateral lunges, alternating lateral glides, or lateral lunge to balance.
Easier variation: Hold a stable surface and use a smaller side glide.
Harder variation: Add a three-second return to make the adductors work harder.
10. Glute Bridge With Foot Press
Best for: Glute strength, hip extension, hamstring control, and core stability.
Muscles worked: Glutes, hamstrings, core, lower back stabilizers, and calves.
Equipment needed: Pilates board with foot platform or sliding surface.
Why it stands out: The bridge trains the backside of the body while teaching your pelvis to stay steady. Adding a foot press makes the move more active through the legs.
Suggested sets and reps: Perform 2 to 4 sets of 10 to 15 reps.
Beginners: Start with a regular glute bridge without sliding.
Intermediate: Add a small foot press while keeping your hips level.
Advanced: Use single-leg support or a longer press-out if your board is stable.
Rest: Rest 45 to 75 seconds between sets.
How to do it:
- Lie on your back with your knees bent and feet on the board area.
- Brace your core and keep your ribs down.
- Press through your heels and lift your hips.
- Hold the bridge position.
- Press your feet slightly away if your board allows it.
- Return slowly and lower your hips with control.
Common mistakes: Avoid over-arching the lower back, lifting too high, letting the knees drift outward or inward, or pushing through your toes only.
Expert tip: Finish each rep by squeezing your glutes, not by arching your spine.
Exercise variations: Try regular bridges, bridge holds, bridge marches, or single-leg bridges.
Easier variation: Do a floor glute bridge beside the board.
Harder variation: Add a three-second hold at the top or perform controlled bridge press-outs.
11. Hamstring Curl Bridge
Best for: Hamstring strength, glute control, and posterior-chain endurance.
Muscles worked: Hamstrings, glutes, calves, core, and hip stabilizers.
Equipment needed: Pilates board with sliding foot surface.
Why it stands out: This is one of the most challenging lower-body Pilates board exercises because the hamstrings must bend the knees while the glutes keep the hips lifted.
Suggested sets and reps: Perform 2 to 3 sets of 6 to 10 reps.
Beginners: Start with hips down or use a very small range.
Intermediate: Keep hips lifted through the full curl.
Advanced: Try single-leg eccentric curls or slower tempo reps.
Rest: Rest 60 to 90 seconds between sets.
How to do it:
- Lie on your back with your heels on the sliding surface.
- Lift your hips into a bridge.
- Keep your ribs down and pelvis level.
- Slowly slide your heels away from your body.
- Pull your heels back toward your glutes.
- Keep your hips from dropping during the curl.
Common mistakes: Avoid letting your hips fall, cramping from pushing through the toes, arching your lower back, or sliding too far too soon.
Expert tip: Keep your heels heavy and move slowly. The return is where many people lose control.
Exercise variations: Try double-leg curls, eccentric-only curls, single-leg supported curls, or bridge hold curls.
Easier variation: Keep your hips on the floor and practice small heel slides.
Harder variation: Perform a slow three-second slide out and one-second curl back.
12. Seated Biceps Curl With Cords
Best for: Arm strength, posture control, and beginner-friendly resistance work.
Muscles worked: Biceps, brachialis, forearms, shoulders, upper back, and core.
Equipment needed: Pilates board resistance cords.
Why it stands out: This move is simple but useful because it lets you train the arms while practicing upright posture and smooth resistance control.
Suggested sets and reps: Perform 2 to 3 sets of 10 to 15 reps.
Beginners: Use light resistance and keep the elbows close to your sides.
Intermediate: Add a slower lowering phase.
Advanced: Use a tall-kneeling position or single-arm curls to challenge posture and core control.
Rest: Rest 30 to 60 seconds between sets.
How to do it:
- Sit tall with one handle in each hand.
- Keep your elbows close to your ribs.
- Brace your core and relax your shoulders.
- Curl the handles toward your shoulders.
- Squeeze briefly at the top.
- Lower slowly until your arms are straight.
Common mistakes: Avoid leaning back, swinging the cords, letting your elbows drift forward, or shrugging your shoulders.
Expert tip: Treat the lowering phase as part of the exercise. Do not let the cords pull your hands down quickly.
Exercise variations: Try standard curls, hammer curls, alternating curls, or kneeling curls.
Easier variation: Use lighter cord tension and a smaller range.
Harder variation: Add a three-second lowering phase on every rep.
Beginner Pilates Board Workout Routine
A beginner can use Pilates board exercises 2 to 3 days per week, leaving at least one rest or easier movement day between sessions. The CDC recommends muscle-strengthening activity at least 2 days per week for adults, which supports a simple full-body routine that trains the major muscle groups.
For a beginner session, use Pilates Board Footwork Press Out for 2 sets of 12 reps, Kneeling Pilates Board Roll Out for 2 sets of 6 reps, Seated Resistance Band Row for 2 sets of 12 reps, Kneeling Resistance Band Chest Press for 2 sets of 10 reps, Reverse Lunge Glide for 2 sets of 8 reps per side, and Glute Bridge With Foot Press for 2 sets of 10 reps.
Keep the effort around 6 out of 10. You should finish each set feeling like you could still do 2 to 4 clean reps. Rest 45 to 75 seconds between exercises and move slowly enough that the board never snaps back.
Intermediate Pilates Board Workout Routine
An intermediate routine can use more volume and slightly harder variations. Train 2 to 3 days per week, or use this as a full-body accessory session between heavier strength workouts.
Use Forearm Plank Glide for 3 sets of 8 reps, Pilates Push Up on Board Handles for 3 sets of 8 to 12 reps, Seated Resistance Band Row for 3 sets of 12 reps, Standing Band Squat for 3 sets of 12 reps, Reverse Lunge Glide for 3 sets of 10 reps per side, Hamstring Curl Bridge for 3 sets of 8 reps, and Prone Back Extension With Band Pull Down for 2 sets of 10 reps.
Keep the effort around 7 to 8 out of 10. The last few reps should feel challenging, but your form should still look controlled. If your hips twist, knees collapse, wrists hurt, or your lower back takes over, reduce the range or choose the easier variation.
How to Progress Pilates Board Exercises
Progress slowly. The best way to improve is to make the same movement cleaner before making it harder.
You can progress Pilates board exercises by increasing reps, adding a set, slowing the lowering phase, increasing the sliding distance, using a slightly stronger resistance cord, adding a pause, or moving from double-leg to single-leg work.
Merrithew notes that reformer spring tension can either support a movement or increase the challenge depending on the person’s level and goal. The same idea applies to resistance cords on a Pilates board: more resistance is not always better if it makes your movement sloppy.
A good progression rule is simple: move up only when you can complete all reps with steady breathing, smooth sliding, stable joints, and no sharp pain.
Common Mistakes to Avoid
The first mistake is moving too fast. Pilates board exercises work best when you control both directions of the movement. If the board rushes back, you are losing one of the most important parts of the exercise.
The second mistake is using too much range of motion. A long roll-out, deep lunge, or wide lateral glide is only useful if your hips, spine, knees, and shoulders stay aligned.
The third mistake is treating the board like a core-only tool. A good routine should include pulling, pressing, squatting, lunging, bridging, and back-extension patterns so the whole body gets trained.
The fourth mistake is ignoring setup. Check that the board is on a flat surface, the cords are secured, your feet are placed evenly, and you have enough room to move before starting.
The fifth mistake is pushing through warning signs. Muscle effort is normal. Sharp pain, numbness, chest pain, dizziness, or unusual symptoms are not something to train through.
FAQs About Pilates Board Exercises
Are Pilates board exercises good for beginners?
Yes, Pilates board exercises can be good for beginners when the movements are simple, slow, and controlled. Beginners should start with footwork, seated rows, bridges, short roll-outs, and supported lunges before trying long plank glides or advanced single-leg moves.
Can a Pilates board replace a reformer?
A Pilates board can mimic some reformer-inspired patterns, but it does not fully replace a studio reformer. A reformer has a larger sliding carriage, springs, pulleys, a footbar, and more adjustable support. A Pilates board is better viewed as a compact home tool for gliding, resistance-cord work, and low-impact strength training.
What muscles do Pilates board exercises work?
Pilates board exercises can work the abs, obliques, glutes, quads, hamstrings, calves, chest, shoulders, back, arms, and hip stabilizers. The exact muscles depend on the exercise. Plank glides focus more on the core and shoulders, while lunges and bridges focus more on the legs and glutes.
How often should you do Pilates board workouts?
Most people can start with 2 to 3 Pilates board workouts per week. Leave time between harder sessions so your muscles and joints can recover. You can also use short, easier sessions for mobility, breathing, and light movement on other days.
Are Pilates board exercises enough for strength training?
They can be enough for general strength, endurance, and body control, especially for beginners and home exercisers. If your goal is maximal strength or significant muscle growth, you may eventually need heavier resistance training with dumbbells, machines, cables, or barbells.
Why does my lower back hurt during Pilates board exercises?
Your lower back may feel uncomfortable if the exercise is too advanced, your range is too large, your core is not staying braced, or your pelvis is moving too much. Stop the exercise, reduce the range, choose an easier variation, and seek guidance from a qualified professional if discomfort continues.
What is the best Pilates board exercise for core strength?
The kneeling roll-out and forearm plank glide are two of the best Pilates board exercises for core strength. Both train your abs to resist extension, which means your core works to keep your spine and pelvis stable while the board moves.
Conclusion
Pilates board exercises are a practical way to build full-body strength at home with a compact, low-impact setup. Start with controlled basics like footwork, rows, bridges, and short roll-outs, then progress to lunges, plank glides, hamstring curls, and stronger resistance-cord work as your form improves.
The key is not speed or extreme range. Move slowly, breathe steadily, keep your joints aligned, and progress only when each rep feels stable and controlled.
This content is for informational purposes only and is not a substitute for professional medical advice.
References
- Cleveland Clinic: Pilates 101: What It Is and Health Benefits
- ACE: Pilates Health Benefits, How to Get Started, and How to Get Better
- Balanced Body: The Ultimate Guide to the Pilates Reformer
- Merrithew: 3 Exercises to Kickstart Your At-Home Reformer Pilates Practice
- CDC: Adult Physical Activity Guidelines
Best meta description:
Explore 12 Pilates board exercises for full-body strength, with form tips, muscles worked, beginner options, progressions, and sample workouts.
Length: 148 characters