
Plank exercises are core-strength movements that train your body to stay stable, braced, and aligned while your arms, legs, or torso resist movement. They are useful for building better core control, improving workout performance, and adding no-equipment strength work to your routine.
This guide covers proper plank form, muscles worked, benefits, common mistakes, beginner and advanced variations, and simple plank workouts you can use at home or in the gym.
What Are Plank Exercises?
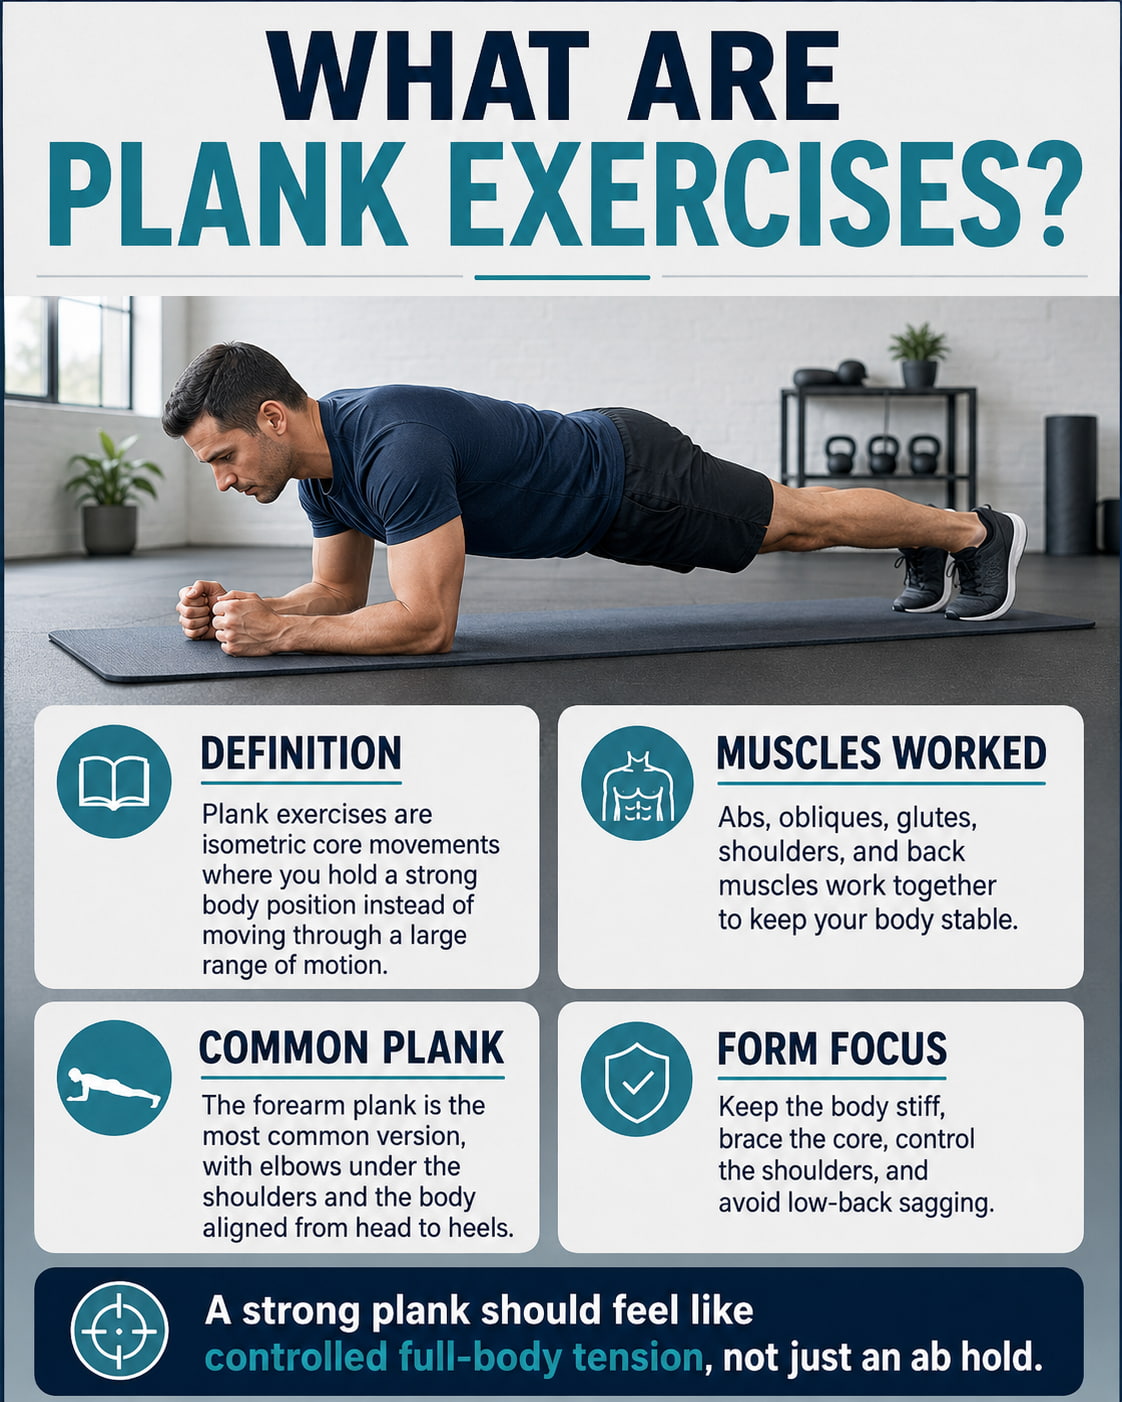
Plank exercises are isometric core movements. That means you hold a strong body position instead of moving through a large range of motion. During a plank, your abs, obliques, glutes, shoulders, and back muscles work together to keep your body from sagging, twisting, or arching.
The most common version is the forearm plank, where your elbows stay under your shoulders and your body forms a straight line from head to heels. The ACE Fitness front plank guide emphasizes keeping the body stiff, avoiding low-back sagging, and maintaining shoulder control.
Planks are simple, but they are not easy when done well. A strong plank should feel like controlled full-body tension, not just an ab hold.
Muscles Worked by Plank Exercises
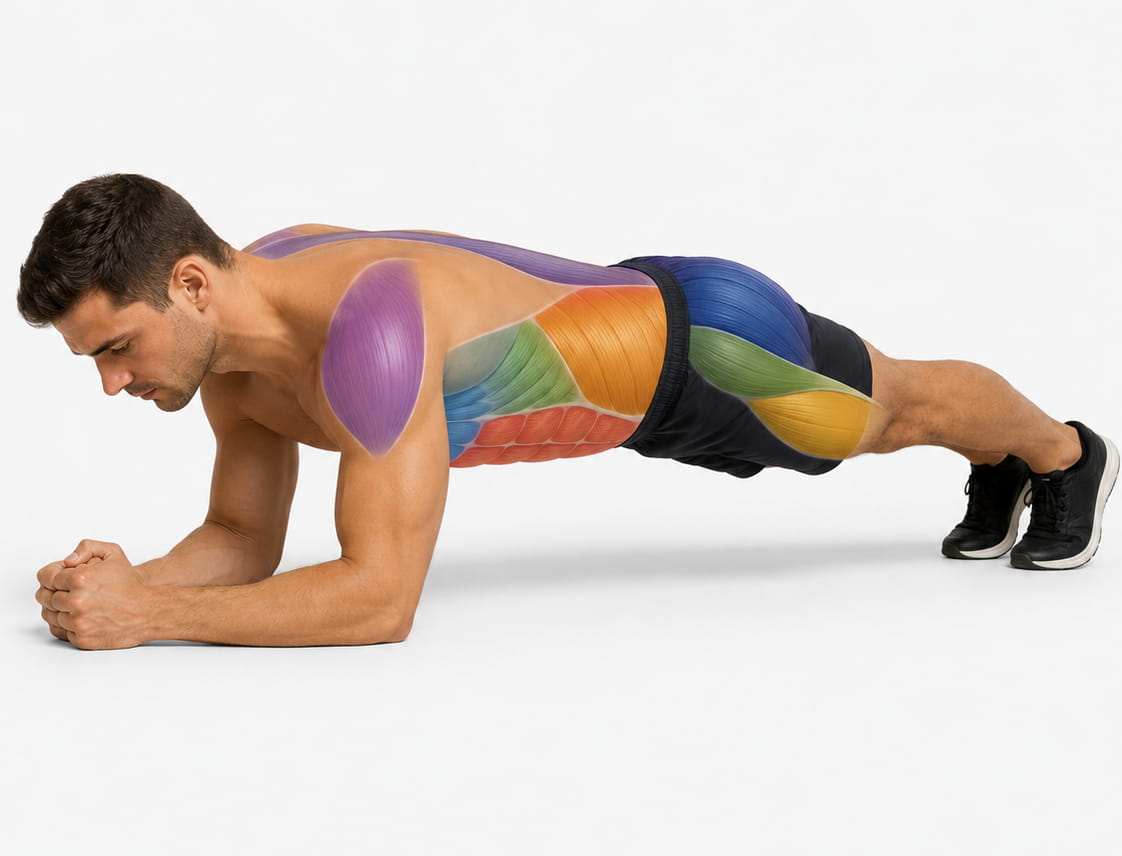
Plank exercises mainly train the core, but they also use several supporting muscles.
The rectus abdominis helps brace the front of your trunk. The transverse abdominis works like a deep support belt around your midsection. The internal and external obliques help resist rotation and side bending. The spinal stabilizers help keep your torso from collapsing.
The glutes help keep the hips extended and prevent the lower back from taking over. The quadriceps help keep the legs straight in standard plank variations. The shoulders, serratus anterior, chest, and upper-back muscles help support your body when your hands or forearms are on the floor.
The Cleveland Clinic plank benefits guide explains that planks train the core muscles between the pelvic floor and diaphragm while also involving muscles such as the glutes, hamstrings, and lower back.
Benefits of Plank Exercises
1. Planks Build Core Bracing Strength
Planks teach your core to resist movement. This is important because your trunk often needs to stay stable while your arms and legs move during squats, deadlifts, lunges, push-ups, running, and daily activities.
A good plank is not about relaxing into the floor. It is about creating enough tension through your abs, glutes, and upper body to hold a strong position.
2. Planks Improve Body Control
Plank exercises help you notice how your ribs, pelvis, hips, shoulders, and neck are positioned. This can carry over to better control during other exercises.
For example, if your hips sag during a plank, you may also struggle to keep your spine stable during push-ups or mountain climbers. Learning to control that position can make other movements cleaner.
3. Planks Require Little Equipment
Most plank exercises need only your body weight. You can use an exercise mat for comfort, but you do not need a full gym setup.
That makes planks useful for home workouts, warm-ups, core finishers, travel workouts, and beginner strength programs.
4. Planks Are Easy to Scale
A beginner can start with an incline plank or knee plank. An intermediate trainee can use side planks, shoulder taps, and leg lifts. A more advanced trainee can progress to body saws, plank rows, or longer high-quality holds.
The key is choosing the plank that lets you keep control without sagging, twisting, or holding your breath.
How to Choose the Right Plank Exercise
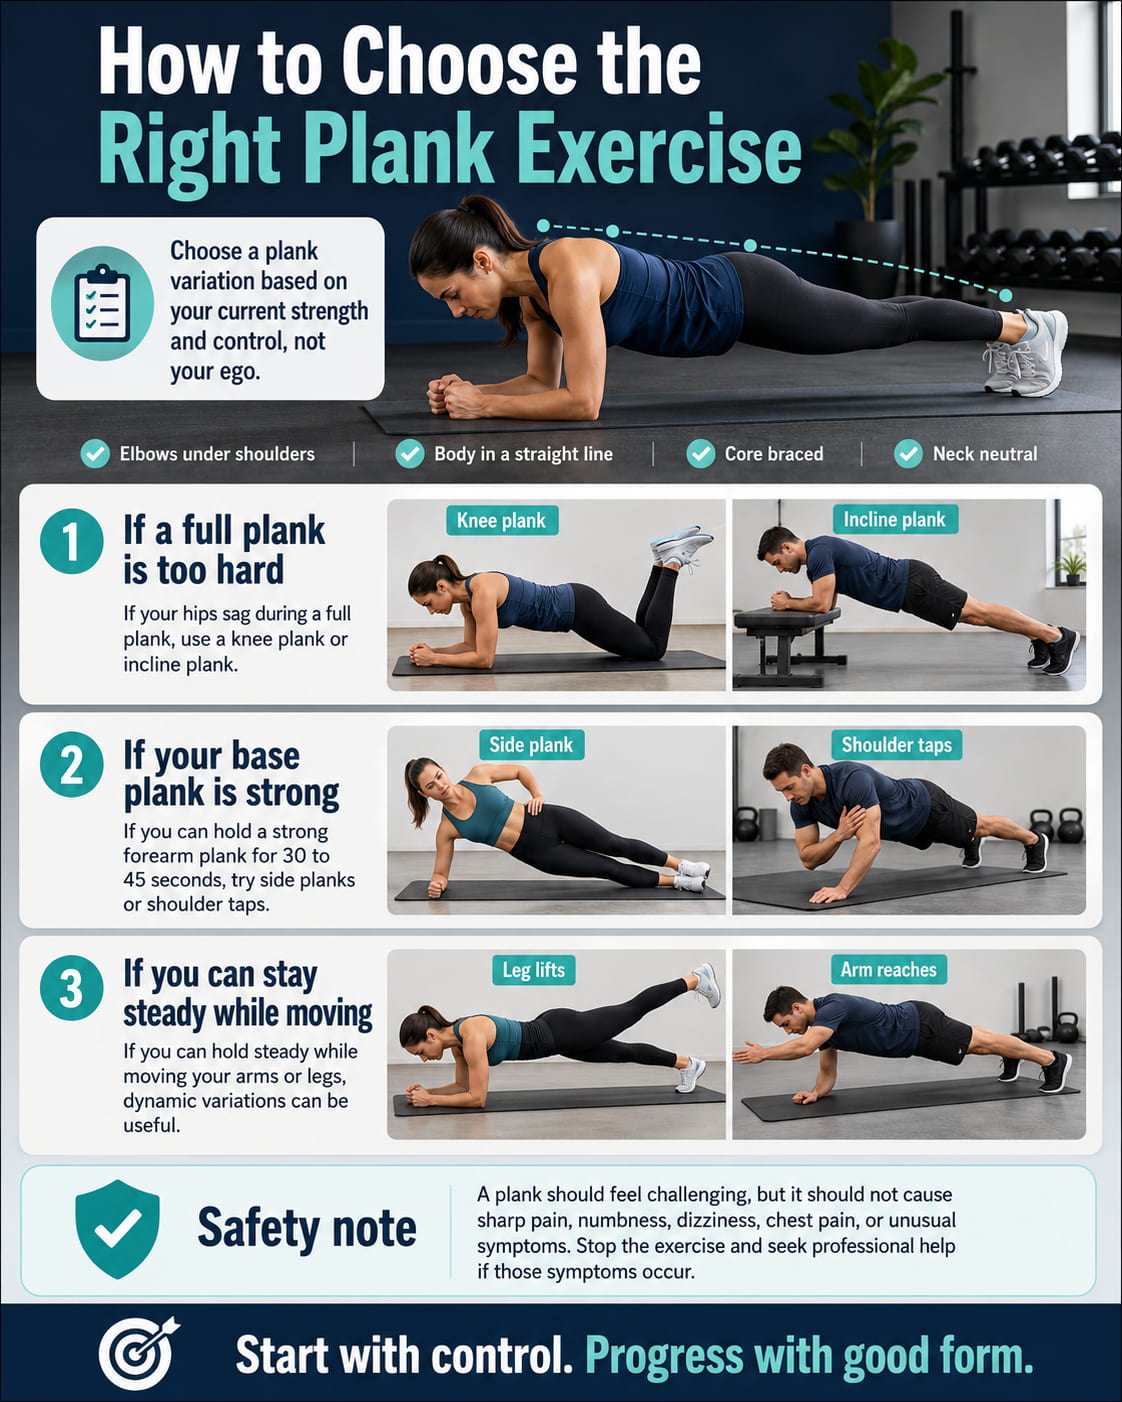
Choose a plank variation based on your current strength and control, not your ego.
If your hips sag during a full plank, use a knee plank or incline plank. If you can hold a strong forearm plank for 30 to 45 seconds, try side planks or shoulder taps. If you can hold steady while moving your arms or legs, dynamic variations can be useful.
A plank should feel challenging, but it should not cause sharp pain, numbness, dizziness, chest pain, or unusual symptoms. Stop the exercise and seek professional help if those symptoms occur.
Best Plank Exercises
1. Forearm Plank
Best for: Building basic core stability, learning trunk bracing, and improving full-body tension.
Muscles worked: Rectus abdominis, transverse abdominis, obliques, glutes, quadriceps, shoulders, and spinal stabilizers.
Why it stands out: The forearm plank is one of the best starting points because it teaches the main plank position without requiring as much wrist support as the high plank.
Suggested sets and reps: Perform 2 to 4 sets of 15 to 45 seconds.
Beginners: Start with 10 to 20 seconds and stop before your hips sag.
Intermediate: Hold 30 to 45 seconds while keeping your ribs down and glutes engaged.
Advanced: Use harder variations instead of forcing very long holds with poor form.
Rest: Rest 30 to 60 seconds between sets.
How to do it:
- Place your forearms on the floor with your elbows under your shoulders.
- Step your feet back until your body forms a straight line from head to heels.
- Brace your abs as if you are preparing for a light punch.
- Squeeze your glutes and keep your legs active.
- Look slightly ahead of your hands without lifting your chin.
- Hold the position while breathing slowly and staying tight.
Common mistakes: The most common mistakes are letting the hips sag, lifting the hips too high, shrugging the shoulders, holding the breath, and looking forward with the neck extended.
Expert tip: Think about pulling your elbows gently toward your toes without actually moving them. This can help create stronger tension through the abs and lats.
Exercise variations: You can perform the forearm plank from the knees, on an incline, with alternating leg lifts, or with a body saw.
Easier variation: Use a forearm knee plank.
Harder variation: Use a forearm plank body saw.
2. High Plank
Best for: Improving core strength, shoulder stability, and push-up position control.
Muscles worked: Abs, obliques, shoulders, serratus anterior, chest, triceps, glutes, quads, and spinal stabilizers.
Why it stands out: The high plank strengthens the top position of a push-up and is a good base for dynamic plank exercises like shoulder taps and mountain climbers.
Suggested sets and reps: Perform 2 to 4 sets of 15 to 45 seconds.
Beginners: Use an incline high plank with your hands on a bench or box.
Intermediate: Hold a full high plank while keeping your hips level.
Advanced: Add controlled shoulder taps or slow leg lifts.
Rest: Rest 30 to 60 seconds between sets.
How to do it:
- Place your hands on the floor under your shoulders.
- Step your feet back and straighten your legs.
- Spread your fingers and press the floor away.
- Brace your core and squeeze your glutes.
- Keep your body in a straight line from head to heels.
- Hold while keeping your neck neutral and breathing steadily.
Common mistakes: Avoid locking your elbows aggressively, sinking between the shoulder blades, letting the hips rotate, or placing your hands too far in front of your shoulders.
Expert tip: Push the floor away so your upper back feels broad and stable.
Exercise variations: Try incline high planks, shoulder taps, plank jacks, or high plank leg lifts.
Easier variation: Use an incline high plank.
Harder variation: Use high plank shoulder taps.
3. Knee Plank
Best for: Beginners who need a safer way to build plank strength before full-body holds.
Muscles worked: Abs, obliques, shoulders, glutes, and spinal stabilizers.
Why it stands out: The knee plank reduces the lever length, making the exercise easier while still teaching bracing and alignment.
Suggested sets and reps: Perform 2 to 3 sets of 10 to 30 seconds.
Beginners: Start here if a full plank causes your lower back to arch.
Intermediate: Use it as a warm-up or form reset before harder plank variations.
Advanced: Use it only when practicing technique or recovering between harder sets.
Rest: Rest 30 to 45 seconds between sets.
How to do it:
- Place your forearms on the floor with elbows under your shoulders.
- Keep your knees on the floor and move them slightly behind your hips.
- Brace your abs and gently squeeze your glutes.
- Keep your head, ribs, hips, and knees aligned.
- Hold the position without letting your lower back sag.
- Breathe slowly through the hold.
Common mistakes: Do not let the hips shift too far back, collapse into the shoulders, or relax your abs because the variation feels easier.
Expert tip: Treat the knee plank like a real strength exercise. The goal is control, not just time.
Exercise variations: You can perform a high knee plank, forearm knee plank, or knee plank with shoulder taps.
Easier variation: Use an incline plank.
Harder variation: Progress to a full forearm plank.
4. Incline Plank
Best for: Beginners, people building plank confidence, and anyone who needs less pressure on the wrists, shoulders, or low back.
Muscles worked: Abs, obliques, shoulders, glutes, quads, and spinal stabilizers.
Equipment needed: A bench, box, sturdy chair, countertop, or stable elevated surface.
Why it stands out: The incline plank lets you practice full-body alignment with less body weight pressing into the floor.
Suggested sets and reps: Perform 2 to 4 sets of 15 to 45 seconds.
Beginners: Start with a higher surface, such as a countertop.
Intermediate: Move to a lower bench or box as your strength improves.
Advanced: Use it as a warm-up before push-ups or floor planks.
Rest: Rest 30 to 60 seconds between sets.
How to do it:
- Place your hands on a stable elevated surface.
- Step your feet back until your body forms a straight line.
- Keep your hands under or slightly in front of your shoulders.
- Brace your core and squeeze your glutes.
- Keep your ribs down and neck neutral.
- Hold without letting your hips drop.
Common mistakes: Avoid using an unstable surface, bending at the hips, shrugging the shoulders, or letting your head hang.
Expert tip: The lower the surface, the harder the exercise becomes.
Exercise variations: You can use an incline forearm plank, incline high plank, or incline shoulder tap.
Easier variation: Use a higher surface.
Harder variation: Move to a lower surface or perform a full floor plank.
5. Side Plank
Best for: Training the obliques, lateral core stability, and side-to-side trunk control.
Muscles worked: Obliques, transverse abdominis, glute medius, shoulders, hips, and spinal stabilizers.
Why it stands out: The side plank trains the core differently from a front plank because your body must resist side bending. The ACE side plank guide highlights the importance of keeping the elbow under the shoulder and maintaining a stiff, aligned body position.
Suggested sets and reps: Perform 2 to 3 sets of 10 to 30 seconds per side.
Beginners: Start with a modified side plank from the knees.
Intermediate: Hold the full side plank with stacked feet.
Advanced: Add a reach-through or top-leg raise.
Rest: Rest 30 to 60 seconds between sides or sets.
How to do it:
- Lie on one side with your elbow under your shoulder.
- Stack your feet or place the top foot slightly in front for support.
- Brace your core and squeeze your glutes.
- Lift your hips until your body forms a straight line.
- Keep your chest open and shoulders stacked.
- Hold, then lower under control and switch sides.
Common mistakes: Avoid letting the hips drop, rolling the chest toward the floor, placing the elbow too far from the shoulder, or holding tension in the neck.
Expert tip: Think about pushing the floor away with your bottom elbow while lifting your bottom hip away from the ground.
Exercise variations: Try modified side plank, full side plank, side plank reach-through, or side plank with hip dips.
Easier variation: Use a modified side plank with knees bent.
Harder variation: Use a side plank reach-through.
6. Reverse Plank
Best for: Training the posterior chain, shoulder extension control, and core stability from the back side of the body.
Muscles worked: Glutes, hamstrings, spinal stabilizers, shoulders, upper back, and abs.
Why it stands out: The reverse plank balances front-plank work by challenging the glutes, hamstrings, and upper back in a different position.
Suggested sets and reps: Perform 2 to 3 sets of 10 to 30 seconds.
Beginners: Start with bent knees in a reverse tabletop position.
Intermediate: Use straight legs and focus on hip extension.
Advanced: Add alternating leg lifts only if your hips stay level.
Rest: Rest 30 to 60 seconds between sets.
How to do it:
- Sit on the floor with your legs extended.
- Place your hands behind your hips with fingers pointing forward or slightly outward.
- Press through your hands and heels.
- Lift your hips until your body forms a straight line.
- Keep your chest open and glutes engaged.
- Hold without letting your hips sink.
Common mistakes: Do not overarch the lower back, let the shoulders roll forward, or force the wrists into an uncomfortable position.
Expert tip: Drive through your heels and squeeze your glutes instead of trying to lift only with your lower back.
Exercise variations: Try reverse tabletop, straight-leg reverse plank, or reverse plank leg lift.
Easier variation: Use a bent-knee reverse tabletop.
Harder variation: Use a reverse plank with alternating leg lifts.
7. Bear Plank
Best for: Building core tension, shoulder stability, and control in a compact position.
Muscles worked: Abs, obliques, shoulders, quads, hip flexors, and spinal stabilizers.
Why it stands out: The bear plank looks simple, but it creates strong tension because the knees hover just above the floor.
Suggested sets and reps: Perform 2 to 4 sets of 10 to 30 seconds.
Beginners: Start with short 10-second holds.
Intermediate: Hold 20 to 30 seconds with steady breathing.
Advanced: Add slow shoulder taps or bear crawls.
Rest: Rest 30 to 60 seconds between sets.
How to do it:
- Start on your hands and knees.
- Place your hands under your shoulders and knees under your hips.
- Tuck your toes under.
- Brace your abs and lift your knees one to two inches off the floor.
- Keep your back flat and hips level.
- Hold without rocking forward or backward.
Common mistakes: Avoid lifting the hips too high, rounding the upper back excessively, holding the breath, or letting the knees drift far from the floor.
Expert tip: Keep the knees close to the floor. A small hover usually works the core harder than lifting the hips high.
Exercise variations: Try bear plank shoulder taps, bear plank leg extensions, or bear crawl holds.
Easier variation: Hold the position for shorter sets.
Harder variation: Add slow bear plank shoulder taps.
8. Plank Shoulder Tap
Best for: Training anti-rotation strength, shoulder control, and core stability during movement.
Muscles worked: Abs, obliques, shoulders, serratus anterior, chest, triceps, glutes, and quads.
Why it stands out: Shoulder taps teach your core to resist twisting while one hand briefly leaves the floor.
Suggested sets and reps: Perform 2 to 4 sets of 6 to 12 taps per side.
Beginners: Use a wider foot stance or perform the exercise from an incline.
Intermediate: Keep the feet closer while maintaining control.
Advanced: Slow the tempo and pause each tap without shifting the hips.
Rest: Rest 30 to 60 seconds between sets.
How to do it:
- Start in a high plank with your hands under your shoulders.
- Set your feet slightly wider than hip-width.
- Brace your abs and squeeze your glutes.
- Lift one hand and tap the opposite shoulder.
- Return the hand to the floor under control.
- Alternate sides while keeping your hips as still as possible.
Common mistakes: Avoid rocking side to side, rushing the taps, letting the hips rotate, or shifting the hands too far forward.
Expert tip: Move slower than you think you need to. The goal is control, not speed.
Exercise variations: Try incline shoulder taps, knee shoulder taps, or slow tempo shoulder taps.
Easier variation: Use an incline plank shoulder tap.
Harder variation: Bring your feet closer together.
9. Plank Leg Lift
Best for: Adding glute work and anti-extension control to a standard plank.
Muscles worked: Abs, obliques, glutes, hamstrings, shoulders, and spinal stabilizers.
Why it stands out: Lifting one leg increases the demand on your hips and core because your body has to resist arching and rotating.
Suggested sets and reps: Perform 2 to 3 sets of 6 to 10 lifts per side.
Beginners: Master a standard forearm plank first.
Intermediate: Lift each leg slowly without changing hip position.
Advanced: Pause each rep for two to three seconds.
Rest: Rest 30 to 60 seconds between sets.
How to do it:
- Start in a forearm plank.
- Brace your abs and squeeze both glutes.
- Lift one foot a few inches off the floor.
- Keep your hips square to the ground.
- Pause briefly, then lower the foot with control.
- Repeat on the other side.
Common mistakes: Avoid lifting the leg too high, arching the lower back, twisting the hips, or losing shoulder position.
Expert tip: A small, controlled lift is better than a high lift that makes your lower back move.
Exercise variations: Try high plank leg lifts, forearm plank leg lifts, or plank leg lift holds.
Easier variation: Use a wider foot stance and shorter lift.
Harder variation: Add a longer pause at the top.
10. Plank Walkup
Best for: Building core control, shoulder endurance, and upper-body coordination.
Muscles worked: Abs, obliques, shoulders, chest, triceps, glutes, and quads.
Why it stands out: The plank walkup moves between forearm plank and high plank, making it a dynamic core and upper-body exercise.
Suggested sets and reps: Perform 2 to 4 sets of 4 to 8 reps per side.
Beginners: Start from the knees or use a slow tempo.
Intermediate: Perform from the toes while keeping hips steady.
Advanced: Alternate the lead arm each rep and pause in each position.
Rest: Rest 45 to 75 seconds between sets.
How to do it:
- Start in a forearm plank.
- Brace your core and keep your feet planted.
- Place one hand under the same-side shoulder.
- Press up with the other hand into a high plank.
- Lower one forearm back to the floor.
- Lower the other forearm and repeat, alternating lead arms.
Common mistakes: Avoid rushing, swaying the hips, placing the hands too wide, or letting the lower back sag during transitions.
Expert tip: Widen your feet slightly to reduce hip rotation while you learn the movement.
Exercise variations: Try knee plank walkups, slow plank walkups, or alternating-lead plank walkups.
Easier variation: Use a knee plank walkup.
Harder variation: Use a slower tempo with a pause at the top and bottom.
11. Plank Body Saw
Best for: Advanced anti-extension strength and stronger bracing under movement.
Muscles worked: Abs, transverse abdominis, obliques, shoulders, lats, glutes, and quads.
Equipment needed: Sliders, a towel on a smooth floor, or suspension straps.
Why it stands out: The body saw makes the plank harder by shifting your body forward and backward while your core resists spinal extension.
Suggested sets and reps: Perform 2 to 4 sets of 6 to 12 slow reps.
Beginners: Do not start here. Build a strong forearm plank first.
Intermediate: Use a small range of motion.
Advanced: Increase the range only if your ribs and pelvis stay controlled.
Rest: Rest 45 to 75 seconds between sets.
How to do it:
- Start in a forearm plank with your feet on sliders or a towel.
- Brace your abs and squeeze your glutes.
- Push your body slightly backward through your forearms.
- Pull your body forward to the starting position.
- Keep your hips level and your lower back stable.
- Repeat slowly without losing alignment.
Common mistakes: Avoid sliding too far, arching the lower back, shrugging the shoulders, or turning the movement into a fast rocking motion.
Expert tip: Keep the range short at first. The exercise should feel harder because of tension, not because your form is falling apart.
Exercise variations: Try short-range body saws, suspension body saws, or pause body saws.
Easier variation: Use a standard forearm plank.
Harder variation: Use a longer controlled range with a pause.
Common Plank Mistakes to Avoid
Letting the Hips Sag
Hip sagging usually means the core and glutes are no longer holding the position. When this happens, the lower back may take more stress. Shorten the hold, squeeze your glutes, and think about bringing your ribs and pelvis slightly closer together.
Lifting the Hips Too High
A high hip position can make the plank easier by shifting tension away from the core. Your body does not need to look perfectly flat, but your shoulders, ribs, hips, knees, and ankles should stay in a strong line.
Holding Your Breath
Breath-holding can make the exercise feel harder than it needs to be. Breathe slowly while staying braced. A good cue is to take quiet breaths without letting your ribs flare.
Shrugging the Shoulders
Shrugging can create unnecessary neck and upper-trap tension. Press the floor away and keep your shoulders stable without jamming them toward your ears.
Chasing Long Holds With Poor Form
A clean 20-second plank is better than a sloppy two-minute plank. Once form breaks down, the set is no longer giving you the same training benefit. Add time only when you can keep control.
How Long Should You Hold a Plank?
Most people do not need extremely long plank holds. A good starting point is 10 to 30 seconds per set. As strength improves, 30 to 60 seconds is enough for many training goals.
The NASM plank exercise library recommends starting with shorter holds and progressing as strength improves. The main idea is simple: quality matters more than time.
For beginners, use 2 to 3 sets of 10 to 30 seconds. For intermediate training, use 3 to 4 sets of 30 to 45 seconds. For advanced training, use harder variations instead of only adding more time.
How Often Should You Do Plank Exercises?
Plank exercises can be trained 2 to 4 times per week. They work well at the end of strength workouts, in a short core circuit, or as part of a warm-up when the intensity stays low.
You do not need to max out every session. Most sets should stop with one to two good breaths left before form breaks down. If your shoulders, wrists, or lower back feel irritated, reduce the difficulty or take more recovery.
Beginner Plank Workout
Use this workout 2 to 3 times per week. Start with an incline plank for 2 sets of 20 to 30 seconds, then perform a knee plank for 2 sets of 15 to 25 seconds. Finish with a modified side plank for 2 sets of 10 to 20 seconds per side.
Rest 30 to 60 seconds between sets. Keep the effort around a moderate level, where the position feels challenging but still controlled. Progress by adding 5 seconds to each hold when all sets feel stable.
Intermediate Plank Workout
Use this workout 2 to 4 times per week. Perform a forearm plank for 3 sets of 30 to 45 seconds, a side plank for 2 to 3 sets of 20 to 30 seconds per side, and plank shoulder taps for 3 sets of 8 to 12 taps per side.
Rest 45 to 60 seconds between sets. Progress by improving control first, then adding time or reps. If your hips rotate during shoulder taps, widen your feet or slow the movement down.
Advanced Plank Workout
Use this workout 2 to 3 times per week after your main strength work. Perform plank walkups for 3 sets of 6 to 8 reps per side, plank body saws for 3 sets of 8 to 12 reps, and side plank reach-throughs for 2 to 3 sets of 6 to 10 reps per side.
Rest 60 to 75 seconds between sets. Keep the effort high but controlled. Progress by increasing range of motion, slowing the tempo, or adding a pause instead of rushing into harder variations.
How to Progress Plank Exercises Safely
Progress plank exercises in stages. First, improve your position. Next, increase hold time. After that, move to a harder variation.
A smart progression could look like incline plank, knee plank, forearm plank, high plank, side plank, shoulder tap, plank leg lift, plank walkup, and body saw. You do not need to master every variation. Choose the ones that match your goal and your current ability.
Avoid adding difficulty if your hips sag, your lower back arches, your shoulders shrug, or you cannot breathe steadily. Those are signs that the variation is too hard right now.
Plank Exercises for Different Goals
For general core strength, focus on forearm planks, high planks, and side planks. For beginner training, use incline planks, knee planks, and modified side planks. For shoulder stability, use high planks, shoulder taps, and plank walkups. For anti-rotation strength, use side planks and slow shoulder taps. For advanced core control, use body saws, plank walkups, and controlled leg-lift variations.
The best plank exercise is the one you can perform with clean alignment, steady breathing, and enough tension to make the set challenging without losing control.
Frequently Asked Questions
Are plank exercises good for beginners?
Yes, plank exercises can be good for beginners when the variation matches the person’s current strength. Incline planks, knee planks, and modified side planks are usually better starting points than long full planks.
Do planks work the abs?
Yes, planks work the abs, especially the muscles that help brace and stabilize the trunk. They also train the obliques, glutes, shoulders, and back stabilizers depending on the variation.
Are forearm planks or high planks better?
Neither is always better. Forearm planks usually feel more core-focused and reduce wrist pressure. High planks train the push-up position and place more demand on the shoulders, chest, and arms.
Should I do planks every day?
You can practice easy plank variations often, but hard plank workouts usually do not need to be done every day. Training planks 2 to 4 times per week is enough for most people when the sets are challenging and controlled.
Why does my lower back hurt during planks?
Lower-back discomfort during planks often happens when the hips sag, the ribs flare, or the core and glutes stop bracing. Use an easier variation, shorten the hold, and stop if you feel sharp pain or unusual symptoms.
How do I make planks harder without holding longer?
You can make planks harder by adding shoulder taps, leg lifts, side plank variations, plank walkups, body saws, slower tempo, or longer pauses. Harder does not always mean longer.
Conclusion
Plank exercises are simple, effective, and easy to adjust for different fitness levels. Start with a variation you can control, focus on strong alignment, breathe through each hold, and progress only when your form stays solid.
For best results, use planks as part of a balanced strength routine that includes lower-body, upper-body, pulling, pushing, and mobility work. A better plank is not the longest plank. It is the plank you can hold with control, tension, and clean technique.
This content is for informational purposes only and is not a substitute for professional medical advice.