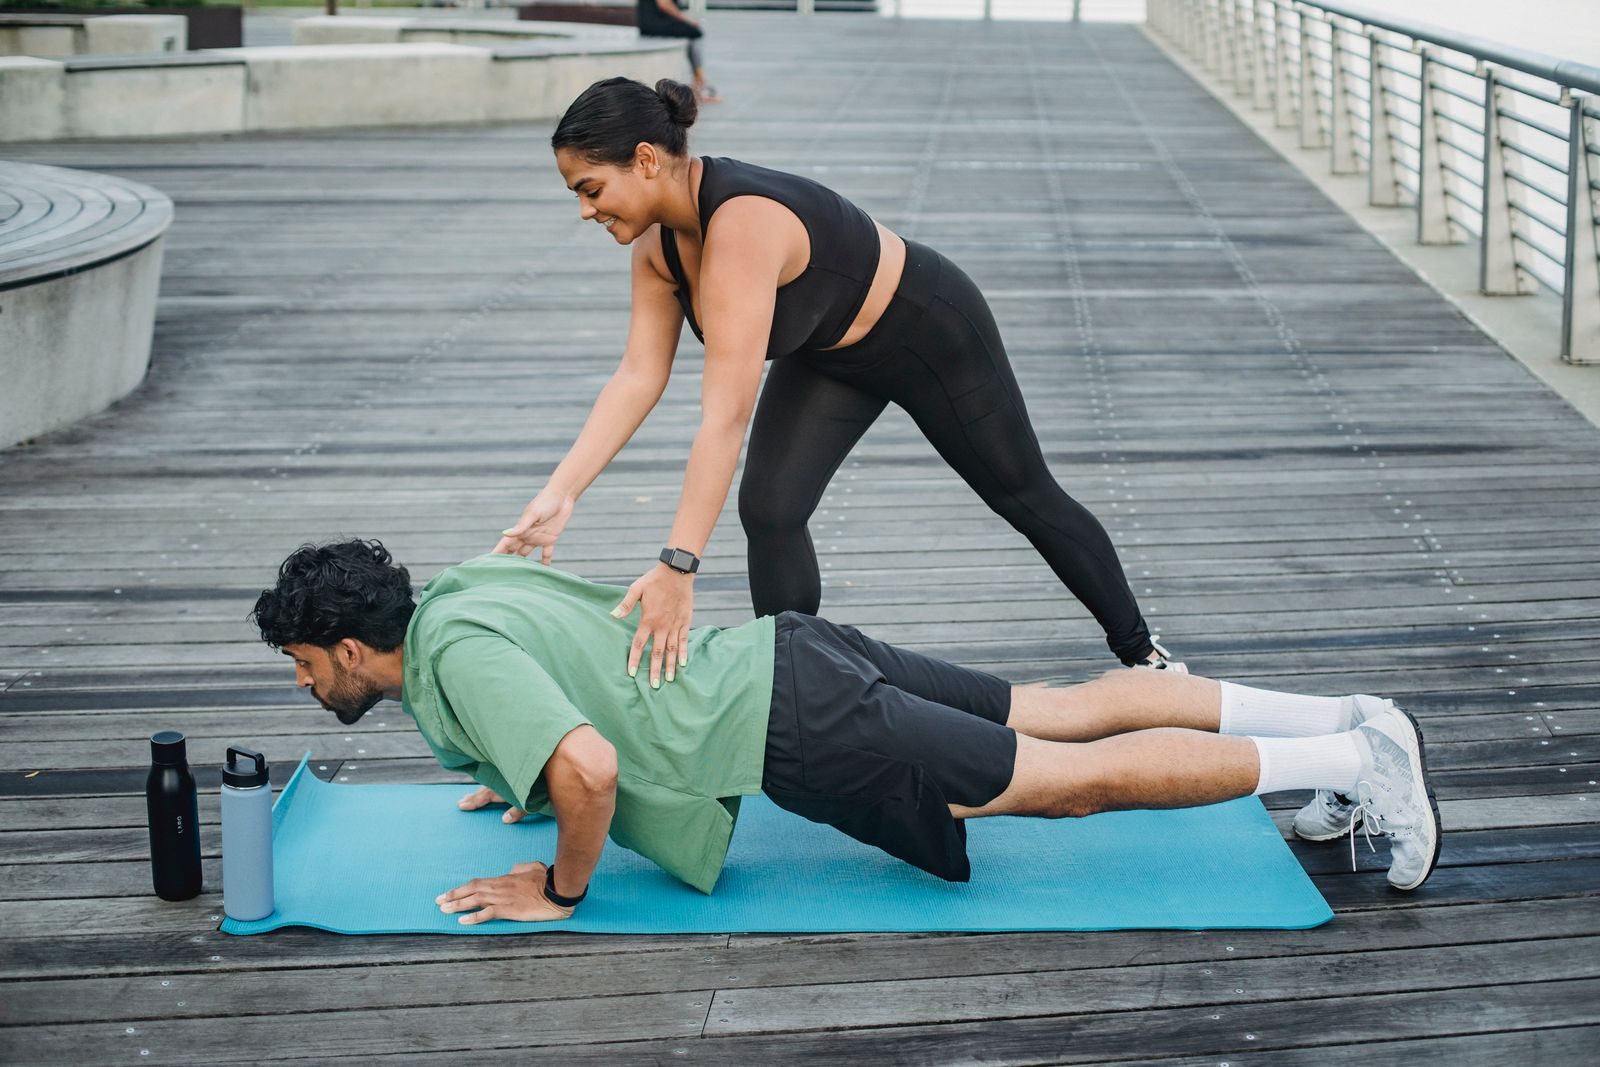
Arm exercises with no equipment can train your triceps, challenge your biceps through self-resistance, and work the muscles that support your shoulders. Start with three or four suitable movements—not all ten—and make them gradually more challenging as your control improves.
The exercises below require no dumbbells, bands, bars, chairs, or towels. You need clear floor space, with a wall available for an easier push-up option. A mat is optional.
How to Train Your Arms Without Equipment
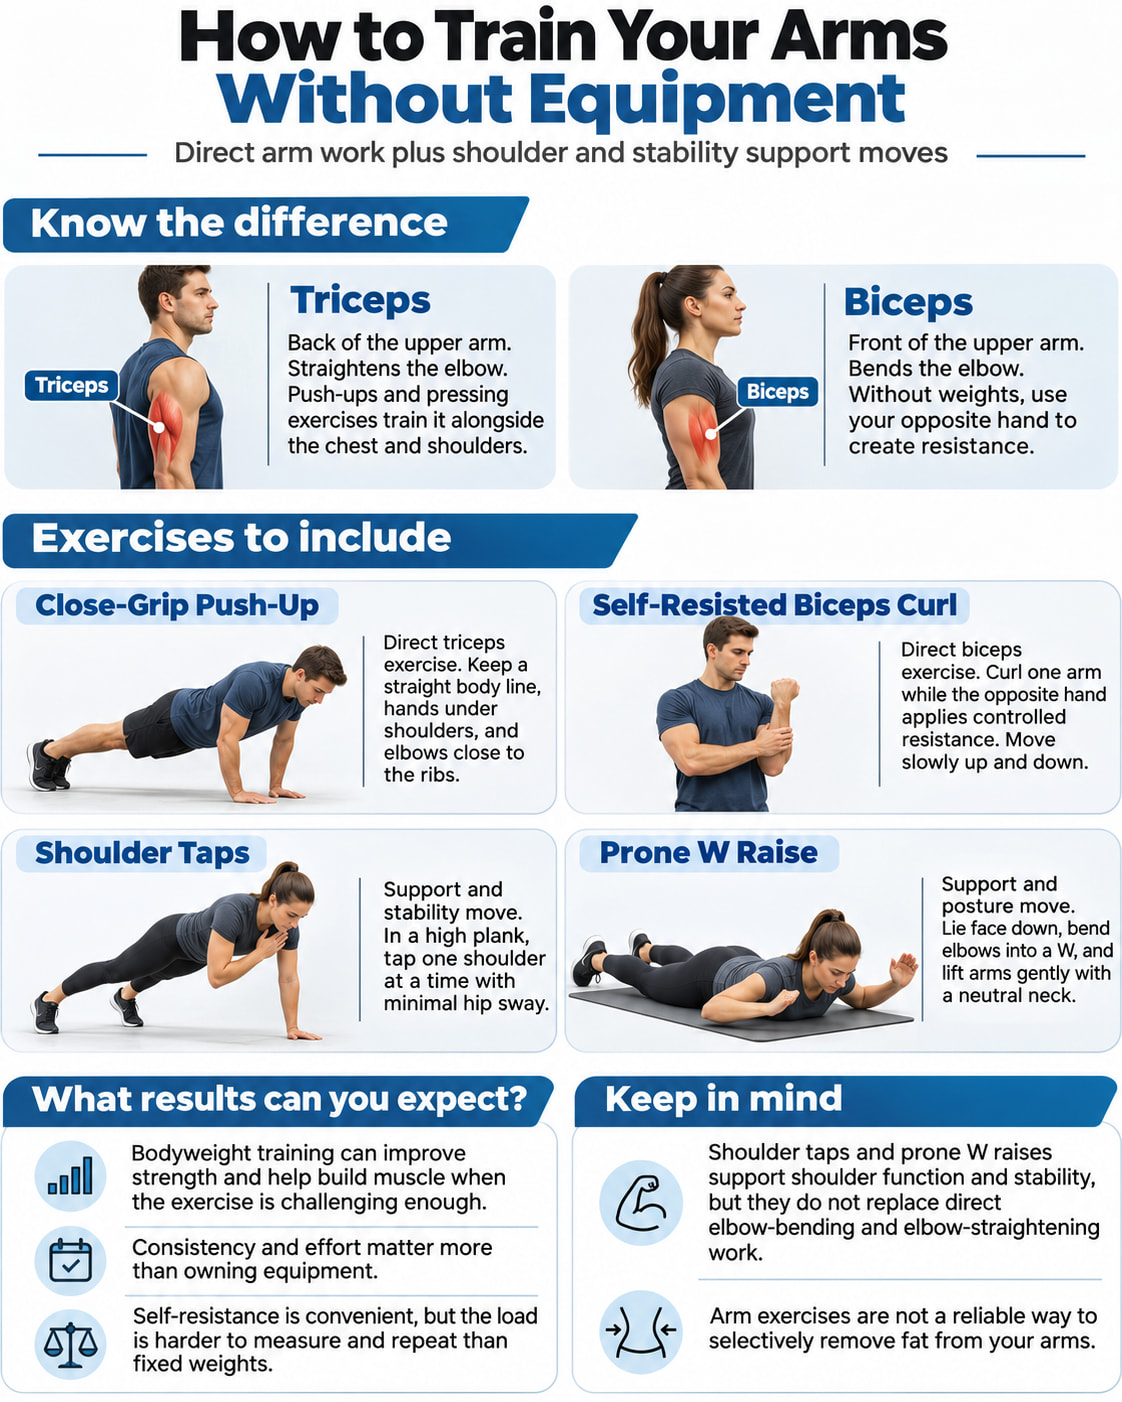
Your triceps, along the backs of your upper arms, straighten your elbows. Push-ups and other pressing exercises train them alongside your chest and shoulders. Your biceps, at the fronts of your upper arms, help bend your elbows. To challenge them without weights or a pulling anchor, you can use your opposite hand to provide resistance.
That distinction matters: doing more push-up variations does not create a balanced biceps-and-triceps workout. The list includes direct arm exercises plus shoulder and stability movements, with each exercise’s role explained.
What Results Can You Expect?
Bodyweight training can improve strength and contribute to muscle growth when the exercises provide enough challenge. The American College of Sports Medicine’s resistance-training guidance recognizes bodyweight and home-based training as useful options; consistency and appropriate effort matter more than owning particular equipment.
Self-resistance has a practical limitation: you control both the movement and the opposing pressure. That makes the load harder to measure and reproduce than a known weight. Treat these exercises as convenient training options, not guaranteed equivalents to progressively heavier curls or extensions.
Shoulder taps and prone W raises also serve different purposes from direct arm work. They belong here as supporting exercises, not as substitutes for challenging elbow-bending and elbow-straightening movements.
Finally, arm exercises are not a reliable way to selectively remove fat from your arms. Train for strength, muscle development, and control rather than expecting a particular movement to determine where fat is lost.
10 Arm Exercises With No Equipment
Use this list as an exercise menu. The sets and repetitions are starting suggestions for the movements you choose, not instructions to complete every exercise.
Rest about 60–90 seconds between sets, extending that to 90–120 seconds after demanding push-ups, pike push-ups, or plank-ups. For single-arm exercises, complete both sides before taking the full rest period; pause between arms when needed.
For challenging bodyweight sets, finish while you could still perform roughly two or three more controlled repetitions. You do not need to reach failure. For self-resisted exercises, use steady pressure that makes the movement demanding without causing straining or stalled repetitions.
1. Standard Push-Up
The standard push-up is a useful main pressing exercise for your triceps, chest, and shoulders. Choose a version that lets your torso and legs move together rather than forcing repetitions from your toes.
How to do it:
- Place your hands on the floor slightly wider than shoulder-width. Extend your legs behind you and balance on your toes.
- Tighten your abdomen and glutes so your head, torso, and legs form a straight line.
- Bend your elbows and lower your chest toward the floor through a range you can control. Keep your neck aligned with your back.
- Press through your palms to return to the starting position, lifting your body as one unit.
Form and scaling: Avoid letting your hips sag or reaching your chin toward the floor. For a knee-supported version, keep a straight line from your head through your knees rather than bending at your hips.
For a standing alternative, place your hands on a wall at shoulder height, step back slightly, and bend your elbows to bring your chest toward the wall. Push away without bending at your waist. Move closer to the wall to reduce the challenge.
Starting amount: 1–2 sets of 6–12 repetitions of your chosen version.
2. Triceps-Focused Push-Up
This variation uses approximately shoulder-width hands and elbows that track close to your torso. It emphasizes the triceps without requiring your thumbs and fingers to form a diamond. Your chest and shoulders still contribute.
How to do it:
- Begin in a push-up position with your hands about shoulder-width apart and your fingers pointing forward.
- Brace your torso and keep your shoulders positioned over your hands.
- Bend your elbows backward close to your sides as you lower your chest between your hands.
- Press back up without letting your hips drop or forcing your elbows beyond a comfortable straight position.
Form and scaling: Keep your hands far enough apart that your wrists feel comfortable. Narrower is not automatically better. Use knee support or perform the same elbows-close movement against a wall when the floor version is too demanding.
Starting amount: 1–2 sets of 6–12 repetitions.
Choose this instead of the standard push-up when you want more triceps emphasis. Beginners do not need both in the same session.
3. Side-Lying Triceps Push-Up
This single-arm exercise trains the triceps of the upper arm while your lower body remains supported on the floor. It provides a different option from holding a full push-up position.
How to do it:
- Lie on your left side with your legs comfortably stacked. Place your left hand on your right shoulder, keeping the left elbow off the floor.
- Place your right palm on the floor in front of your chest.
- Press through your right hand to straighten that elbow and lift your upper body. Keep your hips and legs supported.
- Bend the elbow to lower slowly. Complete the repetitions, then switch sides.
Form and scaling: Avoid rolling forward or backward to help yourself rise. Adjust your hand position slightly to find a comfortable pressing path, and use a smaller controlled lift when a full repetition is too difficult.
The movement can be challenging despite its supported position. Do not assume you should match your regular push-up repetition count.
Starting amount: 1–2 sets of 6–10 repetitions per arm.
4. Floor Pike Push-Up
The pike push-up is a more challenging, shoulder-focused press with triceps assistance. Both your hands and feet stay on the floor—there is no bench, elevated-foot setup, or handstand.
How to do it:
- Place your hands and feet on the floor. Raise your hips to form an inverted V, with your hands around shoulder-width apart.
- Keep your abdomen engaged and your neck aligned with your upper back.
- Bend your elbows to lower your head toward the floor while keeping your hips raised. Stop before you lose control; do not rest your weight on your head.
- Press through your hands to straighten your arms and return to the pike position.
Form and scaling: Do not turn the repetition into a regular push-up by dropping your hips. Start with a shallow lowering range and increase it gradually. Skip this option until you can comfortably support your weight through your hands and control the descent.
Starting amount: 1–2 sets of 4–8 repetitions.
Use it when shoulder pressing is a priority, rather than adding it automatically after several other pressing exercises.
5. Self-Resisted Single-Arm Biceps Curl
Your opposite hand supplies the resistance for this biceps-focused exercise. The goal is a smooth curl against meaningful pressure—not simply moving an unloaded arm.
How to do it:
- Stand tall with your right upper arm beside your torso and your right palm facing up.
- Place your left hand over your right hand or lower forearm. Keep your right wrist straight.
- Bend your right elbow to curl upward while your left hand presses downward enough to challenge the movement.
- Lower slowly while maintaining controlled opposing pressure. Complete the repetitions, then switch arms.
Form and scaling: Keep the working upper arm relatively still. Avoid leaning backward, lifting your shoulder, or curling your wrist to finish the movement.
Begin with light pressure while learning the coordination. Increase it gradually, but not so much that the curl becomes a motionless struggle. Try to use a similar range and movement speed on both sides.
Starting amount: 1–2 sets of 8–12 repetitions per arm.
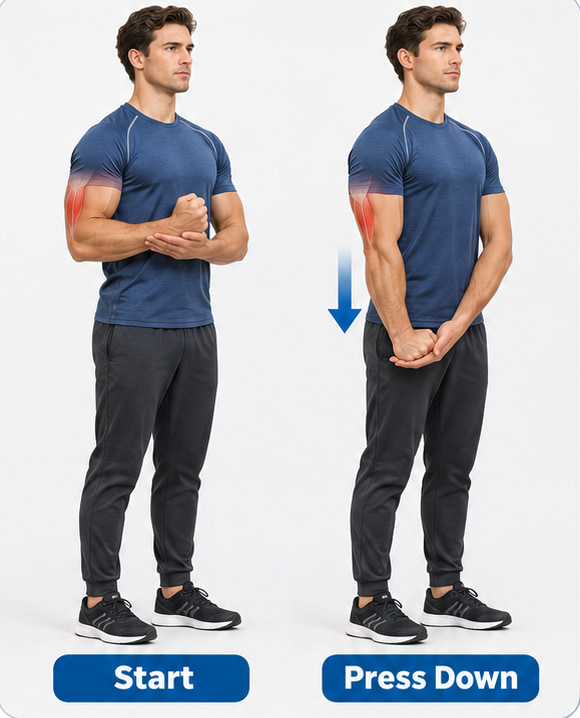
6. Self-Resisted Single-Arm Triceps Press-Down
This standing option lets you practice resisted elbow extension without supporting your bodyweight on your hands. Self-resisted single-arm triceps press-downs are included in Human Kinetics’ published bodyweight exercise programming.
In this version, the opposite hand provides the upward resistance that you press against.
How to do it:
- Stand upright with your right upper arm beside your ribs and your right elbow bent. Keep your right wrist straight.
- Place your left palm beneath your right hand or lower forearm.
- Press your right hand downward by straightening your right elbow while your left hand provides smooth upward resistance.
- Let the right elbow bend again under control while maintaining light downward effort. Finish the repetitions, then switch arms.
Form and scaling: Keep your upper arm beside your torso instead of sweeping it backward. The movement should come mainly from the elbow, not from leaning your body over your hands.
Use gentle pressure at first. Reduce it near the end of the movement as needed to avoid abruptly forcing the elbow straight. Keep breathing rather than bracing so hard that you hold your breath.
Starting amount: 1–2 sets of 8–12 repetitions per arm.
7. Plank-Up
Plank-ups combine arm pressing with shoulder and trunk control. Unlike a push-up, you move between your hands and forearms one arm at a time.
How to do it:
- Begin in a high plank with your hands beneath your shoulders and your legs extended.
- Lower onto your right forearm, then your left forearm, keeping your abdomen engaged.
- Place your right palm beneath your shoulder and press up, then bring your left hand underneath you to return to a high plank.
- Repeat while leading with your left arm. Continue alternating the lead arm after each complete repetition.
Form and scaling: Keep your hips as level as possible rather than rocking from side to side. Separate your feet slightly for a wider base of support.
Practice with your knees on the floor when necessary, keeping your shoulders, hips, and knees aligned. Choose another exercise when you cannot control the transitions without dropping onto your elbows.
Starting amount: 1–2 sets of 4–8 complete repetitions. One down-and-up sequence counts as one repetition.
8. High-Plank Shoulder Tap
Shoulder taps challenge the supporting arm and shoulder while your core resists twisting. They are a stability exercise, not a replacement for biceps curls or triceps extensions.
How to do it:
- Begin in a high plank with your hands beneath your shoulders. Separate your feet enough to help you stay balanced.
- Shift only as much weight as necessary into your left hand and touch your left shoulder with your right hand.
- Return your right hand to the floor before lifting the other hand.
- Touch your right shoulder with your left hand, replace it, and continue alternating slowly.
Form and scaling: Avoid rushing through the taps while your hips swing from side to side. Push the floor away through your supporting arm instead of sinking into that shoulder.
Start with knee-supported taps or practice a steady high plank first. Progress to the full version when holding the position feels controlled and comfortable.
Starting amount: 1–2 sets of 6–10 taps per side. Count each shoulder touch as one tap.
9. Self-Resisted Single-Arm Lateral Raise
This is a shoulder exercise, especially for the muscles that lift your upper arm sideways. It adds standing shoulder work without another floor-based press.
How to do it:
- Stand tall with your right arm beside your body and a slight bend in your right elbow.
- Reach your left hand across your body and place it against the outside of your right upper arm, above the elbow.
- Raise your right arm sideways while your left hand provides gentle opposing pressure.
- Lower slowly and repeat, then switch sides. Use only a range in which you can maintain comfortable contact and control.
Form and scaling: Do not shrug your shoulder toward your ear or lean away to make the arm rise. A small, controlled movement is preferable to forcing the arm to shoulder height.
Reduce the pressure when learning the movement. Add resistance gradually without turning it into a prolonged maximum-effort hold.
Starting amount: 1–2 sets of 8–12 repetitions per arm.
10. Prone W Raise With a Brief Hold
The prone W raise works the shoulders and muscles around the shoulder blades. Use it as a controlled accessory exercise, not as direct biceps work or an equivalent replacement for loaded rows.
How to do it:
- Lie face down with your legs resting on the floor. Bend your elbows so your arms form a W, with your elbows angled toward your sides rather than straight out at shoulder level.
- Keep your neck aligned with your upper back and lightly tighten your abdomen.
- Gently lift your arms a small distance from the floor while drawing your shoulder blades together.
- Hold for 5–10 seconds while breathing normally, then lower and relax.
Form and scaling: Do not throw your head or chest upward to make the lift look larger. The movement should come mainly through your shoulders, not a large lower-back arch.
Start with shorter holds and a smaller lift. Increase the hold only while you can maintain the same position without straining.
Starting amount: 1–2 sets of 2–4 holds, lasting 5–10 seconds each. Relax for about 5 seconds between holds.
Build a No-Equipment Arm Workout at Home
For a first session, choose one push-up variation, the self-resisted biceps curl, and one or two complementary exercises. There is no need to combine standard push-ups, triceps-focused push-ups, pike push-ups, and plank-ups in one beginner workout.
The following is an example starting routine, not a universal prescription.
Beginner Arm Workout
Warm up for 5–10 minutes with brisk walking or marching, then include a few comfortable arm circles and easy wall push-ups. Keep the warm-up easy enough that it does not tire your arms before the working sets. Mayo Clinic recommends warming up before resistance exercise and using controlled movement rather than rushing.
| Order | Exercise | Sets | Repetitions or holds | Rest |
|---|---|---|---|---|
| 1 | Standard push-up, using wall or knee support as needed | 2 | 6–12 repetitions | 90–120 seconds |
| 2 | Self-resisted single-arm biceps curl | 2 | 8–12 repetitions per arm | 60–90 seconds after both arms |
| 3 | Self-resisted single-arm triceps press-down | 2 | 8–12 repetitions per arm | 60–90 seconds after both arms |
| 4 | Prone W raise | 1 | 2–4 holds of 5–10 seconds | About 5 seconds between holds |
Complete the sets for one exercise before moving to the next. Allow roughly 20–30 minutes, including the warm-up, both arms, rest, and transitions. The time will vary with your repetition speed and rest needs.
Start with one set of each exercise when you are new to training or returning after a break. Add the second sets once you can finish comfortably with consistent technique.
Frequency and Adjustments
Begin with two nonconsecutive sessions per week, such as Monday and Thursday. Leave recovery time between demanding sessions for the same muscles. An arm-focused routine should be part of a broader plan that also trains your other major muscle groups.
For more triceps emphasis, replace the standard push-up with the triceps-focused version rather than automatically adding it.
For shoulder control, substitute shoulder taps for the triceps press-down once you can maintain a steady plank. For a fully standing session, use wall push-ups and replace the prone W raise with the self-resisted lateral raise.
When you already do push-ups or other pressing exercises in another workout, count that work too. You may only need the curl and one accessory movement rather than an additional full arm session.
Keep the Session Comfortable and Controlled
Use a stable, nonslip surface and breathe throughout each set. Stop a movement that causes joint pain rather than forcing additional repetitions.
Stop exercising for sharp pain, numbness, dizziness, chest pain, or other concerning symptoms, and seek appropriate professional help. Chest pain that persists, severe breathlessness, or other potentially serious symptoms require urgent medical assessment.
How to Progress Without Adding Equipment
First, make the repetitions more consistent. Use the same setup, a similar range of motion, and controlled movement from the beginning of the set to the end. More repetitions are not progress when they require increasingly shortened movement or momentum.
Then add repetitions within the suggested range. A practical progression rule is to increase difficulty after reaching the upper end of the range with good control in two consecutive sessions. This is a coaching guideline, not a requirement to progress on a fixed schedule.
Change one variable at a time. For push-ups, gradually move from a comfortable wall version toward a more demanding body position. On the floor, a brief pause near the bottom or a slower lowering phase can make familiar repetitions more challenging. Reduce your repetition target when trying a harder version.
For self-resisted exercises, increase the opposing pressure slightly while keeping the same movement speed and range. Do not make the exercise harder by bending your wrist, holding your breath, or moving your whole torso.
For shoulder taps and plank-ups, progress by reducing unnecessary rocking and controlling each hand transition. For W raises, build from shorter holds toward the upper end of the suggested range rather than trying to lift your arms as high as possible.
Recognize the limits of the setup. Self-resistance is difficult to quantify, and no-equipment training offers fewer straightforward pulling options. When these exercises no longer provide a useful challenge, adding resistance later may make continued progression easier to measure. That does not make your equipment-free training a wasted starting point.
For your next workout, choose a push-up version you can control, pair it with the self-resisted curl, and add one or two movements that fit your goal. Record your repetitions and how the sets felt so your next session has a clear starting point.
References
- American College of Sports Medicine: Resistance Training Guidelines and Full Position Stand
- Mayo Clinic: Strength-Training Technique, Warm-Up, and Recovery Guidance
- American Council on Exercise: Push-Up, Plank-Ups, and Prone Shoulder Stabilization Series
- Human Kinetics: Bodyweight Strength Workout
- Nutracheck: Self-Resisted Biceps Curl Instructions
- Exercise guidance: [P]rehab—Side-Lying Triceps Push-Up, Wellen—Plank With Shoulder Taps, and Yes2Next—Self-Resisted Lateral Raise
- University of Sydney: Why Exercising One Body Part Does Not Reliably Target Local Fat Loss
- British Heart Foundation: Exercise Warning Symptoms and When Chest Pain Needs Urgent Help