Gentle Pilates exercises for back pain may help improve trunk control, hip strength, mobility, and confidence with movement without requiring gym equipment. The NHS includes Pilates among its exercise resources for people with chronic back pain. Research also suggests Pilates can reduce low-back pain compared with no exercise, although it does not work equally well for everyone and is not clearly superior to every other well-designed exercise program.
The routine below is intended for adults with mild, stable, nonspecific lower-back discomfort. Start with small movements, breathe normally, and use the easiest version that feels controlled. These exercises are not a substitute for an individual assessment when pain is severe, worsening, related to an injury, or accompanied by nerve symptoms.
Before Starting Pilates for Back Pain
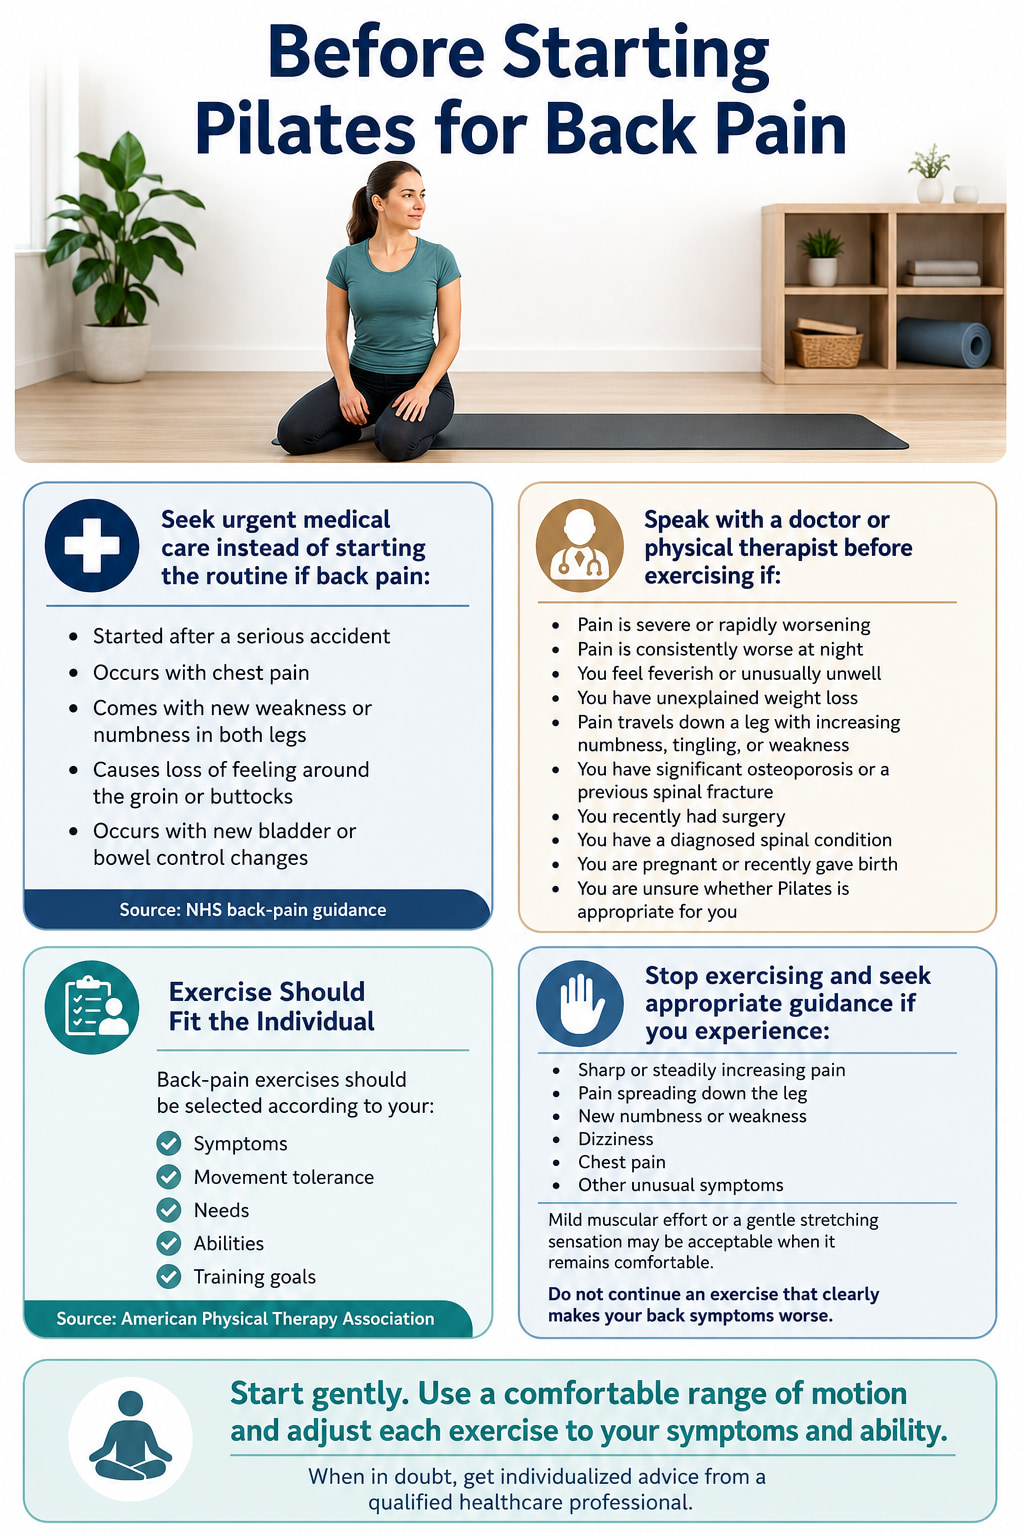
According to NHS back-pain guidance, seek urgent medical care rather than beginning this routine if back pain started after a serious accident or is accompanied by chest pain, new weakness or numbness in both legs, loss of feeling around the groin or buttocks, or bladder or bowel control changes.
Speak with a doctor or physical therapist before exercising when:
- Pain is severe, rapidly worsening, or consistently worse at night.
- You feel feverish, unwell, or have unexplained weight loss.
- Pain travels down a leg with increasing numbness, tingling, or weakness.
- You have significant osteoporosis, a previous spinal fracture, recent surgery, or a diagnosed spinal condition.
- You are pregnant, recently gave birth, or are uncertain whether these movements are suitable for you.
Back-pain exercises should be adjusted to the individual. The American Physical Therapy Association notes that strengthening and mobility work should be selected according to a person’s symptoms, needs, and goals.
During the routine, muscular effort or a mild stretching sensation may be acceptable. Stop if you experience sharp or steadily increasing pain, spreading leg symptoms, numbness, weakness, dizziness, chest pain, or unusual symptoms. The NHS also advises stopping back exercises when pain gets worse and seeking professional guidance.
Pilates Exercises for Back Pain at a Glance
| Exercise | Main training purpose | Easiest starting option |
|---|---|---|
| Pelvic Tilt | Practice gentle pelvic and lower-back movement | Make the tilt very small |
| Supine Knee Sways | Introduce comfortable trunk rotation | Move the knees only a few inches |
| Heel Slide | Control the trunk while moving one leg | Use a short sliding range |
| Pilates Knee Fold | Stabilize the pelvis while lifting one foot | Lift only the heel |
| Shoulder Bridge | Strengthen the glutes and hamstrings | Perform a mini bridge |
| Side-Lying Clam | Strengthen the outer hips | Open the knee through a small range |
| Pilates Cat Stretch | Practice controlled spinal movement | Round only the upper and middle back |
| Opposite Arm and Leg Reach | Build trunk and hip stability | Move one limb at a time |
You do not have to perform all eight exercises immediately. Begin with four or five movements that feel comfortable and add the others as your control and tolerance improve.
How to Prepare for the Routine
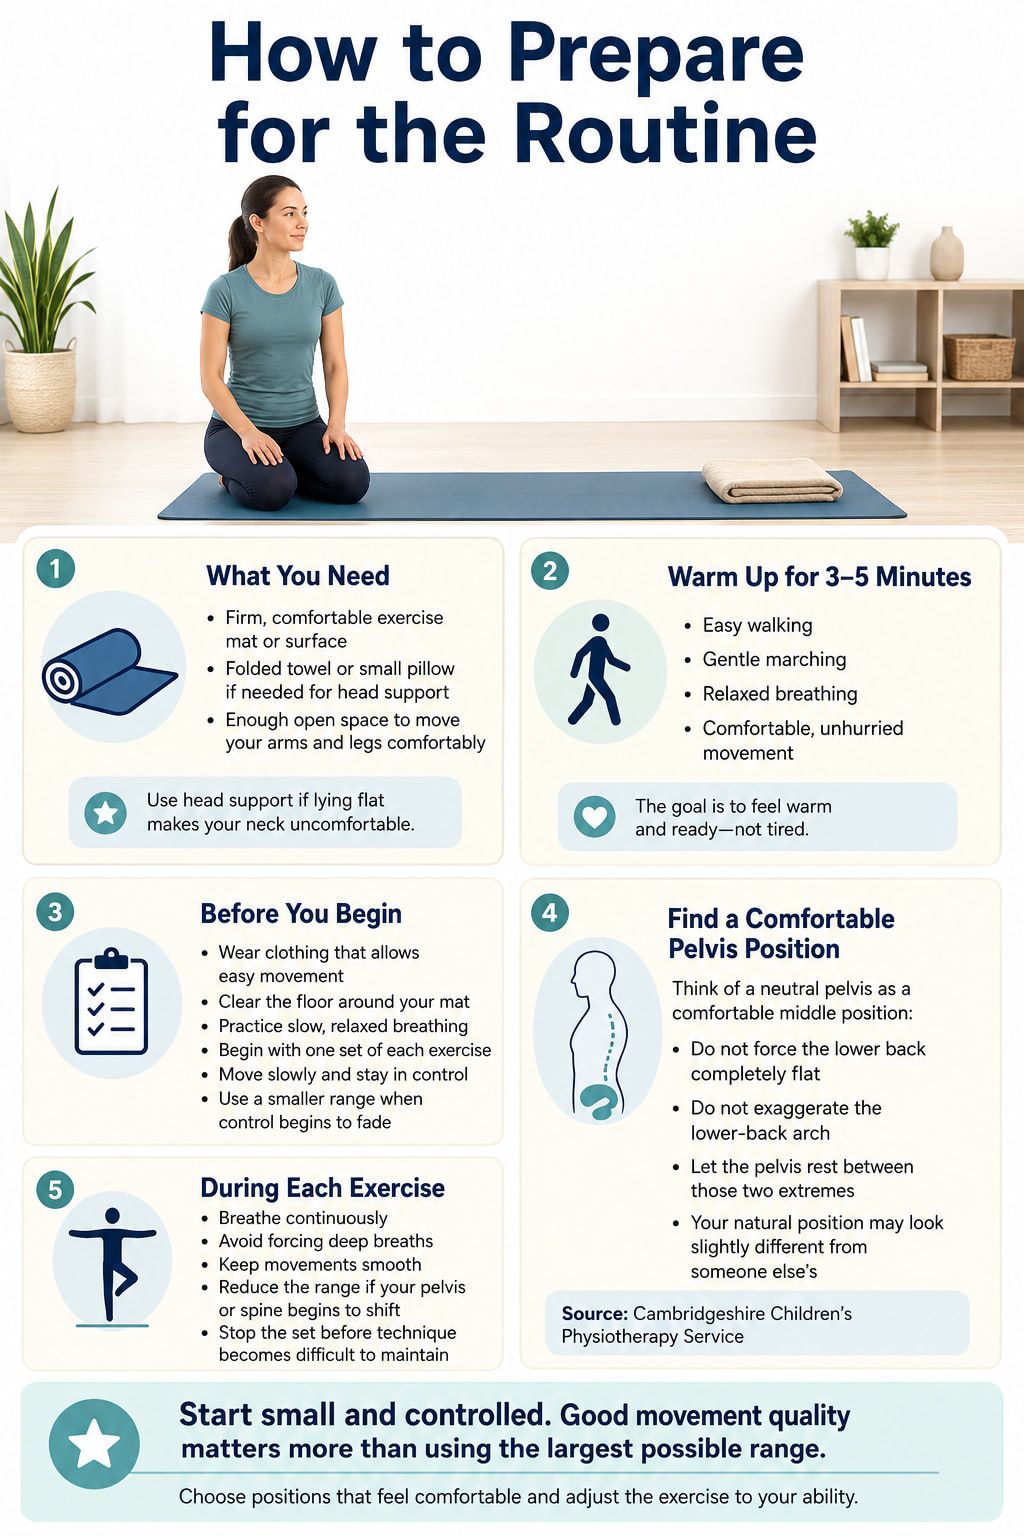
You need a mat or other firm, comfortable surface. A folded towel or small pillow can support your head if lying flat makes your neck uncomfortable.
Before starting:
- Walk or march gently for three to five minutes.
- Wear clothing that allows comfortable movement.
- Clear enough floor space to extend your arms and legs.
- Practice slow breathing without forcing a deep inhale.
- Begin with one set of each exercise.
- Use a smaller range whenever you cannot control the movement.
The Cambridgeshire Children’s Physiotherapy Service describes a neutral pelvis as a middle position rather than strongly flattening or excessively arching the lower back. It is not one rigid position that must look identical for everyone.
8 Gentle Pilates Exercises for Back Pain Relief at Home
These 8 gentle Pilates exercises for back pain focus on controlled movement, core stability, hip strength, and mobility.
Start with a comfortable range, use the easier variations when needed, and progress only when the exercises feel controlled.
1. Pelvic Tilt
Best for: Learning how to move the pelvis and lower back gently before performing more demanding exercises.
Muscles worked: Deep abdominal muscles, obliques, and glutes.
Equipment needed: Exercise mat and optional head support.
Sets, reps, and rest: Perform 1–2 sets of 6–10 repetitions. Rest for approximately 20–30 seconds.
How to Do It
- Lie on your back with your knees bent and feet flat, approximately hip-width apart.
- Let your arms rest beside you and find a comfortable starting position for your lower back.
- Exhale and gently tip your pelvis toward your ribs, allowing your lower back to move slightly closer to the mat.
- Pause for one or two seconds without lifting your hips.
- Inhale and return to your comfortable starting position.
Move slowly enough to notice the pelvis rocking. Do not press your lower back forcefully into the floor.
Common mistakes: Lifting the hips, squeezing the abdominals as hard as possible, pushing through the feet, holding the breath, or making the movement so large that it increases discomfort.
Regression or progression: Make the tilt almost invisible if your back feels sensitive. To progress, pause for three seconds in the tilted position or alternate smoothly between a slight flattening and a comfortable neutral position.
Coaching cue: Rock the pelvis rather than moving the rib cage.
Newcastle Hospitals includes pelvic tilts in its back-pain guidance as an early movement exercise and recommends using a small range when needed.
2. Supine Knee Sways
Best for: Exploring comfortable rotation through the hips, pelvis, and lower back.
Muscles worked: Obliques, spinal stabilizers, and hip rotators.
Equipment needed: Exercise mat.
Sets, reps, and rest: Perform 5–8 repetitions per side for 1–2 sets. Rest for approximately 20 seconds.
How to Do It
- Lie on your back with your knees bent and feet flat.
- Keep your knees together or comfortably close. Place your arms beside you or out slightly for support.
- Exhale as you allow both knees to move a short distance to one side.
- Keep both shoulders comfortably in contact with the mat.
- Inhale as you return to the center, then repeat in the other direction.
The goal is not to reach the floor. Use only the range from which you can return smoothly.
Common mistakes: Forcing the knees toward the floor, lifting one shoulder, separating the legs, moving quickly, or using momentum to return to the center.
Regression or progression: Begin by moving the knees only a few inches. Gradually increase the range when you can keep the movement slow and your symptoms remain settled.
Coaching cue: Move only as far as you can return without a jerk.
Newcastle Hospitals back-exercise guidance also recommends beginning knee rolls with a relatively small movement through the hips, pelvis, and lower back.
3. Heel Slide
Best for: Building abdominal and pelvic control while one leg moves.
Muscles worked: Deep abdominal muscles and obliques, with assistance from the hip and thigh muscles.
Equipment needed: Exercise mat. Socks may make the movement easier on a smooth surface.
Sets, reps, and rest: Perform 1–2 sets of 5–8 repetitions per leg. Rest for approximately 20–30 seconds.
How to Do It
- Lie on your back with your knees bent, feet flat, and pelvis in a comfortable neutral position.
- Inhale to prepare.
- Exhale and slowly slide one heel away from your body.
- Stop before your pelvis tips, your lower back arches noticeably, or discomfort increases.
- Inhale and slide the heel back to the starting position.
- Alternate legs.
Keep the nonmoving knee quiet rather than allowing it to drift from side to side.
Common mistakes: Straightening the leg farther than you can control, pressing the lower back aggressively into the mat, lifting the heel, holding the breath, or rushing the return.
Regression or progression: Use a very short slide when beginning. Progress by extending the leg farther while keeping the pelvis steady. A later progression is to let the heel hover slightly above the mat, but only when the standard version is easy and comfortable.
Coaching cue: Imagine that your pelvis is a quiet platform.
The Cambridgeshire Children’s Physiotherapy Service also describes the heel-slide movement as a basic Pilates one-leg stretch, emphasizing pelvic control while the heel moves.
4. Pilates Knee Fold
Best for: Teaching the trunk to remain steady while one foot leaves the floor.
Muscles worked: Deep abdominal muscles, obliques, and hip flexors.
Equipment needed: Exercise mat.
Sets, reps, and rest: Perform 1–2 sets of 5–8 repetitions per side. Rest for approximately 20–30 seconds.
How to Do It
- Lie on your back with your knees bent and feet flat.
- Keep your pelvis in a comfortable middle position and relax your shoulders.
- Exhale as you lift one foot from the floor while keeping the knee bent.
- Raise the leg only as far as you can without rocking or arching the pelvis. The shin does not have to become parallel with the floor.
- Inhale and lower the foot quietly.
- Repeat with the opposite leg.
Keep the knee comfortably bent rather than pulling it forcefully toward your chest.
Common mistakes: Rocking from side to side, pulling the knee too close, pushing the abdomen outward, lifting the head, or holding the breath.
Regression or progression: Begin by lifting only the heel while the toes remain on the mat. Next, lift the whole foot a few inches. Progress toward alternating tabletop knee folds or controlled toe taps only after you can keep the pelvis steady.
Coaching cue: Lift the leg without tipping the pelvis.
5. Shoulder Bridge
Best for: Strengthening the glutes and hamstrings while practicing controlled hip extension.
Muscles worked: Gluteus maximus, hamstrings, spinal extensors, and abdominal muscles.
Equipment needed: Exercise mat.
Sets, reps, and rest: Perform 1–2 sets of 6–10 repetitions. Rest for approximately 30–45 seconds.
How to Do It
- Lie on your back with your knees bent and feet approximately hip-width apart.
- Place your feet close enough that you can press through them comfortably.
- Exhale, make a small pelvic tilt, and press through both feet.
- Lift your hips until your body forms a comfortable slope from your shoulders toward your knees.
- Pause for one or two seconds while keeping your ribs controlled.
- Inhale and lower your hips slowly.
Stop the lift before your lower back arches excessively. Your weight should remain across your shoulders and upper back—not your neck.
Common mistakes: Lifting too high, pushing the ribs upward, allowing the knees to collapse inward, placing pressure on the neck, or driving mainly through the toes.
Regression or progression: Perform a mini bridge by lifting your hips only a few inches. Progress by holding the top position for three to five seconds. A bridge march is a later option, but only when you can keep the pelvis level without discomfort.
Coaching cue: Lift with your glutes instead of arching your back.
Calderdale and Huddersfield NHS Foundation Trust includes bridges in its Pilates exercise guidance to develop gluteal strength and control around the pelvis and lower back.
6. Side-Lying Clam
Best for: Strengthening the outer hips without placing the spine under a heavy load.
Muscles worked: Gluteus medius, gluteus minimus, and deep hip rotators.
Equipment needed: Exercise mat and optional pillow.
Sets, reps, and rest: Perform 1–2 sets of 8–12 repetitions per side. Rest for approximately 30 seconds before changing sides.
How to Do It
- Lie on one side with your head supported.
- Bend both knees and bring them slightly forward while keeping your hips stacked.
- Keep your feet together.
- Exhale and open the top knee without rolling your pelvis backward.
- Stop when you feel the outer hip working or just before the pelvis begins to move.
- Inhale and lower the knee slowly.
The movement may be much smaller than expected. A high knee position is not necessary.
Common mistakes: Rolling backward, twisting through the waist, opening the knee too far, separating the feet, or using momentum.
Regression or progression: Use a smaller range or perform a single-knee fallout while lying on your back. Progress by placing a light resistance band above your knees after you can complete 12 controlled bodyweight repetitions.
Coaching cue: Imagine both hip bones pointing straight ahead.
Cambridge University Hospitals describes maintaining a level, controlled pelvis during the clam rather than rotating the whole body backward.
7. Pilates Cat Stretch
Best for: Practicing slow, supported movement through the spine.
Muscles worked: Abdominal muscles, spinal extensors, and shoulder stabilizers.
Equipment needed: Exercise mat.
Sets, reps, and rest: Perform 1–2 sets of 5–8 slow repetitions. Rest for approximately 20 seconds.
How to Do It
- Begin on your hands and knees with your hands under your shoulders and knees under your hips.
- Spread your fingers and keep your elbows soft rather than locked.
- Inhale in a comfortable neutral position.
- Exhale as you gently tuck your tailbone and round your spine.
- Allow your head to follow the movement without forcing your chin against your chest.
- Inhale and return to neutral.
You may add a small downward curve on the return if extension feels comfortable, but a deep arch is not required.
Common mistakes: Forcing the largest possible curve, dropping between the shoulders, shifting the hips far backward, moving only the neck, or holding the breath.
Regression or progression: Perform the movement seated with your hands resting on your thighs or standing with your hands on a countertop. Progress to a small cat-cow motion when both directions feel comfortable.
Coaching cue: Make the curve smooth rather than large.
Newcastle Hospitals also includes the cat stretch in its guidance as a supported four-point movement for the back.
8. Four-Point Opposite Arm and Leg Reach
This exercise is also commonly called a modified bird dog or four-point kneeling superman.
Best for: Building trunk endurance and resisting unwanted twisting while the arms and legs move.
Muscles worked: Deep abdominal muscles, multifidus, spinal extensors, glutes, and shoulder stabilizers.
Equipment needed: Exercise mat.
Sets, reps, and rest: Perform 1–2 sets of 4–8 repetitions per side. Hold each controlled reach for 2–3 seconds. Rest for approximately 30–45 seconds.
How to Do It
- Begin on your hands and knees with your spine in a comfortable neutral position.
- Gently tighten your abdomen without holding your breath.
- Slide one foot backward along the floor until the leg is nearly straight.
- If you remain steady, reach the opposite arm forward.
- Lift the arm and leg only as high as you can without arching or rotating your back.
- Pause briefly, return with control, and change sides.
The arm and leg do not have to reach full height. Maintaining a quiet torso is more important than lifting farther.
Common mistakes: Lifting the leg too high, opening one hip, rotating the pelvis, sagging through the lower back, shrugging the shoulder, or trying to balance before mastering the easier versions.
Regression or progression: Begin with an arm reach, leg slide, or leg lift on its own. Progress to the full opposite arm and leg reach, then gradually extend the hold toward five seconds.
Coaching cue: Imagine balancing a glass across your lower back.
Calderdale and Huddersfield NHS Foundation Trust uses four-point kneeling reaches in its Pilates guidance to train the core, coordination, and balance.
10-Minute Beginner Pilates Routine for Back Pain
Perform this routine two or three times per week on nonconsecutive days. Start with one round.
| Exercise | Starting amount |
|---|---|
| Pelvic Tilt | 6–8 repetitions |
| Supine Knee Sways | 5 per side |
| Heel Slide | 6 per side |
| Pilates Knee Fold | 5 per side |
| Shoulder Bridge | 6–8 repetitions |
| Side-Lying Clam | 8 per side |
| Pilates Cat Stretch | 5–6 repetitions |
| Opposite Arm and Leg Reach | 4 per side |
Rest for 20–45 seconds between exercises. Keep the session at a light-to-moderate effort of approximately 3–5 out of 10. You should feel that you could complete several more repetitions with good form.
Do not force yourself to finish every movement. Skip an exercise that consistently aggravates your symptoms and continue with the comfortable options.
How to Progress Safely
Progress only when you can complete your current routine with controlled breathing, steady form, and no meaningful increase in symptoms afterward.
Use this order:
- Improve the quality and smoothness of each repetition.
- Increase the range slightly.
- Add one or two repetitions.
- Add a second set.
- Move to the harder exercise variation.
Change one variable at a time. For example, do not add a resistance band, extra repetitions, longer holds, and a second set during the same session.
A 2024 randomized trial published in Clinical Rehabilitation used supervised Pilates sessions twice weekly for six weeks, with exercises modified to each participant’s ability. That does not mean everyone requires the same schedule.
If your back feels noticeably worse later in the day or the following morning, reduce the range, repetitions, or number of exercises during the next session. Seek professional guidance if the increase continues.
Common Mistakes When Doing Pilates With Back Pain
Forcing the Lower Back Flat
Not every exercise requires the lower back to remain pressed against the mat. Use a comfortable middle position unless the exercise specifically involves a pelvic tilt.
Using Too Much Range
A smaller controlled movement usually provides more useful practice than a large movement accompanied by twisting, arching, or pain.
Bracing as Hard as Possible
Pilates requires control, not maximum abdominal tension. Tighten your trunk gently enough to remain steady while continuing to breathe.
Progressing Too Quickly
Full tabletop positions, double-leg movements, long planks, teasers, and roll-ups demand more control than the exercises in this routine. Master the easier versions first.
Holding the Breath
Exhale during the harder part of the exercise and inhale during the return. Do not force your breathing into an uncomfortable rhythm.
Treating Every Type of Back Pain the Same Way
Some people tolerate bending better, while others prefer extension or a smaller overall range. Exercise selection should be based on your symptoms rather than a universal list of “good” and “bad” movements.
Can Pilates Exercises Help With Back Pain?
Pilates can be a useful form of structured exercise for some people with persistent or recurring low-back pain.
The World Health Organization recommends structured exercise programs as one part of person-centered, nonsurgical care for chronic primary low-back pain. A review prepared for the guideline found moderate-certainty evidence that structured exercise probably reduces pain and functional limitations in adults with chronic primary low-back pain.
A 2024 systematic review indexed by the National Library of Medicine and covering 36 studies reported a positive effect from Pilates compared with no exercise, with a similar positive trend when Pilates was compared with nonspecific exercise.
However, Pilates should not be presented as a guaranteed cure or the only effective option. A large Cochrane review found that exercise probably reduces chronic low-back pain, but improvements in functional limitations were generally smaller.
The Clinical Rehabilitation randomized trial involving 145 adults found short-term statistical differences favoring Pilates over a home exercise program. The differences in pain and disability were not considered clinically meaningful, and there were no significant differences in those outcomes at the six-month follow-up. Both groups improved over time.
The practical takeaway is that Pilates may help, especially when exercises are appropriately selected and progressed. Consistency, individual tolerance, and good instruction are usually more important than choosing one supposedly perfect exercise method.
Frequently Asked Questions
Is Pilates good for lower-back pain?
Pilates may help some people with persistent or recurring nonspecific lower-back pain by providing structured practice in strength, movement, breathing, and coordination. The systematic review indexed by the National Library of Medicine found favorable effects compared with no exercise, but Pilates is one exercise option rather than a guaranteed solution. People with specific injuries or medical conditions may need an individualized program.
How often should I do Pilates for back pain?
Begin with two or three short sessions per week. Gentle movements such as pelvic tilts or small knee sways may be practiced more often when they feel comfortable, but strengthening exercises may benefit from a recovery day between sessions.
Should Pilates make my back hurt?
You may notice muscular effort, stiffness easing, or a mild stretching sensation. Sharp, spreading, or steadily increasing pain is a reason to stop. Reduce the movement if symptoms build during the set or remain noticeably worse afterward.
Can I do these exercises during a back-pain flare-up?
A reduced routine may be suitable during a mild, familiar flare-up. Use a smaller range, fewer repetitions, and the easiest exercises, such as pelvic tilts or gentle knee sways. Do not self-manage severe, rapidly worsening, unfamiliar, or injury-related pain with a general routine.
Should my lower back stay flat during Pilates?
No. Your lower back normally has a natural curve. Some exercises use a deliberate pelvic tilt, while others ask you to maintain a comfortable middle or neutral position. Avoid forcing either a completely flat or heavily arched posture.
Which Pilates exercises should beginners avoid with back pain?
There is no single prohibited list for everyone. However, beginners should usually postpone demanding movements such as full roll-ups, teasers, double-leg lowers, advanced swimming, long planks, and deep spinal extension until they have sufficient control and those movements are appropriate for their symptoms.
How long does Pilates take to help back pain?
There is no guaranteed timeline. The Clinical Rehabilitation trial reported changes after approximately six weeks of regular practice, but results vary according to the cause and duration of symptoms, exercise selection, supervision, consistency, sleep, stress, general activity, and other health factors.
Conclusion
The best Pilates exercises for back pain are not necessarily the most advanced. Pelvic tilts, heel slides, bridges, clams, and supported four-point movements provide practical ways to build mobility, hip strength, and trunk control at home.
Start with one controlled set, keep the range comfortable, and progress only when your breathing and form remain steady. A physical therapist or other qualified healthcare professional can help personalize the exercises when symptoms persist, repeatedly return, or limit normal activities.
This content is for informational purposes only and is not a substitute for medical advice.
Best References
- Patti A, Thornton JS, Giustino V, et al. Effectiveness of Pilates exercise on low back pain: a systematic review with meta-analysis. Disability and Rehabilitation.
- Tottoli CR, Ben ÂJ, da Silva EN, et al. Effectiveness of Pilates compared with home-based exercises in individuals with chronic non-specific low back pain: Randomised controlled trial. Clinical Rehabilitation.
- Hayden JA, Ellis J, Ogilvie R, Malmivaara A, van Tulder MW. Exercise therapy for chronic low back pain. Cochrane Database of Systematic Reviews.
- Verville L, Ogilvie R, Hincapié CA, et al. Benefits and harms of structured exercise programs for chronic primary low back pain in adults: systematic review to inform a World Health Organization clinical practice guideline. Journal of Occupational Rehabilitation.
- World Health Organization. WHO guideline for non-surgical management of chronic primary low back pain in adults in primary and community care settings.