This chair exercise routine provides a practical full-body workout for beginners using one sturdy chair, with optional resistance bands or light weights. It combines seated and chair-supported movements to train mobility, the legs, hips, back, chest, shoulders, arms, and basic balance.

Start with one controlled round. Most people can complete it in about 15–20 minutes, including short rest periods. As the exercises become easier, add repetitions, resistance, or a second round rather than moving faster.
Chair Exercise Routine at a Glance
| Category | Practical recommendation |
|---|---|
| Best for | Beginners, older adults, home exercisers, and people who prefer low-impact training |
| Duration | About 15–20 minutes for one round |
| Equipment | A sturdy chair; optional resistance band and light weights |
| Starting volume | 1 set of each exercise |
| Repetitions | Usually 8–12 controlled repetitions |
| Rest | 30–60 seconds between exercises |
| Frequency | 2–3 nonconsecutive days per week |
| Effort | Light to moderate, with 2–4 good repetitions still possible |
| Routine type | Mostly seated with two optional chair-supported standing exercises |
What You Need Before Starting
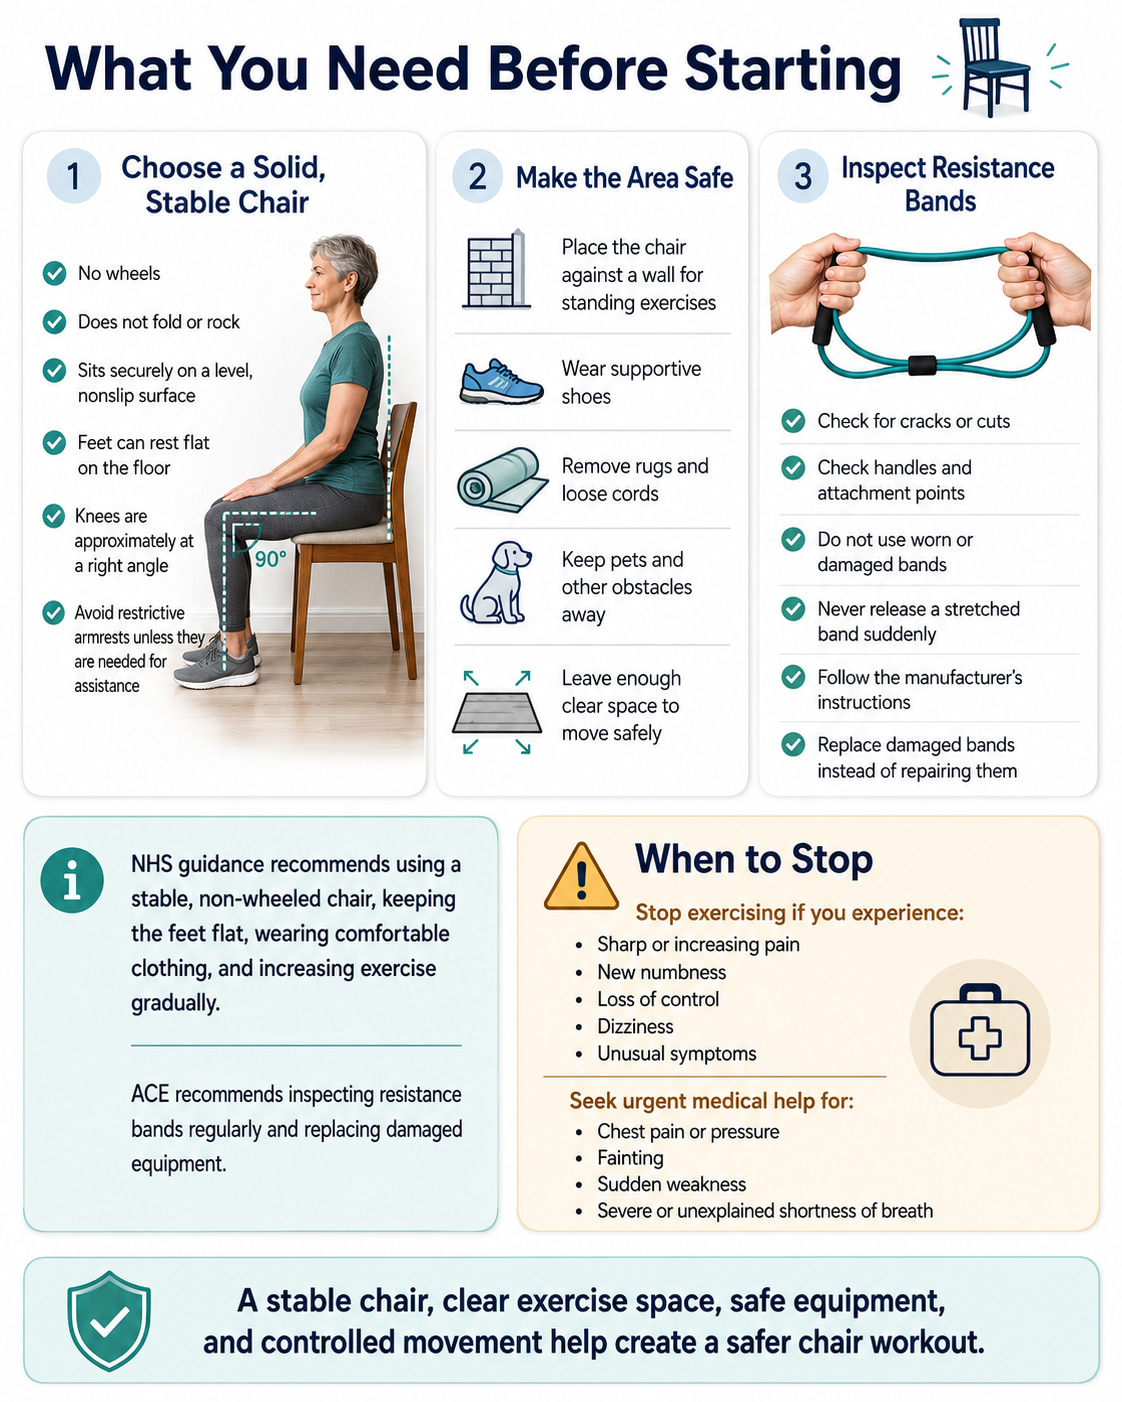
Choose a solid chair that:
- Does not have wheels
- Does not fold or rock
- Sits securely on a level, nonslip surface
- Allows your feet to rest flat on the floor
- Places your knees at approximately a right angle
- Has no armrests that restrict movement, unless you need armrests for assistance
For standing exercises, position the chair against a wall so it cannot slide. Wear supportive shoes and clear away rugs, cords, pets, and other tripping hazards.
The NHS sitting exercise guidance also recommends a stable, non-wheeled chair, flat foot placement, comfortable clothing, and gradual increases in repetitions.
Inspect resistance bands before every workout. Do not use a band with cracks, cuts, damaged handles, or worn attachment points. Never release a stretched band suddenly. The ACE resistance-band safety guidance recommends following the manufacturer’s instructions and discarding damaged bands rather than attempting to repair them.
When to Stop
Stop the exercise if you experience sharp or increasing pain, new numbness, loss of control, dizziness, or unusual symptoms.
Seek urgent medical help for chest pain or pressure, fainting, sudden weakness, or severe or unexplained shortness of breath. These can be warning signs that should not be ignored. (American Heart Association warning signs)
Beginner Chair Exercise Routine
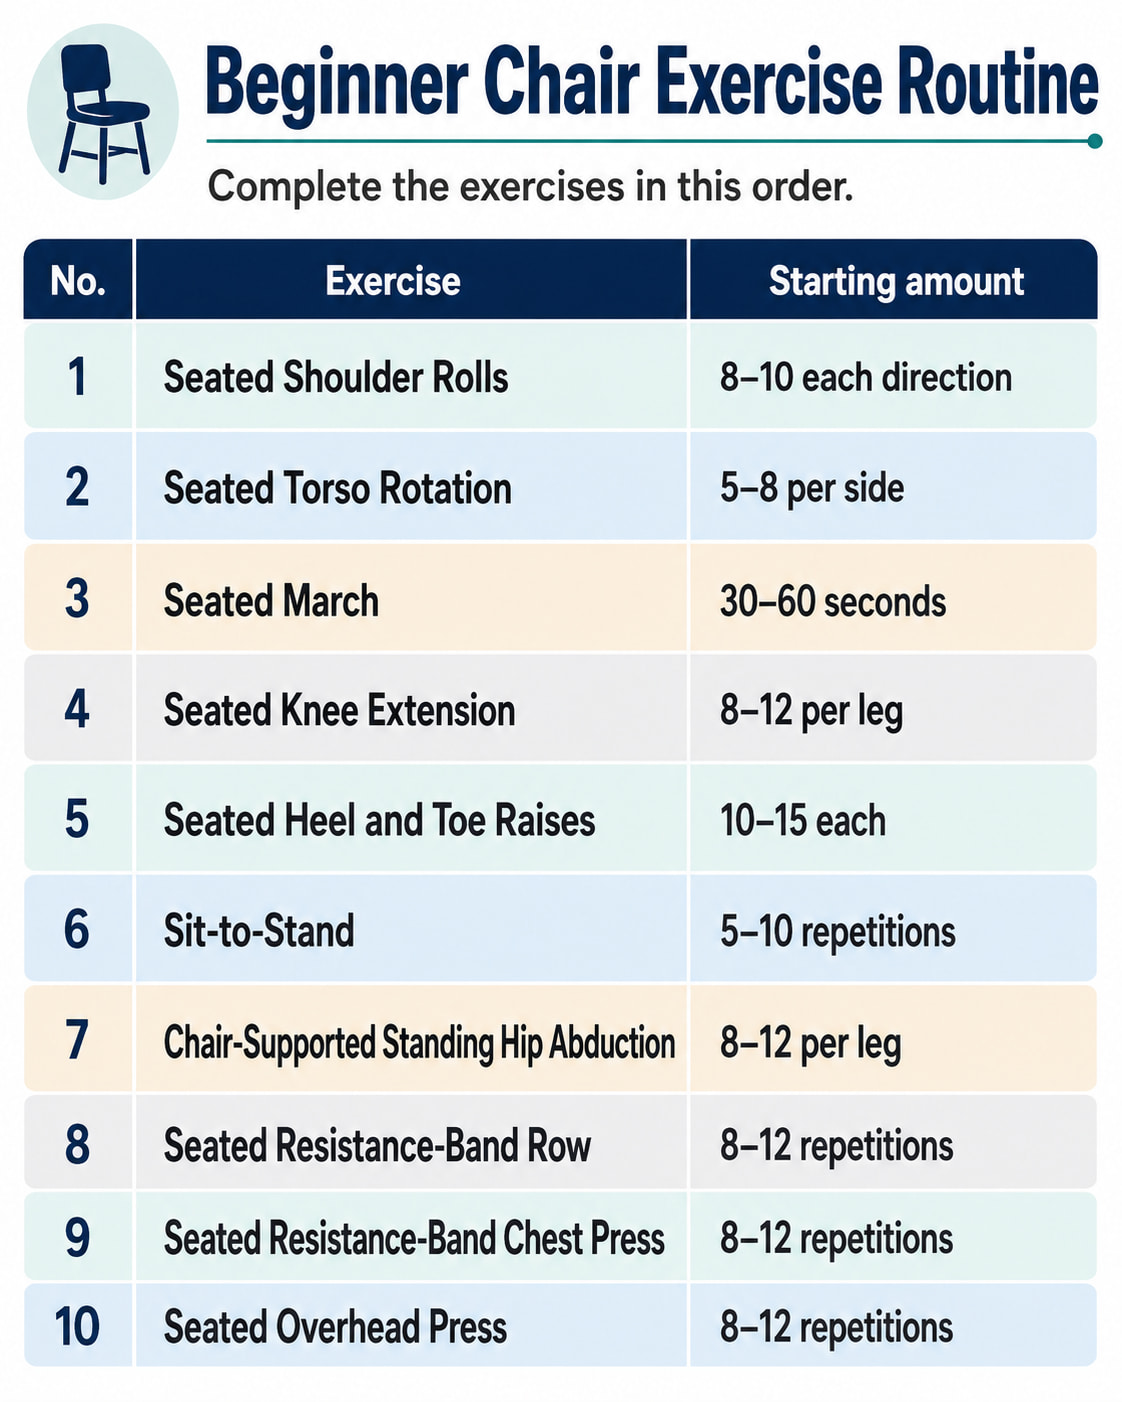
Complete the exercises in this order.
| Exercise | Starting amount | |
|---|---|---|
| 1 | Seated Shoulder Rolls | 8–10 each direction |
| 2 | Seated Torso Rotation | 5–8 per side |
| 3 | Seated March | 30–60 seconds |
| 4 | Seated Knee Extension | 8–12 per leg |
| 5 | Seated Heel and Toe Raises | 10–15 each |
| 6 | Sit-to-Stand | 5–10 repetitions |
| 7 | Chair-Supported Standing Hip Abduction | 8–12 per leg |
| 8 | Seated Resistance-Band Row | 8–12 repetitions |
| 9 | Seated Resistance-Band Chest Press | 8–12 repetitions |
| 10 | Seated Overhead Press | 8–12 repetitions |
How to Structure the Workout
- Begin with shoulder rolls, torso rotations, and seated marching as your warm-up.
- Complete one set of exercises 4–10.
- Rest about 30–60 seconds between exercises.
- Take up to 90 seconds after sit-to-stands if needed.
- Keep your effort around 4–6 out of 10 when starting.
- Finish strength exercises while you could still perform about 2–4 controlled repetitions.
- Perform the routine 2–3 times per week on nonconsecutive days.
Once one round feels comfortable and controlled, progress to two rounds.
10 Easy Full-Body Chair Exercises
These 10 easy full-body chair exercises combine seated and chair-supported movements to train your legs, hips, core, back, chest, shoulders, and arms. Follow them in order, use a comfortable range of motion, and choose the easier modification whenever you need more support or control.
1. Seated Shoulder Rolls
Best for: Warming up the shoulders and practicing relaxed, upright posture.
Muscles worked: The trapezius, rhomboids, levator scapulae, and other muscles that move and control the shoulder blades. This is primarily a mobility exercise rather than a heavy strengthening movement.
Equipment needed: A sturdy chair.
Sets, reps, and rest: Perform 1 set of 8–10 rolls in each direction. Little or no rest is needed.
How to Do It
- Sit tall with your feet flat and your hands resting on your thighs.
- Let your arms and neck relax.
- Slowly lift your shoulders toward your ears.
- Roll them backward, then guide them down away from your ears.
- Complete all repetitions before carefully reversing the direction.
Common mistakes: Avoid rushing the circles, pushing your head forward, arching your lower back, or forcing the shoulders into an uncomfortable range.
Progression or regression: Make smaller circles if the movement feels stiff. To progress, combine each backward roll with a controlled arm sweep rather than adding heavy weights.
2. Seated Torso Rotation
Best for: Controlled upper-back rotation and trunk mobility.
Muscles worked: Obliques, deep spinal stabilizers, and muscles of the upper back.
Equipment needed: A sturdy chair.
Sets, reps, and rest: Perform 1 set of 5–8 repetitions per side. Pause for 1–3 seconds at a comfortable endpoint.
How to Do It
- Sit upright with your feet flat and knees pointing forward.
- Cross your arms over your chest or place your hands on opposite shoulders.
- Keep your hips and knees facing forward.
- Slowly turn your chest to one side until you feel a comfortable stretch.
- Return to the center and repeat on the other side.
The NHS recommends keeping the hips still and rotating only as far as feels comfortable during a seated upper-body twist.
Common mistakes: Do not bounce, pull against the chair, move the knees from side to side, or force a larger range than you can control.
Progression or regression: Place your hands on your thighs and use a smaller range to make the exercise easier. Progress by adding a slightly longer pause, not by holding a heavy weight while twisting.
3. Seated March
Best for: Warming up the hips and thighs while gently increasing breathing and heart rate.
Muscles worked: Hip flexors and quadriceps, with the abdominal muscles helping maintain an upright trunk.
Equipment needed: A sturdy chair.
Sets, reps, and rest: March for 30–60 seconds or complete 8–12 repetitions per leg. Rest for 30 seconds if needed.
How to Do It
- Sit toward the front half of the chair with your feet flat.
- Hold the sides of the seat lightly if you need additional support.
- Lift one knee as high as you can without leaning backward.
- Lower the foot quietly and under control.
- Alternate legs at a steady pace.
The NHS describes seated hip marching as a controlled lift-and-lower movement for the hips and thighs.
Common mistakes: Avoid leaning far backward, pulling excessively with your hands, stomping the feet, or marching so quickly that your posture changes.
Progression or regression: Slide one foot forward and back without lifting it if marching is difficult. Progress by increasing the duration, lifting the knees slightly higher, or slowing each lowering phase.
4. Seated Knee Extension
Best for: Strengthening the front of the thigh and improving control while straightening the knee.
Muscles worked: Quadriceps.
Equipment needed: A sturdy chair. An ankle weight or light resistance band is optional for later progression.
Sets, reps, and rest: Perform 1–2 sets of 8–12 repetitions per leg. Rest for 30–45 seconds.
How to Do It
- Sit tall with both feet flat.
- Brace your abdomen lightly without holding your breath.
- Slowly straighten one knee until the leg reaches a comfortable position.
- Pause for 1–2 seconds without forcefully snapping the knee backward.
- Lower the foot slowly and repeat before changing legs.
Chair-exercise instructions from University College London Hospitals include controlled seated knee extensions, with the knee straightened and briefly held.
Common mistakes: Avoid kicking the leg, using momentum, leaning far backward, holding your breath, or forcing the knee through pain.
Progression or regression: Use a shorter range or fewer repetitions if needed. Progress with a longer pause, a light ankle weight, or suitable band resistance only after you can control the unweighted movement.
5. Seated Heel and Toe Raises
Best for: Ankle control and lower-leg muscular endurance.
Muscles worked: Gastrocnemius and soleus during heel raises; tibialis anterior and other ankle dorsiflexors during toe raises.
Equipment needed: A sturdy chair.
Sets, reps, and rest: Perform 1–2 sets of 10–15 heel raises followed by 10–15 toe raises. Rest for 30 seconds.
How to Do It
- Sit tall with both feet flat and approximately hip-width apart.
- Keep your toes down as you lift both heels.
- Pause briefly, then lower the heels under control.
- Keep your heels down and lift your toes toward your shins.
- Lower the toes slowly and repeat.
UCLH includes controlled seated foot movements in which the toes are pulled upward and then pointed away.
Common mistakes: Do not bounce the feet, roll the ankles outward, rush the repetitions, or let the feet slide away from their starting positions.
Progression or regression: Use a smaller range if necessary. Progress to one foot at a time or place a light weight across the thighs during heel raises.
6. Sit-to-Stand
Best for: Functional leg strength and practicing the movement used to rise from a chair.
Muscles worked: Quadriceps, gluteus maximus, hamstrings, adductors, calves, and trunk stabilizers.
Equipment needed: A sturdy chair positioned against a wall.
Sets, reps, and rest: Begin with 1–2 sets of 5–10 repetitions. Rest for 60–90 seconds.
How to Do It
- Sit near the front of the chair with your feet approximately hip-width apart.
- Place your feet slightly behind your knees if comfortable.
- Lean your torso forward while keeping your back long.
- Press through your feet and stand up using your legs.
- Stand tall without leaning backward.
- Push your hips back and lower yourself slowly to the chair.
UCLH recommends sitting near the chair’s edge, leaning forward slightly, looking ahead, and standing slowly with the leg muscles.
Common mistakes: Avoid dropping onto the seat, letting the knees collapse inward, placing the feet too far forward, or pulling on an unstable object.
Progression or regression: Use your hands on the chair’s armrests, your thighs, or a stable countertop if you need help. A firm cushion can raise the seat. Progress by using less hand assistance, lowering for three seconds, or holding one light weight at your chest.
Coaching cue: Bring your nose forward over your toes before standing.
7. Chair-Supported Standing Hip Abduction
Best for: Strengthening the outer hips and practicing supported standing control.
Muscles worked: Gluteus medius, gluteus minimus, tensor fasciae latae, and muscles that stabilize the standing leg.
Equipment needed: A sturdy chair positioned against a wall.
Sets, reps, and rest: Perform 1–2 sets of 8–12 repetitions per side. Rest for 30–60 seconds.
How to Do It
- Stand behind the chair and hold the backrest with both hands.
- Stand tall with your feet pointing forward.
- Shift your weight onto one leg without leaning over the chair.
- Move the opposite leg a short distance out to the side.
- Pause briefly, then return the foot under control.
- Complete the repetitions before changing sides.
UCLH recommends keeping the upper body upright while moving one leg to the side. Its beginner version uses two hands for support, followed by one hand as control improves.
Common mistakes: Avoid swinging the leg, rotating the toes toward the ceiling, bending sideways, or turning the movement into a large kick.
Progression or regression: Replace the standing exercise with seated resistance-band hip abduction if standing is not appropriate. Progress by using one hand, adding a pause, or using a light loop band above the knees.
Coaching cue: Stay tall and move the leg, not the torso.
8. Seated Resistance-Band Row
Best for: Upper-back strength and balancing the pressing exercises in the routine.
Muscles worked: Latissimus dorsi, rhomboids, middle trapezius, rear deltoids, biceps, and brachialis.
Equipment needed: A long, flat resistance band or a band secured to a manufacturer-approved anchor.
Sets, reps, and rest: Perform 1–2 sets of 8–12 repetitions. Rest for 45–60 seconds.
How to Do It
- Inspect the band before using it.
- Sit tall near the front of the chair with your knees slightly bent.
- Center a flat band securely around the midfoot of both shoes, not around the toes. Hold one end in each hand.
- Begin with your arms extended and shoulders relaxed.
- Pull your elbows backward close to your ribs.
- Pause when your hands reach the sides of your torso.
- Slowly straighten your arms without rounding your back.
The ACE seated row guide emphasizes a straight torso, elbows traveling close to the rib cage, and a controlled return.
Do not loop handled resistance tubes around your feet because the handles may slip. Use a flat band or a secure, purpose-designed anchor according to the manufacturer’s instructions.
Common mistakes: Avoid rounding the back, shrugging the shoulders, leaning backward, jerking the band, or using resistance that prevents a smooth return.
Progression or regression: Choose a lighter band or hold it with more slack to regress. Progress with a stronger band, a two-second pause, or a slower return.
9. Seated Resistance-Band Chest Press
Best for: Training an upper-body pushing pattern without getting onto the floor.
Muscles worked: Pectoralis major, anterior deltoids, and triceps.
Equipment needed: A long resistance band.
Sets, reps, and rest: Perform 1–2 sets of 8–12 repetitions. Rest for 45–60 seconds.
How to Do It
- Place the center of the band across your upper back and guide it under your arms, keeping it away from your neck.
- Hold one end in each hand with your hands near chest height.
- Sit tall with your feet flat and abdomen lightly braced.
- Press both hands forward until your arms are almost straight.
- Keep your wrists aligned with your forearms.
- Return slowly until your hands are beside your chest.
Resistance bands can be wrapped around the upper back to create resistance for a chest press without requiring a machine or bench.
Common mistakes: Avoid placing the band across the neck, flaring the ribs, arching the lower back, snapping the elbows straight, or letting the band pull the hands backward quickly.
Progression or regression: Use a lighter band or begin with less tension. Progress with a stronger band or a slower three-second return.
10. Seated Overhead Press
Best for: Strengthening the shoulders and arms.
Muscles worked: Deltoids and triceps, with the upper back, serratus anterior, and trunk muscles helping stabilize the movement.
Equipment needed: Two light dumbbells, filled water bottles, or no weight.
Sets, reps, and rest: Perform 1–2 sets of 8–12 repetitions. Rest for 45–60 seconds.
How to Do It
- Sit with your back comfortably supported and feet flat.
- Hold the weights near shoulder level with your palms facing forward or slightly inward.
- Keep your wrists straight and elbows slightly in front of your torso.
- Brace your abdomen and press the weights upward through a comfortable range.
- Stop before your ribs lift or your lower back arches.
- Lower the weights slowly to shoulder level.
The ACE seated overhead press guide recommends firm foot support, a braced trunk, neutral wrists, and controlled lifting and lowering without arching the lower back.
Common mistakes: Avoid choosing weights that make you lean backward, shrugging excessively, bending the wrists, banging the weights together, or forcing an uncomfortable overhead range.
Progression or regression: Perform the movement without weights or stop below full overhead if necessary. Progress by adding a small amount of weight only when every repetition remains controlled.
How to Make the Routine Easier
Use one or more of these adjustments:
- Complete fewer repetitions.
- Use a smaller range of motion.
- Perform only one set.
- Remove external resistance.
- Rest for longer than 60 seconds.
- Keep both hands on the chair during standing exercises.
- Use a higher chair or firm cushion for sit-to-stands.
- Replace standing hip abduction with seated band hip abduction.
- Practice a partial sit-to-stand instead of standing completely.
- Separate the routine into an upper-body day and a lower-body day.
Reducing the exercise range or volume is better than rushing through repetitions with poor control.
How to Progress Your Chair Workout
Progress after you can complete the upper end of the recommended repetitions with steady posture, normal breathing, and no unusual symptoms.
Change only one variable at a time:
- Add 1–2 repetitions per exercise.
- Add a second set or circuit.
- Increase the comfortable range of motion.
- Slow the lowering portion of each strength exercise.
- Add a slightly stronger band or heavier weight.
- Use less hand support during suitable standing exercises.
- Add a brief pause at the hardest part of the movement.
Do not progress by bouncing, holding your breath, using momentum, or forcing painful movement.
Benefits of a Full-Body Chair Exercise Routine
Provides an Accessible Starting Point
A chair can reduce balance demands and make exercise feel more manageable for someone who is new to training, returning after inactivity, or uncomfortable exercising on the floor.
Most exercises can also be adjusted by changing the range of motion, repetitions, resistance, or amount of hand support.
Trains Major Muscle Groups
This routine includes movements for the legs, hips, back, chest, shoulders, arms, and trunk.
The 2026 resistance-training guidance from the American College of Sports Medicine emphasizes training all major muscle groups at least twice per week. It also notes that bodyweight exercises, resistance bands, and home-based training can support improvements in strength and physical function.
Practices Everyday Movement Patterns
The sit-to-stand directly practices getting up from and sitting down on a chair. Rows, presses, marches, and knee extensions also use movements that can support common daily tasks.
Allows Gradual Progression
Beginners can start without external resistance. Later, they can add a resistance band, light dumbbells, filled water bottles, more repetitions, or an additional circuit.
Supports a More Complete Activity Plan
A chair workout can contribute to weekly strength and movement goals. However, adults should also include suitable aerobic activity, while older adults should add dedicated balance work when appropriate.
Current CDC physical activity guidance recommends muscle-strengthening activity on at least two days per week. Older adults are also encouraged to include aerobic and balance activities.
Common Chair Exercise Mistakes
Using an Unstable Chair
A wheeled, folding, rocking, or lightweight chair can move unexpectedly. Use a solid chair and place it against a wall for standing movements.
Moving Too Quickly
Fast repetitions can hide poor control and make it difficult to identify an uncomfortable range. Use a pace that allows you to stop at any point.
Holding Your Breath
Breathe continuously. Exhale during the harder part of a strength exercise and inhale as you return to the starting position.
Using Too Much Resistance
The weight or band should not pull you out of position. Reduce resistance if your shoulders shrug, back rounds, wrists bend, or body begins swinging.
Forcing a Larger Range
A larger movement is not automatically better. Use the greatest comfortable range you can control without sharp pain or compensating with another body part.
Progressing Everything at Once
Adding repetitions, sets, resistance, range, and frequency simultaneously can make recovery difficult. Increase one variable, then assess how you feel during and after the next few workouts.
Frequently Asked Questions
Can chair exercises provide a full-body workout?
Yes, provided the routine includes several movement patterns. A full-body chair workout should train the legs and hips, an upper-body pull, an upper-body push, the shoulders, and basic trunk control.
A routine made only of shoulder circles and stretches is useful for mobility but does not provide the same strength challenge as rows, presses, knee extensions, and sit-to-stands.
How long should a chair exercise routine last?
A beginner routine can take approximately 15–20 minutes. The exact duration depends on your pace, rest periods, and whether you complete one or two sets.
A shorter controlled session is more useful than a long routine performed with rushed form.
How often should beginners do chair exercises?
Perform the full strength routine 2–3 times per week, ideally with at least one day between sessions. Easy mobility movements such as shoulder rolls and comfortable torso rotations may be performed more frequently.
Can chair exercises build strength?
Chair exercises may help build strength when they challenge the muscles and become gradually more difficult. Sit-to-stands, resistance-band rows, chest presses, overhead presses, and weighted knee extensions are all progressible resistance exercises.
You will eventually need more repetitions, additional sets, greater resistance, or a harder variation if the original version becomes very easy.
What if I cannot safely stand?
Skip the standing exercises and use seated alternatives. Replace standing hip abduction with seated band hip abduction. You can also practice a small forward weight shift or partial assisted rise instead of a full sit-to-stand.
A physical therapist or qualified healthcare professional can provide individualized alternatives when a health condition significantly affects standing or balance.
Are chair exercises only for older adults?
No. Chair exercises can be useful for adults of different ages, especially beginners, people returning after inactivity, desk workers taking movement breaks, and anyone who prefers a supported or low-impact workout.
The difficulty depends on the exercise selection, resistance, volume, and effort—not simply whether a chair is used.
Do I need a resistance band?
A band is not required for the warm-up and lower-body exercises. However, it provides a practical way to create resistance for upper-body pulling and pressing.
Without a band, you can practice the arm movements, but they will not challenge the muscles as much as a properly selected resistance exercise.
Conclusion
A useful chair exercise routine should do more than loosen stiff joints. It should train the major muscle groups, include both pushing and pulling, practice standing when appropriate, and provide clear ways to progress.
Begin with one round of the 10 exercises, move slowly, and keep several good repetitions in reserve. Once the routine feels controlled and comfortable, add repetitions, a second round, or slightly more resistance.
References
- American College of Sports Medicine: 2026 Resistance Training Guidelines
- Centers for Disease Control and Prevention: Physical Activity Guidelines for Older Adults
- NHS: Sitting Exercises
- University College London Hospitals: Home Strength and Balance Exercises
- American Council on Exercise: Seated Row
- American Council on Exercise: Seated Overhead Press
- Systematic Review: The Effect of Chair-Based Exercise on Physical Function in Older Adults
- American Heart Association: Heart Attack, Stroke, and Cardiac Arrest Symptoms
This content is for informational purposes only and is not a substitute for medical advice.
2 thoughts on “Chair Exercise Routine: 10 Easy Full-Body Exercises”