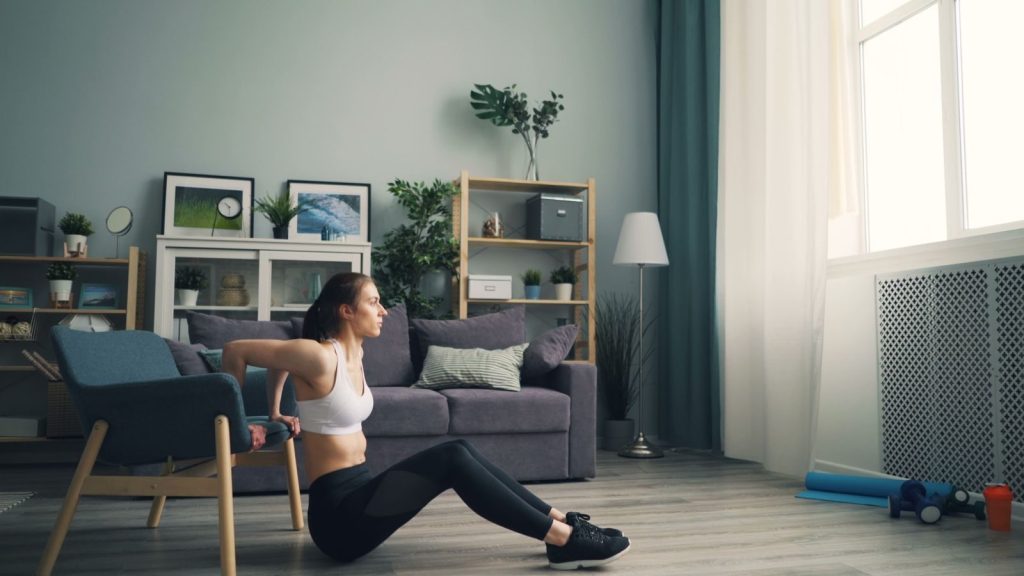
Chair exercises for abs can strengthen your core without requiring you to get onto the floor. With a stable chair and controlled movement, you can train abdominal bracing, pelvic control, trunk flexion, rotation, side bending, and core endurance.
This guide explains seven practical chair ab exercises, the muscles they work, correct form, beginner modifications, common mistakes, and how to combine them into a simple core workout.
Do Chair Exercises Really Work Your Abs?
Chair exercises can work your abs when the movements require your core muscles to stabilize or move your trunk against resistance.
Sitting does not automatically make an exercise easy. Lifting a foot, leaning slightly, rotating the torso, or holding a plank position changes the forces acting on your body. Your abdominal muscles must help control your rib cage, pelvis, and spine.
The challenge still needs to match your ability. An exercise that requires no effort will eventually become too easy, while a movement that makes you swing, strain, or lose your posture is too difficult.
The updated American College of Sports Medicine resistance-training guidance emphasizes consistency, individualization, and regular training over unnecessarily complicated programs. Bodyweight exercise can be effective when it is performed with enough effort and progressed over time.
Chair-based exercise may be especially useful for beginners, older adults, people with limited space, and anyone who finds floor exercises uncomfortable or inconvenient. A systematic review involving 25 studies and 1,388 adults age 50 and older found that chair-based programs improved several measures of physical function. The review examined broader chair exercise programs, however, not this exact abdominal routine.
How to Set Up Your Chair Safely
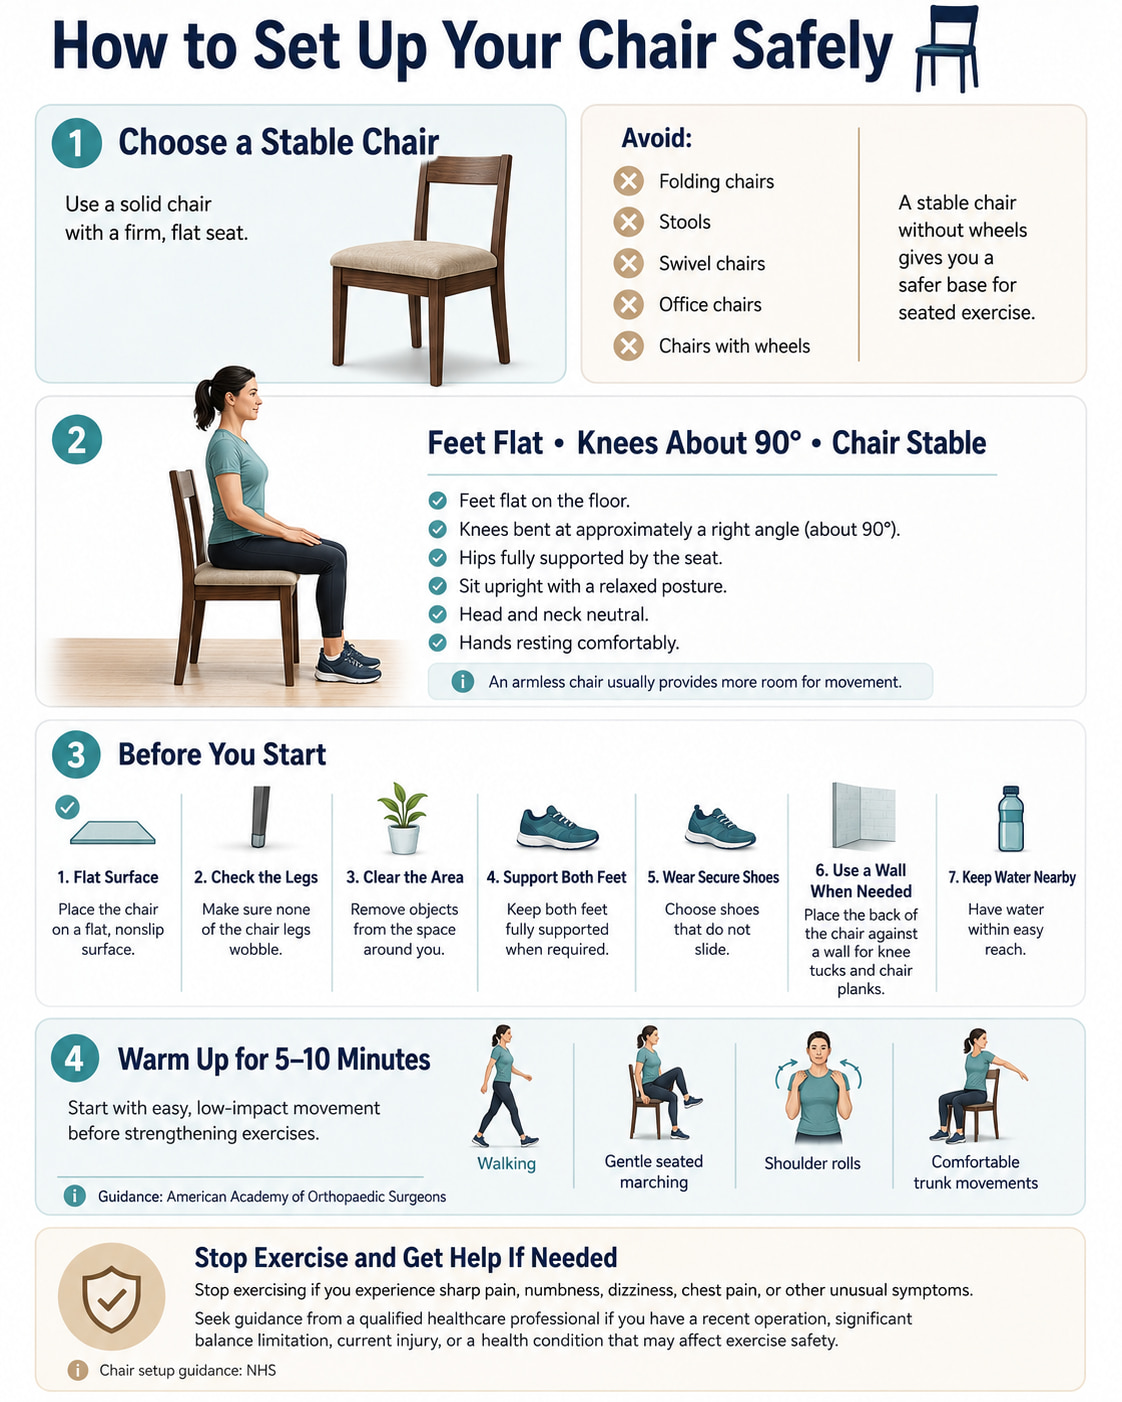
Use a solid chair with a firm, flat seat. Avoid folding chairs, stools, swivel chairs, office chairs, and chairs with wheels.
The NHS sitting-exercise guidance recommends choosing a stable chair without wheels and sitting with the feet flat and the knees bent at approximately right angles. An armless chair generally provides more room for movement.
Before starting:
- Place the chair on a flat, nonslip surface.
- Check that none of its legs wobble.
- Clear objects from the space around you.
- Sit with both feet fully supported.
- Wear shoes that do not slide.
- Place the back of the chair against a wall for knee tucks and chair planks.
- Keep water nearby.
Warm up with approximately 5–10 minutes of easy movement. Walking, gentle seated marching, shoulder rolls, and comfortable trunk movements are suitable options. The American Academy of Orthopaedic Surgeons recommends 5–10 minutes of low-impact activity before strengthening exercise.
Stop exercising if you experience sharp pain, numbness, dizziness, chest pain, or other unusual symptoms. Seek guidance from a qualified healthcare professional if you have a recent operation, significant balance limitation, current injury, or a health condition that may affect exercise safety.
7 Chair Exercises for Abs
Perform each repetition slowly enough to feel your trunk working. Continue breathing and end the set when you can no longer maintain your intended posture.
1. Seated Abdominal Brace
Best for: Learning how to engage the core without moving the spine.
Muscles worked: Transversus abdominis, rectus abdominis, internal and external obliques, and other trunk stabilizers.
Equipment needed: A stable chair.
Sets, reps, and rest: Perform 2–3 sets of 10–20 seconds. Rest for approximately 30 seconds.
How to Do It
- Sit tall near the middle or front half of the chair.
- Place your feet flat, approximately hip-width apart.
- Stack your rib cage comfortably over your pelvis.
- Gently tighten your midsection as though preparing for a light bump to the stomach.
- Keep breathing normally while maintaining the tension.
- Relax completely before beginning the next repetition.
Do not suck your stomach in as hard as possible. The goal is a firm but manageable contraction that allows you to breathe.
Common mistakes: Holding the breath, lifting the shoulders, squeezing at maximum effort, leaning backward, or pressing the feet forcefully into the floor.
Regression: Perform a shorter 5–10-second brace while sitting against the backrest.
Progression: Maintain the brace while slowly lifting one heel or reaching one arm forward.
Coaching cue: Tighten your core without changing your posture.
2. Seated Pelvic Tilt
Best for: Developing awareness and control of the pelvis and lower trunk.
Muscles worked: Abdominal muscles, spinal stabilizers, and muscles surrounding the pelvis.
Equipment needed: A stable chair.
Sets, reps, and rest: Perform 2 sets of 8–12 controlled repetitions. Rest for 30–45 seconds.
How to Do It
- Sit safely near the front half of the chair with your feet flat.
- Begin in a comfortable upright position.
- Exhale and gently roll your pelvis backward, allowing your tailbone to tuck under.
- Let your lower back round slightly without collapsing your chest completely.
- Return through the middle position.
- Gently roll the pelvis forward, creating a small natural curve in your lower back.
- Move slowly between the two positions.
The movement should come mainly from the pelvis rather than from aggressively bending your neck and shoulders.
The South Tees Hospitals NHS Foundation Trust pelvic-tilt instructions similarly describe sitting on a firm surface, rolling the pelvis backward, and then returning it forward under control.
Common mistakes: Making the movement too large, pushing into discomfort, moving only the shoulders, or rushing between positions.
Regression: Reduce the range and place your hands on your hips to feel the pelvis moving.
Progression: Pause for two seconds in each position or perform the movement with your arms crossed over your chest.
Coaching cue: Roll the pelvis; do not force the lower back.
3. Seated Alternating March
Best for: Training the core to control the pelvis while one leg moves.
Muscles worked: Deep abdominal muscles, obliques, rectus abdominis, iliopsoas, rectus femoris, and other hip flexors.
Equipment needed: A stable chair.
Sets, reps, and rest: Perform 2 sets of 8–12 lifts per side. Rest for 30–45 seconds.
How to Do It
- Sit upright with your feet flat and hands resting lightly on the chair.
- Brace your midsection without holding your breath.
- Lift one foot a few inches from the floor while keeping the knee bent.
- Keep your pelvis level and your torso still.
- Lower the foot softly and under control.
- Repeat with the opposite leg.
The NHS seated-marching instructions also emphasize sitting upright, lifting one bent leg only as far as comfortable, and returning the foot with control.
A higher knee lift is not automatically better. Raise the leg only as far as you can without leaning backward or rounding excessively.
Common mistakes: Rocking from side to side, leaning back, lifting the knee too high, stamping the foot down, or turning the exercise into a fast cardio march.
Regression: Lift only the heel while keeping the toes on the floor.
Progression: Pause with the foot raised for two or three seconds, use less hand support, or alternate legs without resting between repetitions.
Coaching cue: Lift the knee without letting your body follow it.
4. Supported Seated Knee Tuck
Best for: Progressing from basic marching to a more demanding trunk-and-hip flexion exercise.
Muscles worked: Rectus abdominis, obliques, deep abdominal muscles, and hip flexors.
Equipment needed: A stable chair positioned against a wall.
Sets, reps, and rest: Perform 2 sets of 6–10 repetitions per side. Rest for approximately 45 seconds.
How to Do It
- Sit near the front half of the chair and hold the sides of the seat.
- Keep one foot flat and extend the other foot slightly forward.
- Lean backward a small amount from your hips while keeping your chest open.
- Brace your core.
- Exhale as you bring the extended knee toward your chest.
- Allow your ribs to move slightly toward your pelvis without collapsing forward.
- Extend the foot forward again and place it down with control.
- Complete the set before changing sides.
Keep the supporting foot on the floor during the beginner version. This provides stability and makes it easier to control the pelvis.
Common mistakes: Swinging the leg, leaning too far backward, pulling forcefully with the arms, rounding the neck, or allowing the chair to move.
Regression: Return to the seated alternating march or use a smaller knee movement.
Progression: Alternate legs continuously. A double-knee tuck can be used later, but only when the chair is completely secure and you can move without swinging.
Coaching cue: Bring the knee in with your abs braced, not with momentum.
5. Seated Cross-Body Knee-to-Elbow Crunch
Best for: Training coordinated trunk flexion and rotation.
Muscles worked: Internal and external obliques, rectus abdominis, deep abdominal muscles, and hip flexors.
Equipment needed: A stable chair.
Sets, reps, and rest: Perform 2 sets of 6–10 repetitions per side. Rest for approximately 45 seconds.
How to Do It
- Sit tall with both feet flat and your arms crossed over your chest.
- Brace your abdomen.
- Lift your right knee while rotating your rib cage toward it.
- Bring your left shoulder toward the right knee without forcing them to touch.
- Pause briefly while keeping your hips in contact with the chair.
- Return to the center with control.
- Repeat on the opposite side.
Think about rotating through your upper torso instead of simply moving your elbow. Your head and chest should turn together.
Common mistakes: Pulling on the neck, moving only the arms, bouncing through the repetition, collapsing the chest, or allowing the hips to twist on the seat.
Regression: Keep both feet down and perform a small seated torso rotation.
Progression: Pause in the rotated position, slow the lowering phase, or complete all repetitions on one side before switching.
Coaching cue: Turn your ribs toward the opposite knee.
6. Seated Side Bend
Best for: Building controlled strength along the sides of the trunk.
Muscles worked: Internal and external obliques with assistance from surrounding trunk stabilizers.
Equipment needed: A stable chair.
Sets, reps, and rest: Perform 2 sets of 8–12 repetitions per side. Rest for 30–45 seconds.
How to Do It
- Sit tall with your feet flat and slightly wider than hip-width.
- Cross your arms over your chest.
- Brace your abdomen and keep both hips evenly weighted on the seat.
- Slowly move your right ribs toward your right hip.
- Stop before your opposite hip begins to lift.
- Use the muscles along the side of your trunk to return upright.
- Repeat on the other side.
Keep the movement directly to the side. Do not combine it with forward bending or rotation.
Common mistakes: Sliding sideways on the chair, lifting one hip, leaning forward, rotating the shoulders, or dropping rapidly into the bottom position.
Regression: Place your hands on your thighs and use a very small range.
Progression: Reach both arms overhead, pause briefly at the bottom, or take three seconds to return upright.
Coaching cue: Keep both sitting bones heavy on the chair.
7. Chair Incline Plank
Best for: Building whole-core endurance without performing a floor plank.
Muscles worked: Transversus abdominis, rectus abdominis, obliques, shoulders, chest, serratus anterior, glutes, and other postural muscles.
Equipment needed: A sturdy chair positioned firmly against a wall.
Sets, reps, and rest: Perform 2–3 holds of 10–30 seconds. Rest for 45–60 seconds.
How to Do It
- Place the back of the chair firmly against a wall.
- Stand facing the chair and place both hands on the seat, approximately shoulder-width apart.
- Walk your feet backward until your body forms a straight line from head to heels.
- Position your shoulders over or slightly behind your hands.
- Tighten your abdomen and glutes.
- Press the chair away while keeping your neck neutral.
- Hold the position while taking slow, normal breaths.
- Step forward before releasing your hands.
Do not use the chair if it slides, rocks, folds, or feels unstable.
Common mistakes: Allowing the hips to drop, pushing the hips excessively upward, shrugging the shoulders, holding the breath, placing the hands too far ahead, or using an unsecured chair.
Regression: Perform a standing wall plank with your hands against a wall.
Progression: Increase the hold gradually or use a lower, equally stable surface. Lowering the hand position makes the exercise harder.
Coaching cue: Make one straight line from your head to your heels.
Beginner Chair Ab Workout
Use the following routine two or three times per week on nonconsecutive days. Complete one round when starting and progress to two rounds when you can maintain good form throughout.
| Exercise | Repetitions or time |
|---|---|
| Seated abdominal brace | 15–20 seconds |
| Seated pelvic tilt | 8–10 reps |
| Seated alternating march | 8 reps per side |
| Supported seated knee tuck | 6–8 reps per side |
| Seated cross-body crunch | 6–8 reps per side |
| Seated side bend | 8 reps per side |
| Chair incline plank | 10–20 seconds |
Rest for 30–60 seconds between exercises and 60–90 seconds between rounds.
Use a controlled effort. At the end of each set, you should feel that you could still perform approximately two or three clean repetitions—or hold the position for several more seconds—without losing your posture.
You can perform this routine:
- After a general strength workout
- As a short stand-alone core session
- During a home workout
- As a no-floor alternative to traditional ab exercises
Avoid training the routine to exhaustion every day. Your core muscles need an appropriate challenge, but they also benefit from recovery.
Muscles Worked During Chair Ab Exercises
Your core includes more than the visible muscles on the front of your stomach. It also includes deeper abdominal muscles and muscles around the pelvis and back that help control your trunk.
According to the National Library of Medicine’s abdominal-wall anatomy overview, the primary abdominal muscles include the rectus abdominis, external obliques, internal obliques, and transversus abdominis. Together, these muscles contribute to trunk flexion, rotation, lateral flexion, pressure regulation, and stabilization.
Rectus Abdominis
The rectus abdominis runs vertically along the front of the abdomen. It helps flex the trunk, such as when you bring your ribs and pelvis closer together during a controlled seated crunch.
External and Internal Obliques
The obliques are located along the sides of the abdomen. They help rotate and side-bend the trunk while also contributing to abdominal bracing.
Cross-body crunches and seated side bends emphasize these functions, although the obliques remain active during most of the exercises in this guide.
Transversus Abdominis
The transversus abdominis is a deep abdominal muscle with fibers that wrap around the trunk. It contributes to abdominal pressure and trunk control.
Bracing exercises and planks train this muscle as part of a coordinated core contraction rather than isolating it completely.
Hip Flexors
The iliopsoas, rectus femoris, and other hip flexors help lift the thigh toward the torso. They are active during seated marches, knee tucks, and cross-body knee lifts.
The National Library of Medicine’s iliopsoas anatomy review identifies the iliopsoas as a primary hip flexor. This is why knee-lifting exercises may be felt in the front of the hips as well as the abdomen.
The abs do not lift the thigh by themselves. Their important role is controlling the pelvis and trunk while the hip flexors move the leg.
Back and Pelvic Stabilizers
Muscles surrounding the lower back and pelvis assist the abdominal muscles in keeping the torso upright and controlled. Chair exercises should therefore be viewed as core exercises rather than attempts to isolate one abdominal muscle.
How to Make Chair Ab Exercises Easier
Use one or more of these adjustments:
- Reduce the number of repetitions.
- Shorten each hold.
- Use a smaller range of motion.
- Keep both hands on the chair.
- Keep one foot on the floor during knee-tuck movements.
- Sit against the backrest when learning to brace.
- Replace the chair plank with a wall plank.
- Perform fewer exercises in one session.
A shorter, well-controlled set is more productive than a longer set performed with swinging or poor posture.
How to Progress Chair Exercises for Abs
Do not change several variables at once. Progress one element, then allow your body time to adapt.
A practical progression order is:
- Improve posture and breathing.
- Add one or two repetitions per set.
- Increase a hold by approximately five seconds.
- Slow the lowering portion of each repetition.
- Use a slightly larger controlled range.
- Reduce hand support.
- Add another set.
- Move to a harder exercise variation.
For example, progress from a heel lift to a seated march, then to a supported single-leg knee tuck. Progress from a wall plank to a chair incline plank before considering a lower surface.
Once you reach the top of the recommended repetition range with steady form, increase the difficulty rather than performing increasingly long sets.
Common Chair Ab Exercise Mistakes
Using an Unstable Chair
A rolling, folding, or lightweight chair can move unexpectedly. Use a solid chair on a nonslip surface and place it against a wall when appropriate.
Holding Your Breath
Breath-holding often makes an exercise feel unnecessarily tense. Exhale during the hardest part of a repetition and continue breathing during static holds.
Moving Too Fast
Fast repetitions make it easier to use momentum. Slow down enough to control both the lifting and lowering phases.
Leaning Back During Every Leg Lift
Excessive leaning reduces the stability challenge and may place more demand on the hip flexors. Keep your torso still during marches and use only a small, intentional lean during supported knee tucks.
Pulling on the Neck
Do not place your hands behind your head and pull during cross-body crunches. Cross your arms over your chest and rotate your rib cage instead.
Using More Range Than You Can Control
A higher knee lift, deeper side bend, or longer plank is not helpful if it causes rocking, twisting, or loss of alignment. Stop the movement at the point where your form remains stable.
Treating Every Exercise as a Flexion Exercise
A balanced core routine should include more than crunching. Bracing, pelvic control, rotation, lateral control, and plank variations train different core functions.
Frequently Asked Questions
Do chair exercises really strengthen your abs?
Yes, chair exercises can strengthen the abs when the abdominal muscles must stabilize or move the trunk against a suitable challenge.
Results depend on exercise selection, effort, technique, consistency, and gradual progression. Simply sitting and moving the arms or legs without controlling the pelvis may provide very little abdominal stimulus.
Can chair ab exercises reduce belly fat?
Ab exercises strengthen and condition the muscles underneath the abdominal area, but they should not be expected to remove fat from one specific location.
In one randomized trial, six weeks of abdominal exercise improved muscular endurance but did not significantly reduce abdominal fat or other body-composition measurements.
Use chair exercises for strength, control, and fitness rather than as a spot-reduction method.
Are chair exercises for abs suitable for beginners?
Most of the exercises in this guide can be suitable for beginners because their range, repetitions, and support can be adjusted.
Start with abdominal bracing, pelvic tilts, and alternating marches. Add knee tucks, cross-body crunches, and chair planks after you can keep your torso and pelvis controlled.
Are chair ab exercises good for older adults?
Chair exercise can be an accessible option for older adults, particularly for people who find floor transitions difficult. Research suggests that broader chair-based exercise programs may support physical function in adults over 50.
Exercise ability varies widely, however. An older adult with significant balance limitations, osteoporosis, recent surgery, or another health concern should seek individualized professional guidance.
How often should I perform chair exercises for abs?
Two or three sessions per week is a practical starting point. Leave recovery time between challenging sessions, especially when the exercises are new.
You do not need to perform every exercise each time. A shorter session containing four or five well-chosen movements can still be effective.
Why do I feel seated knee lifts in my hip flexors?
The hip flexors are responsible for lifting the thigh toward the torso, so they naturally work during marches and knee tucks.
Your abdominal muscles help control your pelvis and prevent excessive leaning or lower-back movement. Reduce the height of the lift if you feel pinching at the front of the hip or cannot keep your trunk stable.
Can every exercise be done while seated?
The first six exercises are performed while seated. The chair incline plank is performed standing with your hands supported on the chair.
Use a wall plank or a seated abdominal brace when standing or supporting weight through the hands is not suitable.
Conclusion
Chair exercises for abs provide a practical way to build core strength without a mat, gym machine, or floor-based routine. Begin with bracing and pelvic control, move slowly, keep the chair secure, and choose variations that allow you to maintain steady posture.
Practice the routine consistently and progress only when you can complete the current version without swinging, breath-holding, or losing control.
References
- American College of Sports Medicine: 2026 Resistance Training Guidelines
- NHS: Sitting Exercises
- NHS: Chair-Based Pilates
- South Tees Hospitals NHS Foundation Trust: Pelvic Tilt in Sitting
- National Library of Medicine: Abdominal Wall Anatomy
- National Library of Medicine: Iliopsoas Anatomy
- PubMed: Chair-Based Exercise and Physical Function in Older Adults
- PubMed: The Effect of Abdominal Exercise on Abdominal Fat
- American Academy of Orthopaedic Surgeons: Spine Conditioning Program
This content is for informational purposes only and is not a substitute for medical advice.