Plyometric exercises are fast, explosive movements that train your body to absorb force and produce force quickly. Common examples include jumps, hops, bounds, medicine-ball throws, and explosive push-up variations.
This list of plyometric exercises includes 20 beginner, intermediate, and advanced movements. You will learn how each exercise works, which muscles it trains, how to perform it correctly, and how to build a plyometric workout without sacrificing landing control or movement quality.
What Are Plyometric Exercises?
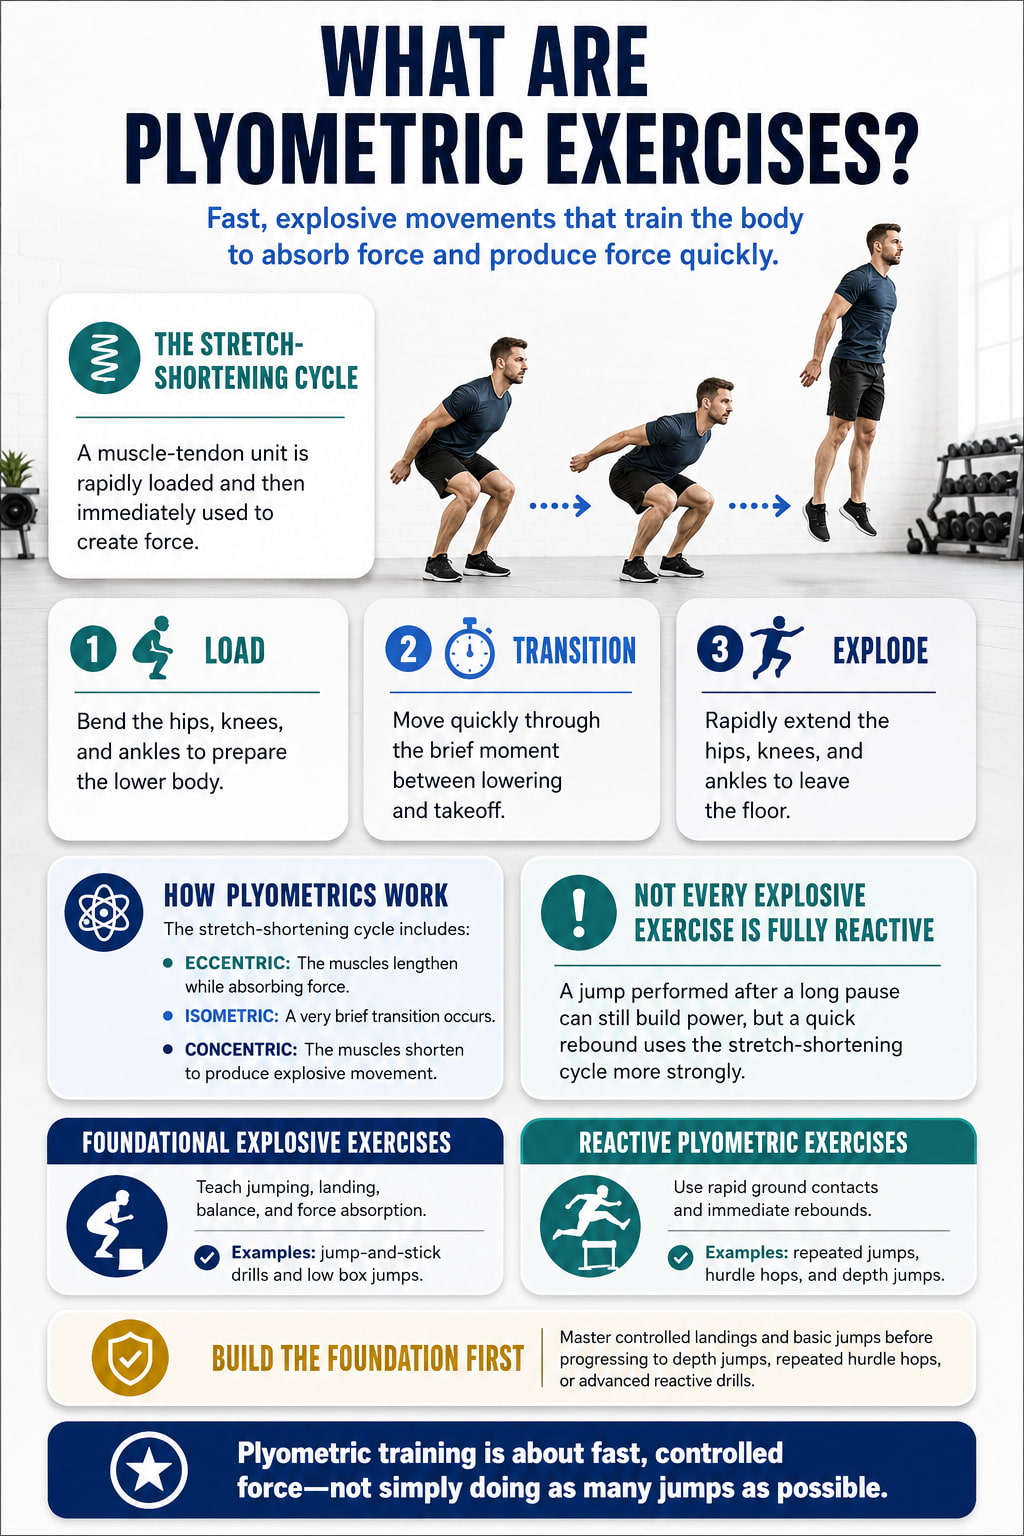
Plyometric exercises use the stretch-shortening cycle. This occurs when a muscle-tendon unit is rapidly loaded and then immediately used to produce force.
A jump provides a simple example:
- You quickly bend your hips, knees, and ankles.
- Your muscles and tendons absorb and store energy.
- You rapidly extend your lower body to leave the floor.
The National Strength and Conditioning Association describes this cycle as a sequence of eccentric, isometric, and concentric actions. A faster transition generally makes greater use of the reactive component, while a long pause reduces it. Bounding, leaping, and medicine-ball throws are all common examples.
Not every explosive movement is technically a reactive plyometric exercise. A jump performed after a complete pause can still develop power, but it does not use the stretch-shortening cycle as strongly as a quick rebound jump.
For practical training, this guide includes both:
- Foundational explosive drills that teach jumping and landing
- Reactive plyometric exercises that use rapid ground contacts
Beginners should master the foundational movements before attempting depth jumps, repeated hurdle hops, or advanced single-leg drills.
Benefits of Plyometric Exercises
1. Builds Explosive Power
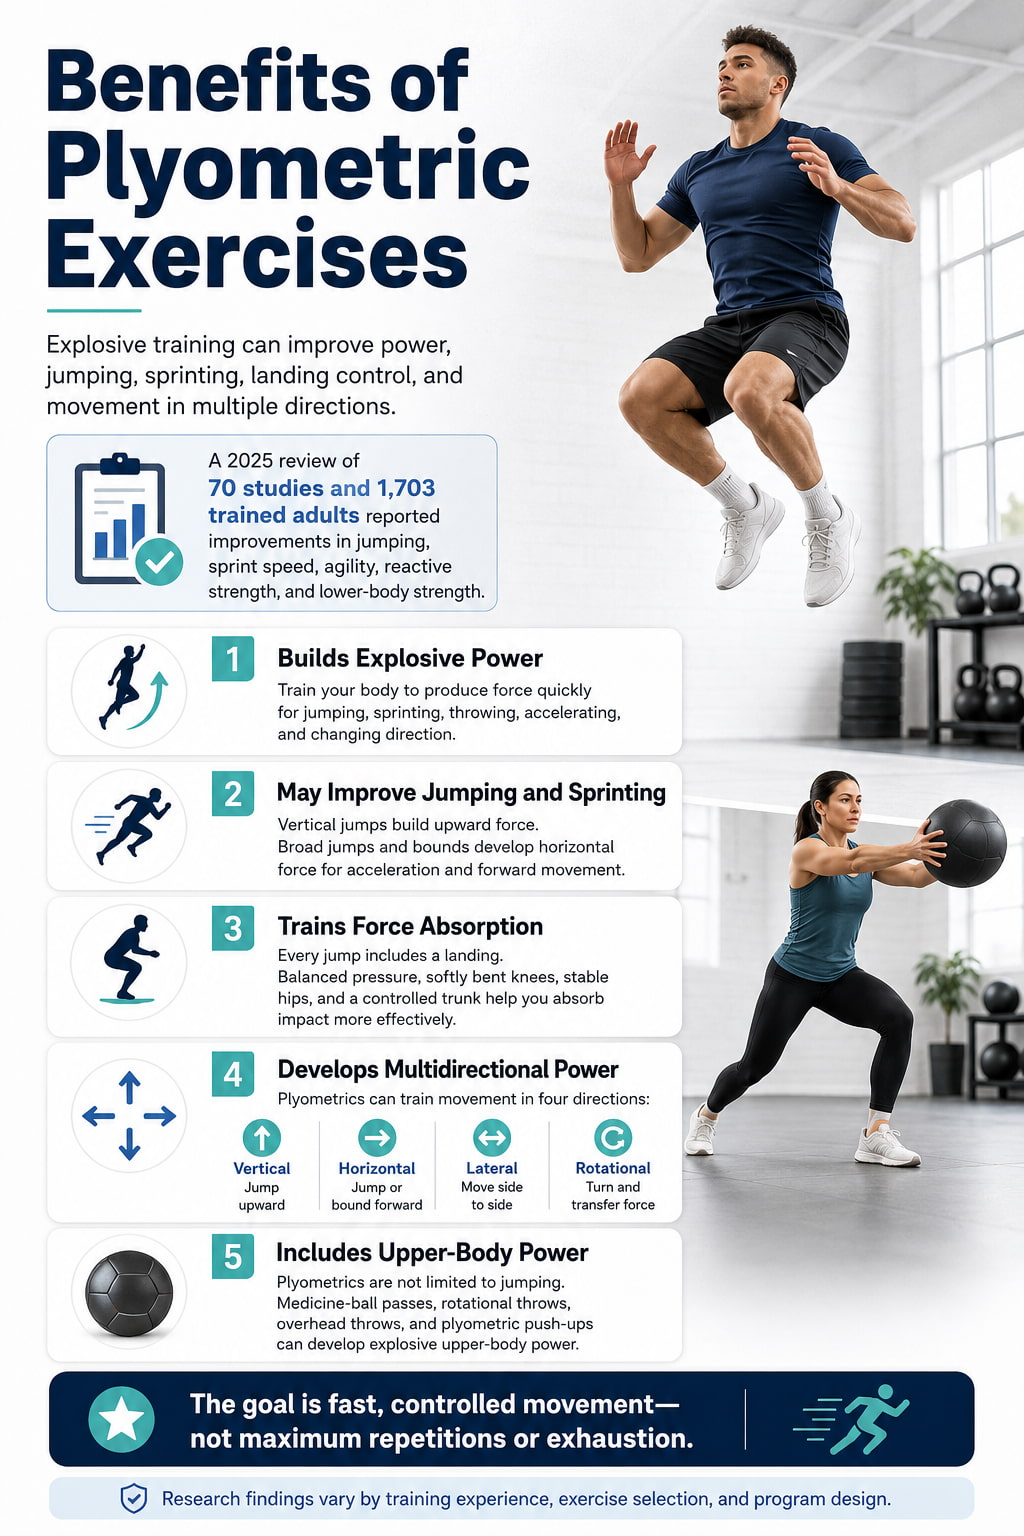
Plyometrics train your muscles to produce force in less time. This can be useful for jumping, sprinting, throwing, accelerating, and changing direction.
2. May Improve Jumping, Sprinting, and Agility
A 2025 systematic review and meta-analysis included 70 studies and 1,703 conditioned adults. Plyometric training improved measures including vertical jumping, standing long-jump performance, reactive strength, sprint speed, agility, and lower-body strength. Most participants were active adults or athletes, so results may not apply equally to every beginner.
A separate 2025 review focused on adult female athletes also found improvements in jumping, sprinting, and change-of-direction performance.
3. Trains Force Absorption
Plyometric training is not only about taking off. Every jump also requires you to absorb force when you land.
Practicing controlled landings may improve your ability to keep your feet, ankles, knees, hips, and trunk organized during fast movement.
4. Develops Power in Different Directions
Plyometrics can train:
- Vertical power through upward jumps
- Horizontal power through broad jumps and bounds
- Lateral power through side-to-side hops
- Rotational power through turning jumps and medicine-ball throws
Using several movement directions can create a more complete program than performing only jump squats.
5. Includes Upper-Body Training
Plyometric training is not limited to the legs. Medicine-ball chest passes, rotational throws, overhead throws, and plyometric push-ups can develop explosive power through the chest, shoulders, arms, trunk, and hips.
Muscles Worked by Plyometric Exercises
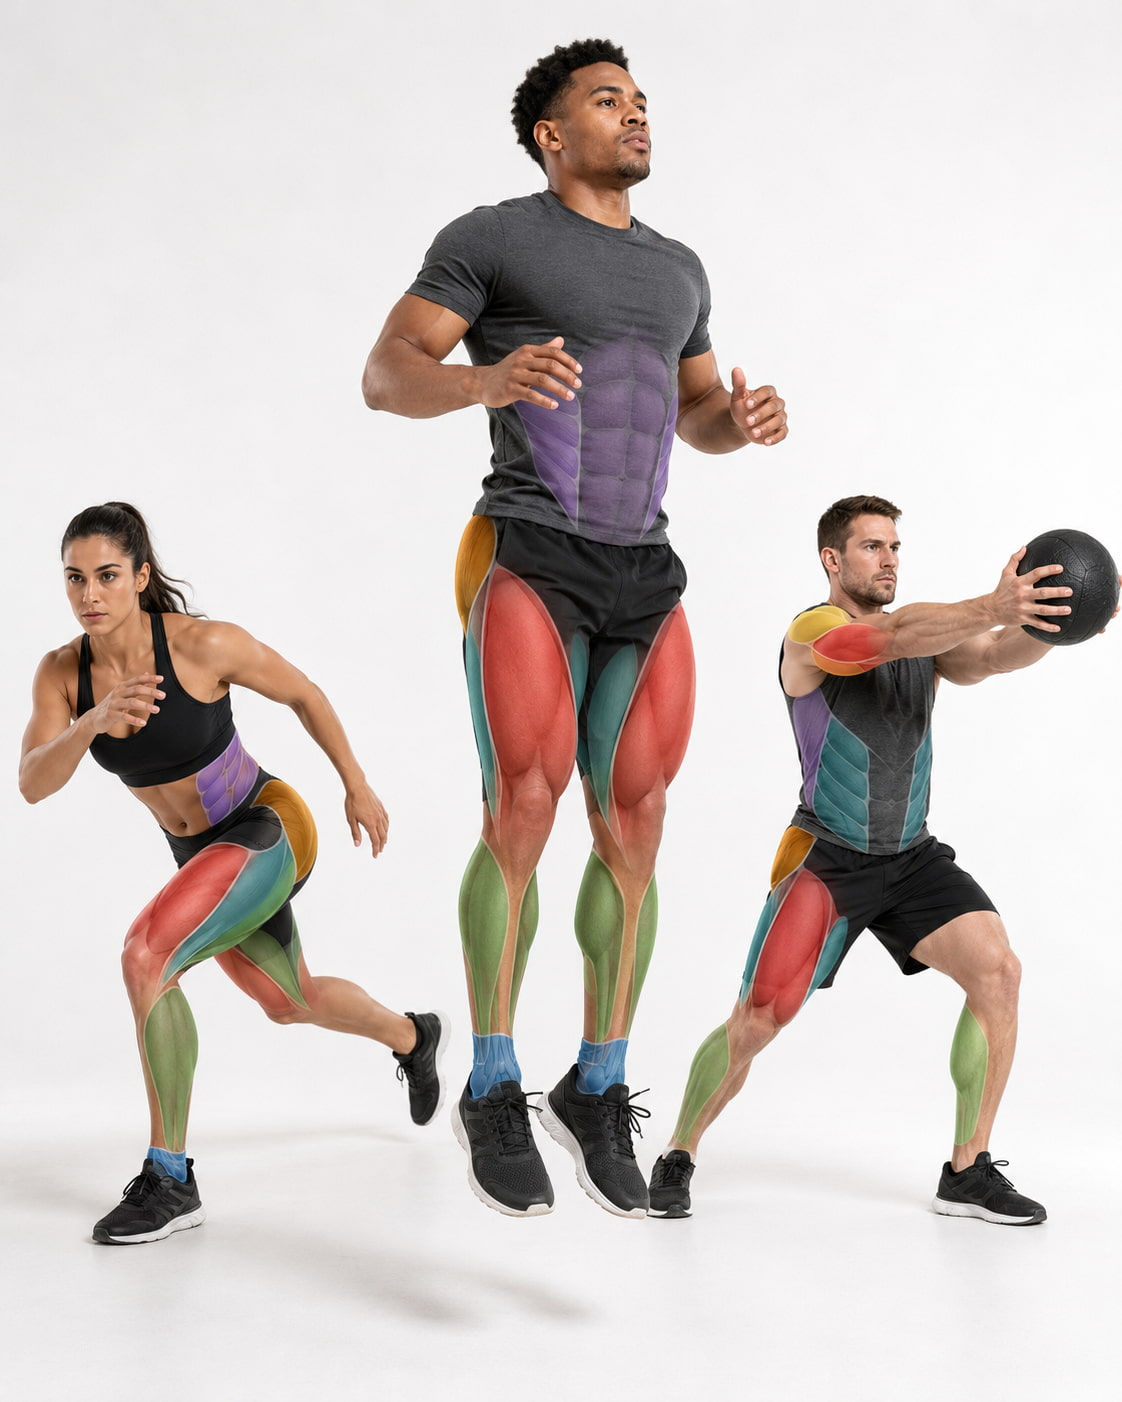
Most lower-body plyometric exercises involve the:
- Quadriceps
- Gluteus maximus
- Hamstrings
- Gastrocnemius and soleus
- Hip abductors and adductors
- Foot and ankle stabilizers
- Abdominal and spinal stabilizers
Vertical jumps usually place substantial demand on the quadriceps, glutes, and calves. Broad jumps and bounds add a strong horizontal force component through the hips and hamstrings.
Lateral and single-leg exercises also challenge the gluteus medius, inner-thigh muscles, and smaller stabilizers around the feet, ankles, hips, and trunk.
Upper-body plyometrics mainly train the chest, shoulders, triceps, upper back, and core. Medicine-ball throws also use the legs and hips to transfer force through the torso.
Are Plyometric Exercises Suitable for Beginners?
Beginners can perform plyometrics, but they should start with low-impact movements, short sets, and controlled landings.
Before attempting demanding plyometrics, you should ideally be able to:
- Perform controlled bodyweight squats and lunges
- Balance on one leg
- Land without taking several recovery steps
- Keep your knees aligned with your feet
- Complete the movement without pain
- Maintain similar technique across the entire set
The Hospital for Special Surgery beginner plyometrics guide recommends starting with landing practice and limiting beginner plyometric sessions to approximately one or two times per week.
How to Land Correctly
A good landing should look balanced and controlled.
Use these basic cues:
- Land with pressure distributed across the foot
- Allow the heels to settle naturally
- Bend through the hips, knees, and ankles
- Keep the knees facing in approximately the same direction as the toes
- Keep your chest and pelvis controlled
- Finish balanced before beginning another repetition
Hospital for Special Surgery recommends keeping the knees from turning inward, bending the hips and knees, and landing softly.
A quiet landing is a useful cue, but it is not the only goal. You must also control your knee alignment, trunk position, balance, and landing depth.
List of Plyometric Exercises at a Glance
| Exercise | Primary purpose | Level | Equipment |
|---|---|---|---|
| Pogo Jumps | Ankle reactivity | Beginner | None |
| Forward-and-Back Line Hops | Linear foot speed | Beginner | Floor line |
| Lateral Line Hops | Side-to-side reactivity | Beginner | Floor line |
| Countermovement Jump and Stick | Vertical power and landing | Beginner | None |
| Low Box Jump | Vertical power | Beginner–Intermediate | Box |
| Broad Jump and Stick | Horizontal power | Beginner–Intermediate | None |
| Skater Hop and Stick | Lateral landing control | Beginner–Intermediate | None |
| Medicine-Ball Chest Pass | Upper-body power | Beginner | Medicine ball |
| Medicine-Ball Overhead Throw | Total-body power | Beginner–Intermediate | Medicine ball |
| Rotational Medicine-Ball Scoop Toss | Rotational power | Intermediate | Medicine ball |
| Repeated Countermovement Jumps | Repeated vertical power | Intermediate | None |
| Split Squat Jumps | Alternating-leg power | Intermediate | None |
| Lateral Bounds | Reactive lateral power | Intermediate | None |
| 180-Degree Jumps | Rotational control | Intermediate | None |
| Single-Leg Hop and Stick | Unilateral power | Intermediate | None |
| Alternating Bounds | Horizontal running power | Intermediate | Open space |
| Tuck Jumps | Repeated vertical power | Advanced | None |
| Low Hurdle Hops | Quick ground contacts | Advanced | Low hurdles |
| Plyometric Push-Up | Upper-body reactive power | Advanced | None |
| Depth Jump | Reactive lower-body power | Advanced | Low box |
List of 20 Plyometric Exercises
The exercises below are a movement library, not one giant workout. Select two to four movements that match your experience, training goal, and available equipment.
1. Pogo Jumps
Best for: Learning quick ground contacts and developing ankle stiffness.
Muscles worked: Calves, quadriceps, hamstrings, glutes, foot muscles, and core.
Suggested sets and reps: Perform 2–4 sets of 8–20 contacts.
Beginners: Start with small two-leg bounces and pause between sets.
Advanced: Use alternating-foot or single-leg pogos.
Rest: Rest for 45–90 seconds between sets.
How to do it:
- Stand tall with your feet approximately hip-width apart.
- Keep your knees softly bent and your trunk upright.
- Bounce from the ankles rather than dropping into a full squat.
- Land on the balls of your feet and allow your heels to settle slightly.
- Move into the next jump with a short, controlled ground contact.
Common mistakes: Bending deeply at the knees, jumping as high as possible, letting the heels slam down, or continuing after the rhythm becomes uneven.
Expert tip: Think about making yourself tall and springy rather than trying to force maximum jump height.
2. Forward-and-Back Line Hops
Best for: Building low-level linear reactivity and foot coordination.
Muscles worked: Calves, quadriceps, hamstrings, glutes, foot muscles, and core.
Equipment needed: A floor line, tape, or flat marker.
Suggested sets and reps: Perform 2–3 sets of 6–12 hops in each direction.
Beginners: Pause briefly after each forward-and-back pair.
Advanced: Perform the drill on one leg.
Rest: Rest for 45–90 seconds between sets.
How to do it:
- Stand behind a line with both feet together or hip-width apart.
- Brace your core and keep your knees softly bent.
- Hop a short distance forward over the line.
- Immediately hop backward to the starting position.
- Continue with small, balanced contacts.
Common mistakes: Jumping too far, losing posture, landing with locked knees, or allowing the feet to separate unpredictably.
Expert tip: Keep the movement short and fast. Distance is less important than consistent positioning.
3. Lateral Line Hops
Best for: Developing side-to-side foot speed and ankle control.
Muscles worked: Calves, quadriceps, glutes, hip abductors, hip adductors, and core.
Equipment needed: A floor line or strip of tape.
Suggested sets and reps: Perform 2–3 sets of 8–16 total contacts.
Beginners: Use a small hop and reset your balance when necessary.
Advanced: Use one leg or hop over a very low obstacle.
Rest: Rest for 45–90 seconds between sets.
How to do it:
- Stand beside a line with your feet together.
- Keep your hips, knees, and ankles slightly flexed.
- Hop sideways over the line.
- Land under control and immediately hop back.
- Maintain a tall trunk and consistent rhythm.
Common mistakes: Crossing the feet, allowing the knees to collapse inward, hopping too high, or letting the trunk sway excessively.
Expert tip: Imagine the floor is warm and make each contact quick without rushing your alignment.
4. Countermovement Jump and Stick
Best for: Learning vertical power and controlled landing mechanics.
Muscles worked: Quadriceps, glutes, hamstrings, calves, and core.
Suggested sets and reps: Perform 2–4 sets of 3–5 jumps.
Beginners: Use a small jump and hold the landing for two seconds.
Advanced: Add an approach step or progress to repeated jumps.
Rest: Rest for 60–120 seconds between sets.
How to do it:
- Stand with your feet around hip-to-shoulder width apart.
- Swing your arms back as you quickly bend your hips and knees.
- Drive through the floor and jump vertically.
- Land with both feet at approximately the same time.
- Bend your hips and knees, stabilize, and hold the landing.
Common mistakes: Dropping into an unnecessarily deep squat, landing with stiff knees, letting the knees fall inward, or immediately bouncing into another repetition.
Expert tip: Finish every repetition in a position you could comfortably hold for several seconds.
5. Low Box Jump
Best for: Developing vertical power with less landing distance than a floor jump.
Muscles worked: Quadriceps, glutes, hamstrings, calves, and core.
Equipment needed: A stable plyometric box or platform.
Suggested sets and reps: Perform 3–5 sets of 2–5 jumps.
Beginners: Choose a low box and step down after every repetition.
Intermediate: Gradually increase jump intent without chasing excessive box height.
Advanced: Add a short approach or use a slightly higher box only when form remains consistent.
Rest: Rest for 60–180 seconds between sets.
How to do it:
- Stand close enough to the box to land near its center.
- Dip through your hips and knees while swinging your arms back.
- Drive upward and forward onto the box.
- Land with your whole foot supported and your knees softly bent.
- Stand tall, then step down carefully.
Common mistakes: Selecting a box that is too high, landing in an extremely deep squat, jumping down between repetitions, or landing near the edge.
Expert tip: Box height is not the main score. Use a height that allows you to land in roughly the same position from which you took off.
6. Broad Jump and Stick
Best for: Developing horizontal power and controlled deceleration.
Muscles worked: Glutes, hamstrings, quadriceps, calves, and core.
Suggested sets and reps: Perform 3–5 sets of 2–4 jumps.
Beginners: Jump a comfortable distance and prioritize balance.
Advanced: Progress to repeated broad jumps or bounds.
Rest: Rest for 60–180 seconds between sets.
How to do it:
- Stand with your feet around hip-width apart.
- Swing your arms back and quickly load your hips.
- Drive through the floor and jump forward.
- Reach forward with your body without losing trunk control.
- Land on both feet, bend your hips and knees, and hold the position.
Common mistakes: Reaching too far with the feet, collapsing forward, landing with the heels far ahead of the hips, or taking extra steps to regain balance.
Expert tip: Think about pushing the floor behind you rather than simply reaching your feet forward.
7. Skater Hop and Stick
Best for: Learning lateral power and single-leg landing control.
Muscles worked: Glutes, quadriceps, hamstrings, calves, hip abductors, adductors, and core.
Suggested sets and reps: Perform 2–4 sets of 3–6 repetitions per side.
Beginners: Use a short distance and touch the trailing foot down for balance.
Intermediate: Land on one leg and hold without support.
Advanced: Increase distance or progress to continuous lateral bounds.
Rest: Rest for 60–120 seconds between sets.
How to do it:
- Stand on one leg with your knee softly bent.
- Push sideways from the standing leg.
- Travel laterally and land on the opposite foot.
- Bend the landing hip and knee to absorb force.
- Hold your balance before jumping back.
Common mistakes: Allowing the knee to collapse inward, rotating the pelvis, landing on a straight leg, or immediately rushing into the next repetition.
Expert tip: Keep your hip, knee, and middle toes facing in a similar direction as you land.
8. Medicine-Ball Chest Pass
Best for: Developing horizontal upper-body power.
Muscles worked: Chest, triceps, shoulders, serratus anterior, and core.
Equipment needed: A light medicine ball, sturdy wall, or training partner.
Suggested sets and reps: Perform 3–5 sets of 3–6 throws.
Beginners: Use a light ball and a tall-kneeling or standing position.
Advanced: Use reactive catch-and-throw repetitions with an appropriate rebound ball and experienced partner.
Rest: Rest for 60–120 seconds between sets.
How to do it:
- Hold the ball at chest height with both hands.
- Stand in an athletic position facing a sturdy wall or partner.
- Bring the ball toward your chest without letting your elbows flare excessively.
- Forcefully extend your arms and throw the ball straight forward.
- Retrieve the ball, reset, and repeat.
Common mistakes: Choosing a ball that is too heavy, turning the throw into a slow press, overextending the lower back, or standing too close to a rebounding ball.
Expert tip: Use a ball light enough to move fast. The goal is velocity, not grinding through a heavy throw.
9. Medicine-Ball Overhead Throw
Best for: Developing total-body extension and overhead throwing power.
Muscles worked: Glutes, quadriceps, calves, core, upper back, shoulders, and triceps.
Equipment needed: A medicine ball and a large, clear throwing area.
Suggested sets and reps: Perform 3–5 sets of 3–5 throws.
Beginners: Use a light ball and practice the movement at moderate speed.
Advanced: Add an approach step or perform a backward overhead throw in a safe open area.
Rest: Rest for 60–150 seconds between sets.
How to do it:
- Stand with your feet around shoulder-width apart.
- Hold the ball with both hands and bring it overhead.
- Bend your hips and knees slightly to load your lower body.
- Drive through your legs and hips as you throw the ball forcefully.
- Finish tall without forcing your lower back into excessive extension.
Common mistakes: Using only the arms, selecting an overly heavy ball, arching the lower back, or throwing in an area without enough clearance.
Expert tip: Let your legs and hips start the movement before your arms finish it.
10. Rotational Medicine-Ball Scoop Toss
Best for: Building rotational power through the hips and trunk.
Muscles worked: Glutes, quadriceps, calves, obliques, upper back, shoulders, and arms.
Equipment needed: A medicine ball and a sturdy wall.
Suggested sets and reps: Perform 3–5 sets of 3–5 throws per side.
Beginners: Start close to the wall with a light ball and controlled pivot.
Advanced: Add a step-in, shuffle, or reactive return.
Rest: Rest for 60–150 seconds between sets.
How to do it:
- Stand sideways to a sturdy wall with the ball near your outside hip.
- Bend your hips and knees slightly.
- Push through the floor and rotate your hips toward the wall.
- Transfer the movement through your trunk and throw the ball into the wall.
- Catch or retrieve the ball, reset, and repeat.
Common mistakes: Throwing mostly with the arms, keeping the rear foot glued to the floor, arching the back, or using a ball that moves too slowly.
Expert tip: Begin the throw from the ground. Your hips should turn before your hands finish the movement.
11. Repeated Countermovement Jumps
Best for: Developing repeated vertical power and reactive lower-body strength.
Muscles worked: Quadriceps, glutes, hamstrings, calves, and core.
Suggested sets and reps: Perform 3–5 sets of 3–6 jumps.
Beginners: Continue using individual jump-and-stick repetitions.
Advanced: Increase to five or six contacts while maintaining height.
Rest: Rest for 90–180 seconds between sets.
How to do it:
- Stand tall with your feet around hip-to-shoulder width apart.
- Quickly bend your hips and knees and jump vertically.
- Land with both feet and absorb the impact.
- Move directly into the next jump without a long pause.
- Stop the set if jump height or landing control declines.
Common mistakes: Turning the set into fast shallow squats, spending too long on the floor, losing jump height, or allowing the knees to collapse inward.
Expert tip: Aim for consistent jumps. The final repetition should look similar to the first.
12. Split Squat Jumps
Best for: Developing alternating-leg power and coordination.
Muscles worked: Quadriceps, glutes, hamstrings, calves, hip stabilizers, and core.
Suggested sets and reps: Perform 2–4 sets of 3–6 repetitions per side.
Beginners: Master reverse lunges and split squats before adding a jump.
Advanced: Increase jump height or use continuous repetitions.
Rest: Rest for 90–180 seconds between sets.
How to do it:
- Begin in a split stance with both knees softly bent.
- Lower slightly while keeping your trunk controlled.
- Drive through both feet and jump upward.
- Switch your legs in the air.
- Land in the opposite split stance and absorb the force.
Common mistakes: Using an excessively narrow stance, landing with stiff knees, allowing the front knee to collapse inward, or continuing after balance deteriorates.
Expert tip: Jump upward before switching your legs. Do not rush the switch while you are still pushing from the floor.
13. Lateral Bounds
Best for: Building reactive side-to-side power.
Muscles worked: Glutes, quadriceps, hamstrings, calves, hip abductors, adductors, and core.
Suggested sets and reps: Perform 3–4 sets of 3–6 bounds per side.
Beginners: Continue practicing skater hops with a held landing.
Advanced: Increase distance or add a low obstacle.
Rest: Rest for 90–180 seconds between sets.
How to do it:
- Stand on one leg with your hips and knee slightly bent.
- Push forcefully to the side.
- Land on the opposite leg and absorb the force.
- Allow only a short contact before bounding back.
- Maintain control through your hips and trunk.
Common mistakes: Reaching with the foot instead of pushing from the stance leg, collapsing at the knee, rotating the pelvis, or making the bounds too large.
Expert tip: Push the ground away and travel from hip to hip.
14. 180-Degree Jumps
Best for: Developing rotational power, body awareness, and landing control.
Muscles worked: Quadriceps, glutes, hamstrings, calves, obliques, and core.
Suggested sets and reps: Perform 2–4 sets of 3–5 jumps in each direction.
Beginners: Start with quarter-turn jumps.
Advanced: Link several turns while alternating directions.
Rest: Rest for 60–120 seconds between sets.
How to do it:
- Stand with your feet around shoulder-width apart.
- Dip through your hips and knees while swinging your arms.
- Jump upward and rotate your body halfway around.
- Spot your landing and place both feet down together.
- Bend your hips and knees and stabilize before repeating.
Common mistakes: Spinning without jumping upward, twisting through the knees, landing with the feet crossed, or repeatedly rotating in only one direction.
Expert tip: Rise first and rotate second. Alternate directions to keep the training balanced.
15. Single-Leg Hop and Stick
Best for: Developing unilateral horizontal power and deceleration.
Muscles worked: Glutes, quadriceps, hamstrings, calves, foot muscles, hip stabilizers, and core.
Suggested sets and reps: Perform 2–4 sets of 2–5 hops per leg.
Beginners: Practice single-leg balance and small in-place hops.
Advanced: Increase distance or progress to repeated single-leg hops.
Rest: Rest for 90–180 seconds between sets.
How to do it:
- Balance on one leg with the hip and knee softly bent.
- Swing your arms and load the standing leg.
- Push through the floor and hop forward.
- Land on the same leg.
- Stabilize your hip, knee, ankle, and trunk before repeating.
Common mistakes: Reaching too far with the foot, allowing the knee to collapse inward, landing on a stiff leg, or touching the other foot down immediately.
Expert tip: Start with a distance you can own. A shorter balanced hop is more useful than a longer uncontrolled one.
16. Alternating Bounds
Best for: Developing horizontal power and running-related coordination.
Muscles worked: Glutes, hamstrings, quadriceps, calves, hip flexors, and core.
Equipment needed: A clear strip of open space.
Suggested sets and reps: Perform 3–5 sets of 10–20 meters or 4–8 contacts per leg.
Beginners: Start with marching and skipping drills.
Advanced: Increase speed or distance while preserving posture.
Rest: Rest for 90–180 seconds between sets.
How to do it:
- Begin with a light approach or standing start.
- Drive one knee forward as the opposite leg pushes into the floor.
- Travel forward with an exaggerated running stride.
- Land on the opposite foot under a controlled hip.
- Continue alternating legs with coordinated arm action.
Common mistakes: Reaching the foot too far ahead, collapsing at the waist, bouncing only upward, or losing the rhythm between the arms and legs.
Expert tip: Project forward through the hips instead of stretching your foot toward the ground.
17. Tuck Jumps
Best for: Advanced repeated vertical power.
Muscles worked: Quadriceps, glutes, hamstrings, calves, hip flexors, and core.
Suggested sets and reps: Perform 2–4 sets of 3–6 jumps.
Beginners: Use individual countermovement jumps instead.
Advanced: Perform several controlled continuous repetitions.
Rest: Rest for 120–180 seconds between sets.
How to do it:
- Stand tall with your feet around shoulder-width apart.
- Quickly bend your hips and knees.
- Jump vertically with an aggressive arm swing.
- Bring your knees upward while remaining tall through the trunk.
- Extend your legs before landing and absorb the impact.
Common mistakes: Pulling the knees up by rounding the back, landing before the legs have extended, performing too many repetitions, or continuing as jump height declines.
Expert tip: Jump high first. The tuck should happen during flight rather than replacing a strong takeoff.
18. Low Hurdle Hops
Best for: Developing quick ground contacts and reactive lower-body strength.
Muscles worked: Calves, quadriceps, glutes, hamstrings, and core.
Equipment needed: Several low hurdles, cones, or soft barriers.
Suggested sets and reps: Perform 3–5 sets of 3–6 hurdle contacts.
Beginners: Use line hops or individual jump-and-stick repetitions.
Intermediate: Hop over low barriers and pause after each landing.
Advanced: Use continuous contacts over several low hurdles.
Rest: Rest for 120–180 seconds between sets.
How to do it:
- Arrange several low obstacles with enough space for safe landings.
- Stand tall and create a quick countermovement.
- Jump over the first obstacle with both feet.
- Land under control and rebound over the next obstacle.
- Stop if the obstacles force you to sacrifice alignment or rhythm.
Common mistakes: Choosing hurdles that are too high, tucking the knees excessively, landing with stiff legs, or rushing through uneven contacts.
Expert tip: Start with very low barriers. Reactive quality matters more than hurdle height.
19. Plyometric Push-Up
Best for: Building reactive upper-body pressing power.
Muscles worked: Chest, triceps, front shoulders, serratus anterior, and core.
Suggested sets and reps: Perform 3–5 sets of 2–6 repetitions.
Beginners: Start with explosive incline push-ups against a stable bench.
Advanced: Use continuous repetitions or add a clap only when landing control is excellent.
Rest: Rest for 90–180 seconds between sets.
How to do it:
- Begin in a strong push-up position with your body in a straight line.
- Lower under control while keeping your elbows at a comfortable angle.
- Push into the floor as explosively as possible.
- Allow your hands to leave the surface.
- Land with softly bent elbows and move into the next repetition or reset.
Common mistakes: Letting the hips sag, flaring the elbows excessively, landing on locked arms, or adding a clap before developing enough height and control.
Expert tip: Your hands only need to clear the surface. A clap is optional and does not automatically make the exercise more effective.
20. Depth Jump
Best for: Advanced reactive strength and rapid force production.
Muscles worked: Quadriceps, glutes, hamstrings, calves, foot muscles, and core.
Equipment needed: A stable low box and clear landing area.
Suggested sets and reps: Perform 3–5 sets of 2–3 repetitions.
Beginners: Do not begin with depth jumps. Use jump-and-stick drills and low depth drops.
Advanced: Add the immediate rebound only after demonstrating strong landing control.
Rest: Rest for 120–240 seconds between sets.
How to do it:
- Stand near the front edge of a low, stable box.
- Step forward from the box without jumping upward.
- Land on both feet with your body under control.
- Immediately redirect the landing into a powerful vertical jump.
- Land the second jump safely, reset, and repeat.
Common mistakes: Jumping off the box, using a platform that is too high, spending too long on the floor, collapsing during the first landing, or performing depth jumps while fatigued.
Expert tip: Start lower than you think you need. Increasing box height can increase landing demand without improving the quality of your rebound.
How to Choose the Right Plyometric Exercises
Choose exercises based on your experience and training goal.
For Vertical Jumping
Use movements such as:
- Countermovement jumps
- Box jumps
- Repeated jumps
- Tuck jumps
- Depth jumps
For Acceleration and Horizontal Power
Use:
- Broad jumps
- Single-leg hops
- Alternating bounds
- Medicine-ball overhead throws
For Lateral Movement
Use:
- Lateral line hops
- Skater hops
- Lateral bounds
- Lateral hurdle hops
For Upper-Body Power
Use:
- Medicine-ball chest passes
- Overhead throws
- Rotational scoop tosses
- Plyometric push-ups
How to Program Plyometric Training
Perform Plyometrics Early
Perform plyometric exercises after a dynamic warm-up and before tiring strength or conditioning work.
Hospital for Special Surgery recommends placing plyometrics near the beginning of the workout so they are performed while you are fresh.
Use Two to Four Exercises
A normal session does not need all 20 exercises. Beginners may use only two movements, while experienced athletes may use three or four.
Keep Sets Short
Use low repetitions so each movement remains fast and controlled.
A general starting range is:
- Low-level hops: 8–20 contacts
- Maximum jumps and bounds: 2–6 repetitions
- Medicine-ball throws: 3–6 repetitions
- Advanced depth jumps: 2–3 repetitions
Rest Between Sets
Use approximately:
- 45–90 seconds after low-level hops
- 60–180 seconds after jumps and throws
- 120–240 seconds after advanced reactive drills
Rest longer when needed to maintain power and technique.
Stop When Quality Drops
End a set when:
- Jump height or distance decreases
- Landings become unstable
- Ground contacts become much slower
- Your knees or trunk lose alignment
- You need extra steps to regain balance
- The movement becomes a conditioning exercise
Beginner Plyometric Workout
Perform this routine once or twice per week on nonconsecutive days.
| Exercise | Sets | Reps | Rest |
|---|---|---|---|
| Countermovement Jump and Stick | 3 | 3 | 90 seconds |
| Forward-and-Back Line Hops | 2 | 6 each direction | 60 seconds |
| Skater Hop and Stick | 2 | 3 per side | 90 seconds |
Use moderate effort during the first sessions. Focus on controlled landings rather than maximum jump distance.
Progress by adding one repetition or one set only when every landing remains stable.
Intermediate Full-Body Plyometric Workout
Perform this routine one or two times per week.
| Exercise | Sets | Reps | Rest |
|---|---|---|---|
| Low Box Jump | 4 | 3 | 120 seconds |
| Lateral Bound | 3 | 4 per side | 120 seconds |
| Medicine-Ball Chest Pass | 3 | 5 | 90 seconds |
| Rotational Medicine-Ball Scoop Toss | 3 | 3 per side | 90 seconds |
Use a medicine ball you can move explosively. Stop each set while you could still complete approximately two good repetitions.
How Often Should You Do Plyometrics?
Most beginners can start with one or two plyometric sessions per week. More experienced athletes may use two or three sessions depending on their sport schedule, strength training, running volume, and recovery.
Remember that sports such as basketball, volleyball, soccer, and tennis already include jumping, sprinting, and rapid direction changes. Those activities contribute to your total plyometric workload.
How to Progress Safely
Use the following sequence:
- Learn to land under control.
- Perform low jumps with a complete reset.
- Increase height or distance gradually.
- Add repeated ground contacts.
- Introduce lateral and rotational movement.
- Progress from two legs to one leg.
- Increase speed or movement complexity.
- Use advanced reactive drills only when ready.
Do not progress several variables at once. For example, avoid increasing box height, repetitions, and frequency during the same week.
Common Plyometric Training Mistakes
Turning Plyometrics Into Cardio
Long jump circuits may increase fatigue but reduce speed, jump height, and landing quality.
Plyometric power training should normally use short sets and adequate recovery.
Performing Too Many Exercises
Two to four carefully selected movements are usually more useful than attempting an entire list in one workout.
Advancing Too Quickly
Depth jumps, continuous hurdle hops, and repeated single-leg movements require more strength and landing control than basic jumps.
Chasing Box Height
A higher box can encourage excessive knee tucking or an uncontrolled deep landing. Use a box that allows a powerful takeoff and stable landing.
Using a Medicine Ball That Is Too Heavy
The ball should move quickly. If the throw becomes a slow press or lift, reduce the weight.
Ignoring Landing Technique
Jump height is only part of the exercise. Your ability to absorb force and maintain alignment is equally important.
Frequently Asked Questions
What are the best plyometric exercises for beginners?
Good beginner choices include pogo jumps, line hops, countermovement jumps with a held landing, low box jumps, skater hops with a pause, and light medicine-ball chest passes.
Are all jumping exercises plyometric?
Not always. True reactive plyometrics involve a rapid transition from loading or landing into takeoff. A paused jump is still an explosive exercise, but it uses less reactive stretch-shortening action.
Are burpees plyometric?
A burpee that includes a jump has a plyometric component. However, burpees are commonly used for conditioning rather than maximum power.
Individual jumps and hops are usually easier to perform with consistent speed and landing technique.
How many plyometric exercises should you do in one workout?
Most people need only two to four exercises. Beginners can start with two movements and gradually add another exercise as their control and recovery improve.
Should plyometrics be done before or after lifting?
Plyometrics are generally performed after warming up and before fatiguing strength work. This helps preserve speed and coordination.
Do plyometrics build muscle?
Plyometrics can challenge the muscles and may support muscular development, especially in less-trained exercisers. Their main purpose is developing speed, power, reactive strength, and coordination.
Traditional resistance training remains more practical for creating controlled progressive overload for muscle growth.
Can you do plyometrics every day?
Most people do not need demanding plyometric training every day. Beginners generally benefit from one or two weekly sessions with recovery between them.
Conclusion
A useful list of plyometric exercises should include more than difficult jumps. It should provide a progression from landing practice and low-level hops to multidirectional bounds, explosive throws, and advanced reactive exercises.
Start with two or three movements, keep your repetitions fast and controlled, and rest long enough to maintain good technique. Progress only when you can land in balance without losing speed, posture, or alignment.
Stop exercising and seek professional guidance if a movement causes sharp pain, numbness, dizziness, chest pain, or unusual symptoms.
This content is for informational purposes only and is not a substitute for professional medical advice.
References
- National Strength and Conditioning Association: Plyometric Training
- Hospital for Special Surgery: Beginner’s Guide to Plyometrics Workouts
- Hospital for Special Surgery: Jumping and Landing Safely
- Scientific Reports: Effects of Plyometric Training in Athletically Trained Adults
- Frontiers in Physiology: Plyometric Training in Adult Female Athletes