Roman chair exercises can strengthen your lower back, glutes, hamstrings, abdominals, and obliques when you use a stable setup and controlled form. The basic Roman chair back extension is the best place to start: position the pad below your hip crease, hinge forward from your hips, and return only until your body forms a straight line.
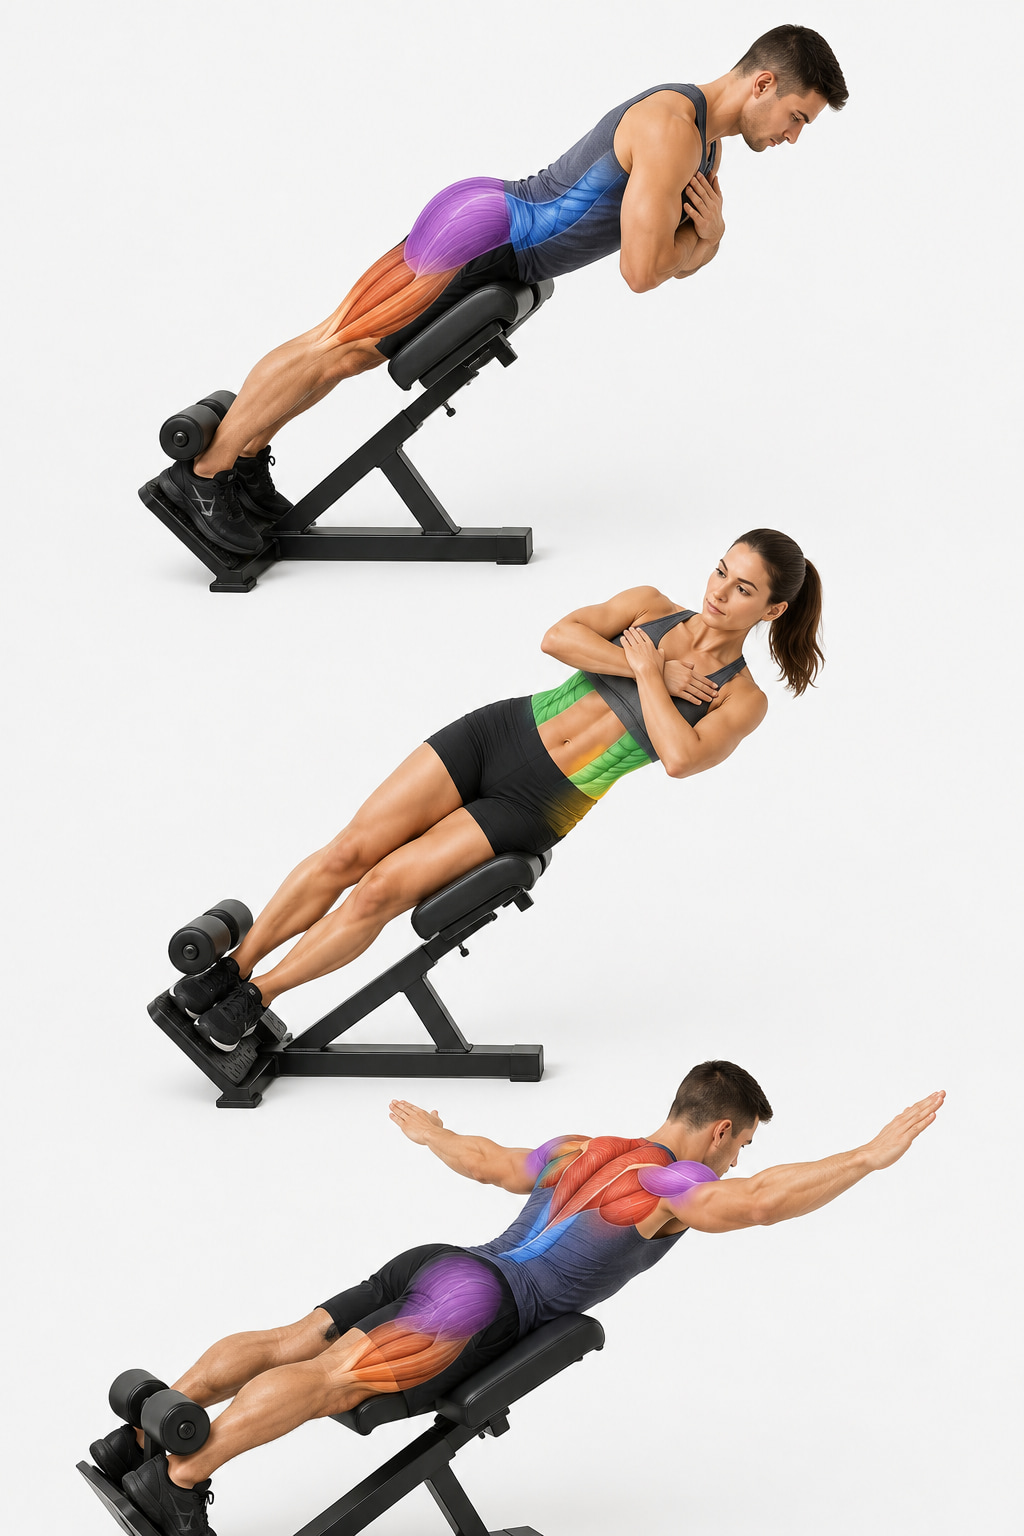
This guide covers 10 useful Roman chair exercises, including beginner movements, weighted progressions, unilateral variations, and core exercises. You will also learn how to adjust the equipment, choose sets and reps, avoid common mistakes, and build a practical Roman chair workout.
Roman Chair Exercises at a Glance
| Exercise | Main training focus | Level | Suggested starting volume |
|---|---|---|---|
| 1. 45-Degree Roman Chair Back Extension | Glutes, hamstrings, lower back | Beginner | 2–3 sets of 8–15 |
| 2. Horizontal Roman Chair Back Extension | Posterior-chain strength | Intermediate | 2–3 sets of 8–12 |
| 3. Roman Chair Isometric Hold | Back and hip-extensor endurance | Beginner–intermediate | 2–3 holds of 15–30 seconds |
| 4. Weighted Roman Chair Back Extension | Progressive posterior-chain strength | Intermediate | 2–4 sets of 6–12 |
| 5. Long-Lever Roman Chair Back Extension | Greater bodyweight resistance | Intermediate | 2–3 sets of 6–12 |
| 6. Single-Leg Roman Chair Back Extension | Unilateral glutes and hamstrings | Advanced | 2–3 sets of 6–10 per side |
| 7. Roman Chair Side Bend | Obliques and lateral trunk muscles | Intermediate | 2–3 sets of 8–15 per side |
| 8. Roman Chair Side Plank Hold | Lateral core endurance | Intermediate | 2–3 holds of 15–30 seconds per side |
| 9. Roman Chair Crunch | Abdominal strength | Beginner–intermediate | 2–3 sets of 8–15 |
| 10. Roman Chair I-Y-T Raise | Upper back and trunk stability | Intermediate | 2–3 sets of 6–8 cycles |
You do not need to perform all 10 exercises in one workout. Most people only need one back-extension variation and one or two core movements per session.
What Is a Roman Chair?
A Roman chair is a bodyweight-training bench that supports your hips and anchors your lower legs while your upper body moves freely. Equipment manufacturers commonly group Roman chairs with 45-degree and horizontal back-hyperextension benches. (Body-Solid Roman chair and hyperextension equipment)
In this article, “Roman chair” refers to a hyperextension-style bench, not a vertical knee-raise or dip station. A vertical station with a back pad and forearm supports is more accurately called a captain’s chair, vertical knee-raise station, or power tower.
45-Degree vs. Horizontal Roman Chair
A 45-degree Roman chair supports your body on an incline. It is normally easier to control and is the better starting option for beginners.
A horizontal Roman chair places your torso parallel to the floor at the top of the movement. This creates a longer lever and usually makes back extensions more challenging.
Research examining variable-angle Roman chair exercises found that lumbar paraspinal activity increased as the bench became more horizontal. Moving the arms into longer lever positions also increased the demand. (PubMed study on Roman chair angle and hand position)
How to Set Up a Roman Chair Correctly
Correct adjustment allows your hips to move while keeping your lower body secure.
- Check the equipment. Make sure the frame is stable, the adjustment pins are fully inserted, and the pads and foot supports are secure.
- Adjust the hip pad. The top of the pad should sit just below your hip crease. Your hips must be able to hinge without the pad pressing into your abdomen.
- Secure your lower legs. Place your feet firmly on the platform and your ankles or calves against the rollers.
- Test the position. Lean forward slightly. Your pelvis should remain supported without sliding off the pad.
- Start with an easy arm position. Cross your arms over your chest or place your hands on the pad until you can control the movement.
- Brace before moving. Tighten your abdomen gently and maintain a natural head and neck position.
A pad set too high blocks the hip hinge. A pad set too low may allow the pelvis to slide forward and make the exercise unstable.
10 Best Roman Chair Exercises
Roman chair exercises can strengthen your lower back, glutes, hamstrings, and core using controlled bodyweight and weighted movements.
The 10 exercises below include beginner-friendly options, core variations, and progressions for building strength and stability.
1. 45-Degree Roman Chair Back Extension
Best for: Learning the hip-hinge pattern and building basic posterior-chain strength.
Muscles worked: Gluteus maximus, hamstrings, erector spinae, and abdominal stabilizers.
Equipment needed: 45-degree Roman chair or hyperextension bench.
Sets, reps, and rest: Perform 2–3 sets of 8–15 repetitions. Rest 60–90 seconds.
How to Do It
- Position the pad just below your hip crease and secure your lower legs.
- Cross your arms over your chest and begin with your head, torso, and hips in a straight line.
- Push your hips backward and lower your torso slowly.
- Stop when you reach a comfortable range or before your back begins to lose control.
- Press your feet into the platform and use your glutes and hamstrings to return to a straight body line.
Common mistakes: Avoid dropping quickly, lifting your chin, bending mainly through the lower back, or raising your torso above its natural line. “Back extension” does not mean forcing your spine into excessive extension.
Progression or regression: Place your hands lightly on the pad for assistance if you are a beginner. Progress by adding a brief pause at the top, increasing repetitions, or holding a light weight against your chest.
Coaching cue: Push your hips into the pad and finish long, not arched.
2. Horizontal Roman Chair Back Extension
Best for: A more demanding bodyweight back extension on a horizontal or 90-degree bench.
Muscles worked: Glutes, hamstrings, erector spinae, and trunk stabilizers.
Equipment needed: Horizontal Roman chair, 90-degree back-extension bench, or suitable GHD.
Sets, reps, and rest: Perform 2–3 sets of 8–12 repetitions. Rest 75–120 seconds.
How to Do It
- Secure your feet and position the front edge of the pad below your hip crease.
- Begin with your body parallel to the floor and your arms crossed.
- Hinge forward slowly while keeping your pelvis supported.
- Lower only as far as you can maintain control.
- Extend your hips to return until your body is parallel to the floor.
Common mistakes: Do not let your pelvis slide off the pad, bounce out of the bottom, or finish with your chest far above your legs. The horizontal position increases the lever, so it may feel much harder than a 45-degree version.
Progression or regression: Use a 45-degree Roman chair as the regression. Progress with a longer arm position or a small weight only after you can complete controlled bodyweight repetitions.
3. Roman Chair Isometric Back Extension Hold
Best for: Developing back and hip-extensor endurance without repeated movement.
Muscles worked: Erector spinae, multifidus, glutes, hamstrings, and abdominals.
Equipment needed: 45-degree or horizontal Roman chair.
Sets, reps, and rest: Perform 2–3 holds of 15–30 seconds. Rest 60–90 seconds.
How to Do It
- Set up as you would for a standard back extension.
- Raise your torso until your head, shoulders, hips, and legs form one straight line.
- Cross your arms over your chest.
- Brace your abdomen and squeeze your glutes lightly.
- Hold the position while breathing normally, then lower with control.
Common mistakes: Avoid holding your breath, letting your stomach and lower back sag, lifting your chin, or arching higher as fatigue builds.
Progression or regression: Begin on a 45-degree bench or shorten the hold to 10 seconds. Progress by extending your arms forward, increasing the hold gradually, or holding a light plate against your chest.
A randomized study found that progressive Roman chair training improved back-extension endurance, although it did not significantly increase maximal isometric lumbar-extension strength. This makes endurance a more defensible benefit than claiming the exercise completely isolates or maximizes lower-back strength.
4. Weighted Roman Chair Back Extension
Best for: Progressively strengthening the glutes, hamstrings, and back after mastering bodyweight repetitions.
Muscles worked: Gluteus maximus, hamstrings, erector spinae, and abdominal stabilizers.
Equipment needed: Roman chair plus a weight plate, dumbbell, or weight vest.
Sets, reps, and rest: Perform 2–4 sets of 6–12 repetitions. Rest 90–120 seconds.
How to Do It
- Set up securely and complete one bodyweight repetition to confirm your position.
- Hold a light plate or dumbbell firmly against your upper chest.
- Hinge forward from your hips while keeping the weight close to your body.
- Lower under control without allowing the weight to pull you downward.
- Extend your hips and return to a straight body line.
Common mistakes: The most common error is adding too much weight and shortening the range, swinging, or arching the lower back. Do not hold a heavy plate behind your head.
Progression or regression: Return to bodyweight repetitions if you cannot control the descent. Add weight in small amounts only after completing the top of your repetition range with consistent form.
Coaching cue: Keep the load close and make every repetition look the same.
5. Long-Lever Roman Chair Back Extension
Best for: Increasing difficulty without immediately adding external weight.
Muscles worked: Erector spinae, glutes, hamstrings, abdominals, and shoulder stabilizers.
Equipment needed: 45-degree or horizontal Roman chair.
Sets, reps, and rest: Perform 2–3 sets of 6–12 repetitions. Rest 75–120 seconds.
How to Do It
- Set up for a normal bodyweight back extension.
- Extend your arms forward instead of crossing them over your chest.
- Hinge forward slowly while keeping your ribs controlled.
- Maintain the same arm position throughout the repetition.
- Return until your torso and legs form a straight line.
You may eventually move your arms closer to an overhead position if your shoulders move comfortably and you can keep your ribs from flaring.
Common mistakes: Avoid reaching the arms so far overhead that you lose trunk position, shrug your shoulders, or arch your lower back at the top.
Progression or regression: Cross your arms over your chest to make the movement easier. Progress from arms forward to a comfortable overhead position before considering a light external load.
6. Single-Leg Roman Chair Back Extension
Best for: Advanced unilateral hip strength and resisting pelvic rotation.
Muscles worked: Gluteus maximus, hamstrings, erector spinae, obliques, and hip stabilizers.
Equipment needed: A heavy, stable Roman chair that can securely anchor one leg.
Sets, reps, and rest: Perform 2–3 sets of 6–10 repetitions per side. Rest 60–90 seconds between sides.
How to Do It
- Begin with both legs secured and confirm that the machine does not move.
- Keep one lower leg firmly anchored.
- Carefully unload or unhook the other leg only if the machine allows the working leg to remain fully secure.
- Keep both hips facing the floor as you hinge forward.
- Use the anchored-side glute and hamstrings to return to the starting position.
Common mistakes: Do not perform this exercise on a light or unstable bench. Avoid twisting the pelvis, pushing mainly through the arms, or sacrificing your anchor to achieve a larger range.
Progression or regression: For a safer regression, keep both legs secured but concentrate on pressing more firmly through one foot. Use bilateral back extensions until you can maintain a level pelvis.
Skip this variation when the machine cannot hold one leg securely.
7. Roman Chair Side Bend
Best for: Building controlled lateral trunk strength.
Muscles worked: Internal and external obliques, quadratus lumborum, erector spinae, and abdominal stabilizers.
Equipment needed: Roman chair that permits a secure sideways setup.
Sets, reps, and rest: Perform 2–3 sets of 8–15 repetitions per side. Rest 45–75 seconds.
How to Do It
- Turn sideways and place the upper portion of your hip against the pad.
- Secure your feet or lower legs, using a staggered position if the machine permits.
- Cross your arms over your chest and form a straight line from your head to your feet.
- Lower your torso a short distance toward the floor without rotating.
- Use the muscles along the upper side of your trunk to return to a straight position.
Common mistakes: Avoid turning the movement into a forward crunch, twisting your shoulders, dropping too deeply, or using momentum.
Progression or regression: Keep your hands on the pad for light assistance or reduce the range. Progress by placing your hands beside your head or holding a very light weight against your chest.
Coaching cue: Move directly sideways as though you are between two walls.
8. Roman Chair Side Plank Hold
Best for: Lateral core endurance without repeated side bending.
Muscles worked: Obliques, quadratus lumborum, gluteus medius, spinal stabilizers, and shoulder stabilizers.
Equipment needed: Roman chair that safely supports a sideways position.
Sets, reps, and rest: Perform 2–3 holds of 15–30 seconds per side. Rest 45–75 seconds.
How to Do It
- Lie sideways with your hip supported by the pad and your lower legs securely anchored.
- Stack or stagger your feet according to the machine’s design.
- Cross your arms over your chest.
- Lift and hold your body in a straight line.
- Breathe steadily and keep your hips from rotating forward or backward.
Common mistakes: Avoid allowing the waist to sag, turning the chest toward the floor, holding your breath, or placing the pad directly against your ribs.
Progression or regression: Shorten the hold or place one hand on the pad for assistance. Progress by extending your top arm overhead, provided you can maintain a stable body line.
9. Roman Chair Crunch
Best for: Training controlled trunk flexion and abdominal strength.
Muscles worked: Rectus abdominis, internal and external obliques, and hip flexors.
Equipment needed: A multipurpose Roman chair specifically designed for a secure face-up setup.
Sets, reps, and rest: Perform 2–3 sets of 8–15 repetitions. Rest 45–75 seconds.
How to Do It
- Confirm that the manufacturer permits face-up abdominal exercises.
- Sit or lie face up with your lower legs securely anchored.
- Cross your arms over your chest and begin in a slightly reclined position.
- Exhale as you bring your ribs toward your pelvis and lift your torso through a short range.
- Pause briefly, then lower slowly without dropping backward.
Common mistakes: Avoid turning the crunch into a fast full sit-up, pulling on your neck, reclining farther than you can control, or assuming every Roman chair supports this position.
Progression or regression: Reach your arms forward to make the exercise easier. Cross them over your chest or hold a light plate close to your torso to increase the challenge.
10. Roman Chair I-Y-T Raise
Best for: Strengthening the upper back while the posterior chain holds the torso steady.
Muscles worked: Middle and lower trapezius, rhomboids, posterior deltoids, shoulder stabilizers, erector spinae, glutes, and hamstrings.
Equipment needed: Roman chair; no weight is necessary initially.
Sets, reps, and rest: Perform 2–3 sets of 6–8 controlled I-Y-T cycles. Rest 60–90 seconds.
How to Do It
- Set up face down and hold your torso in a straight, stable position.
- Let your arms hang toward the floor with your thumbs pointing forward.
- Raise your arms straight ahead to form an “I.”
- Lower them, then raise them diagonally to form a “Y.”
- Lower again, then raise them out to the sides to form a “T.”
- Complete each position without changing your torso angle.
Common mistakes: Avoid shrugging, swinging the arms, lifting them higher than shoulder mobility allows, or using lower-back movement to create extra range.
Progression or regression: Begin with one arm at a time or perform only the T raise. Progress with very light dumbbells or small plates after you can move smoothly without shrugging.
What Muscles Do Roman Chair Exercises Work?
The muscles emphasized depend on your exercise, range of motion, bench angle, and whether you move mainly through the hips or trunk.
Gluteus Maximus
The gluteus maximus extends the hip as you raise your torso from the lowered position. It works especially hard when you treat the back extension as a controlled hip hinge and finish by squeezing your glutes rather than arching your lower back.
Hamstrings
The hamstrings assist hip extension and help control the lowering phase. They include the biceps femoris, semitendinosus, and semimembranosus.
According to the NCBI Bookshelf overview of hamstring anatomy, the hamstrings contribute to both hip extension and knee flexion.
Erector Spinae and Deep Back Muscles
The erector spinae help extend and control the spine. The multifidus and other deeper muscles contribute to spinal positioning and stability.
The NCBI Bookshelf overview of lumbar-spine anatomy describes the erector spinae and multifidi as important lumbar extensor muscles.
Roman chair extensions should not be described as complete lower-back isolation exercises. A research review concluded that the hip extensors can contribute substantially because the movement is compound rather than isolated lumbar extension.
Abdominals and Obliques
The rectus abdominis contributes to trunk flexion during Roman chair crunches. The internal and external obliques help with lateral flexion, rotation, and trunk control.
The NCBI Bookshelf abdominal-wall anatomy guide identifies the obliques as contributors to lateral flexion and rotation of the vertebral column.
Quadratus Lumborum
The quadratus lumborum is a deep muscle on each side of the lower back. It helps laterally flex the lumbar spine and contributes during side bends and side-plank variations. (NCBI Bookshelf overview of the posterior abdominal wall)
Upper-Back and Shoulder-Blade Muscles
Roman chair I-Y-T raises involve the middle and lower trapezius, rhomboids, posterior deltoids, and smaller shoulder stabilizers. Your glutes, hamstrings, and spinal erectors work isometrically to hold your torso in position.
What Research Says About Muscle Activation
A small study involving resistance-trained women compared loaded Roman chair extensions, Romanian deadlifts, and seated machine back extensions. The Roman chair produced high biceps femoris and gluteus maximus activation, while erector spinae activation was similar among the exercises. These findings support using the Roman chair as a posterior-chain exercise, but short-term muscle-activation results do not prove that it produces greater long-term muscle growth. (PubMed muscle-activation study)
Benefits of Roman Chair Exercises
Train Several Posterior-Chain Muscles Together
Back-extension variations train the glutes, hamstrings, and spinal extensors in the same movement. This makes them useful as accessory exercises after squats, deadlifts, or other lower-body training.
Build Back-Extension Endurance
Roman chair training may help improve the ability of the posterior trunk muscles to maintain effort. In one eight-week study, participants performing progressive Roman chair extensions improved static back-extension endurance by 42%, although maximal lumbar-extension strength did not significantly improve.
The study involved healthy volunteers and should not be interpreted as proof that Roman chair training treats back pain.
Strengthen the Core in Different Directions
The equipment is not limited to forward-and-back movement. Depending on its design, you can train:
- Trunk extension with back extensions
- Lateral flexion with side bends
- Anti-lateral-flexion endurance with side-plank holds
- Trunk flexion with crunches
- Trunk stabilization with I-Y-T raises
Provide Several Ways to Progress
You can make Roman chair exercises harder by changing:
- The bench angle
- Arm position
- Repetition range
- Pause duration
- Lowering speed
- External resistance
- Bilateral or unilateral setup
Changing the angle and arm position can significantly alter lumbar paraspinal demand, so adding weight is not the only progression method.
Require Relatively Little Equipment
One properly designed bench can provide several posterior-chain and core exercises. This can be useful in a small home gym or when the cable and machine areas are busy.
Common Roman Chair Exercise Mistakes
Setting the Pad Too High
A high pad presses into your abdomen and prevents a free hip hinge. Move it down until the hip crease is just above the pad.
Setting the Pad Too Low
If the pad is too low, your pelvis may slide forward or feel unsupported. Adjust it upward until you can move without losing contact.
Extending Beyond a Straight Body Line
Finishing by forcing the lower back into a deep arch does not make the exercise more effective. Stop when your head, torso, hips, and legs are aligned.
Using Momentum
Swinging makes the movement difficult to control and often leads to an exaggerated top position. Lower for approximately two to three seconds and rise smoothly.
Adding Weight Before Mastering Bodyweight Form
First control the setup, range, and tempo. Then increase repetitions or arm length before holding a heavy plate.
Dropping Too Deeply
A larger range is not automatically better. Stop when your hamstrings limit the hinge or when your spine begins to move in a way you cannot control.
Holding Your Breath
Maintain your brace, but continue breathing. Exhale through the most difficult portion of a crunch or as you return from a back extension.
Ignoring Equipment Compatibility
Not every Roman chair supports side planks, crunches, single-leg work, or horizontal extensions. Check the machine instructions and skip any position that cannot be anchored securely.
How to Program Roman Chair Exercises
The 2026 American College of Sports Medicine resistance-training position stand emphasizes progressive resistance training, consistent effort, and training all major muscle groups at least twice weekly as part of a complete program. It also notes that many different resistance-training approaches can improve strength and physical function.
That does not mean you must use the Roman chair twice every week. Account for deadlifts, Romanian deadlifts, squats, good mornings, rows, and other exercises that already challenge your posterior chain.
A practical Roman chair structure is:
- Exercises per session: 2–3
- Working sets: 2–3 per exercise
- Frequency: 1–2 sessions per week
- Effort: Finish most sets with approximately 2–3 controlled repetitions remaining
- Rest: 60–120 seconds for back extensions and 45–75 seconds for smaller core exercises
- Workout placement: After your main compound lifts or in a separate core session
Avoid performing heavy weighted back extensions the day before demanding deadlifts if your posterior chain has not recovered.
Sample Roman Chair Workout
Beginner Core and Back Routine
Perform this routine once or twice per week.
| Exercise | Sets | Reps or time | Rest |
|---|---|---|---|
| 45-Degree Roman Chair Back Extension | 2–3 | 8–12 | 60–90 seconds |
| Roman Chair Side Plank Hold | 2 | 15–25 seconds per side | 45–60 seconds |
| Roman Chair Crunch | 2 | 8–15 | 45–60 seconds |
Use the crunch only if your bench is designed for a secure face-up setup. Otherwise, replace it with the Roman chair I-Y-T raise for 2 sets of 6 controlled cycles.
Intermediate Progression
Once you can complete the beginner routine without swinging, excessive arching, or losing your position, make one change at a time:
- Replace bodyweight extensions with weighted extensions.
- Increase side-plank holds by 5 seconds.
- Use a horizontal bench instead of a 45-degree bench.
- Extend your arms forward during back extensions.
- Add one set rather than changing every variable at once.
When you reach the top of the repetition range with clean form for two consecutive workouts, add a small amount of difficulty.
How to Do Roman Chair Exercises Safely
Warm up with 5–10 minutes of low-impact activity such as walking or easy cycling before strength exercises. The AAOS Spine Conditioning Program recommends this general warm-up and advises readers not to ignore pain during exercise.
Before each session:
- Inspect the bench and adjustment pins.
- Begin with bodyweight.
- Use a range you can control.
- Keep the head and neck aligned with the torso.
- Avoid fast, loaded twisting.
- Stop the set when technique changes noticeably.
People with current back pain, a recent back injury or surgery, diagnosed osteoporosis, radiating leg symptoms, or another spinal condition should get individualized guidance before attempting loaded trunk exercises.
Stop exercising and seek appropriate professional help if you experience sharp or burning pain, numbness, tingling, weakness, pain traveling into the leg, dizziness, chest pain, or unusual symptoms. MedlinePlus identifies leg pain, weakness, and numbness among symptoms that require medical attention when associated with back pain.
Frequently Asked Questions
What is the best Roman chair exercise for beginners?
The 45-degree bodyweight back extension is usually the best starting exercise. The incline reduces the lever compared with a horizontal bench, and you can place your hands on the pad for assistance if needed.
Start with two sets of 8–10 slow repetitions.
Should you feel Roman chair extensions in your lower back?
Your lower-back muscles may work and feel fatigued because they help control your spine. However, you should also feel your glutes and hamstrings contributing.
Sharp pain, pinching, burning, numbness, or symptoms traveling into a leg are not normal training sensations.
How high should you lift during a Roman chair back extension?
Raise your torso until your head, shoulders, hips, and legs form one straight line. Do not continue lifting into a large lower-back arch.
How low should you go?
Lower only as far as you can maintain control and keep your pelvis supported. Your range depends on hip mobility, hamstring flexibility, bench design, and training experience.
A deeper position is not useful if you have to drop, bounce, or lose control to reach it.
How often should you perform Roman chair exercises?
One or two sessions per week is enough for many people, especially when they also perform deadlifts, squats, rows, or other posterior-chain exercises.
Beginners should start with a small amount of volume and monitor how their glutes, hamstrings, and lower back recover.
Are Roman chair exercises good for abs?
They can train the abdominals when the bench safely supports crunches, side bends, or side-plank holds. Standard back extensions primarily emphasize the posterior chain, although the abdominal muscles still help stabilize the trunk.
Is a Roman chair the same as a GHD?
The terms sometimes overlap, but the equipment is not always identical. A Roman chair is commonly a 45-degree or horizontal back-extension bench. A glute-ham developer usually has a larger rounded pad and a more substantial foot platform.
Follow the setup instructions for the specific machine rather than assuming every Roman chair and GHD supports the same exercises.
Conclusion
Roman chair exercises can provide effective posterior-chain and core training without requiring many separate machines. Start with a controlled 45-degree back extension, keep the pad below your hip crease, and stop at a straight body line rather than arching past neutral.
Choose one back-extension variation and one or two core exercises. Build repetitions and control first, then progress through longer arm positions, longer holds, a more horizontal bench, or small increases in resistance.
References
- American College of Sports Medicine Position Stand: Resistance Training Prescription, 2026
- Comparison of Muscle Activity in Three Hip-Extension Exercises
- Effect of Roman Chair Angle and Hand Position on Lumbar Muscle Activity
- Back-Extension Endurance and Variable-Angle Roman Chair Training
- Review of Exercises Designed to Condition the Lumbar Extensors
- NCBI Bookshelf: Hamstring Muscle Anatomy
- AAOS Spine Conditioning Program
This content is for informational purposes only and is not a substitute for medical advice.