Pilates can help strengthen the pelvic floor when each movement is paired with a deliberate pelvic floor contraction, controlled breathing, and complete relaxation. The Pilates movement alone should not be assumed to train these muscles.
The exercises below begin with breathing and pelvic awareness before progressing to controlled leg, hip, and whole-body movements. They require only an exercise mat and are suitable for most beginners who can contract and relax their pelvic floor without pain.
Can Pilates Strengthen the Pelvic Floor?
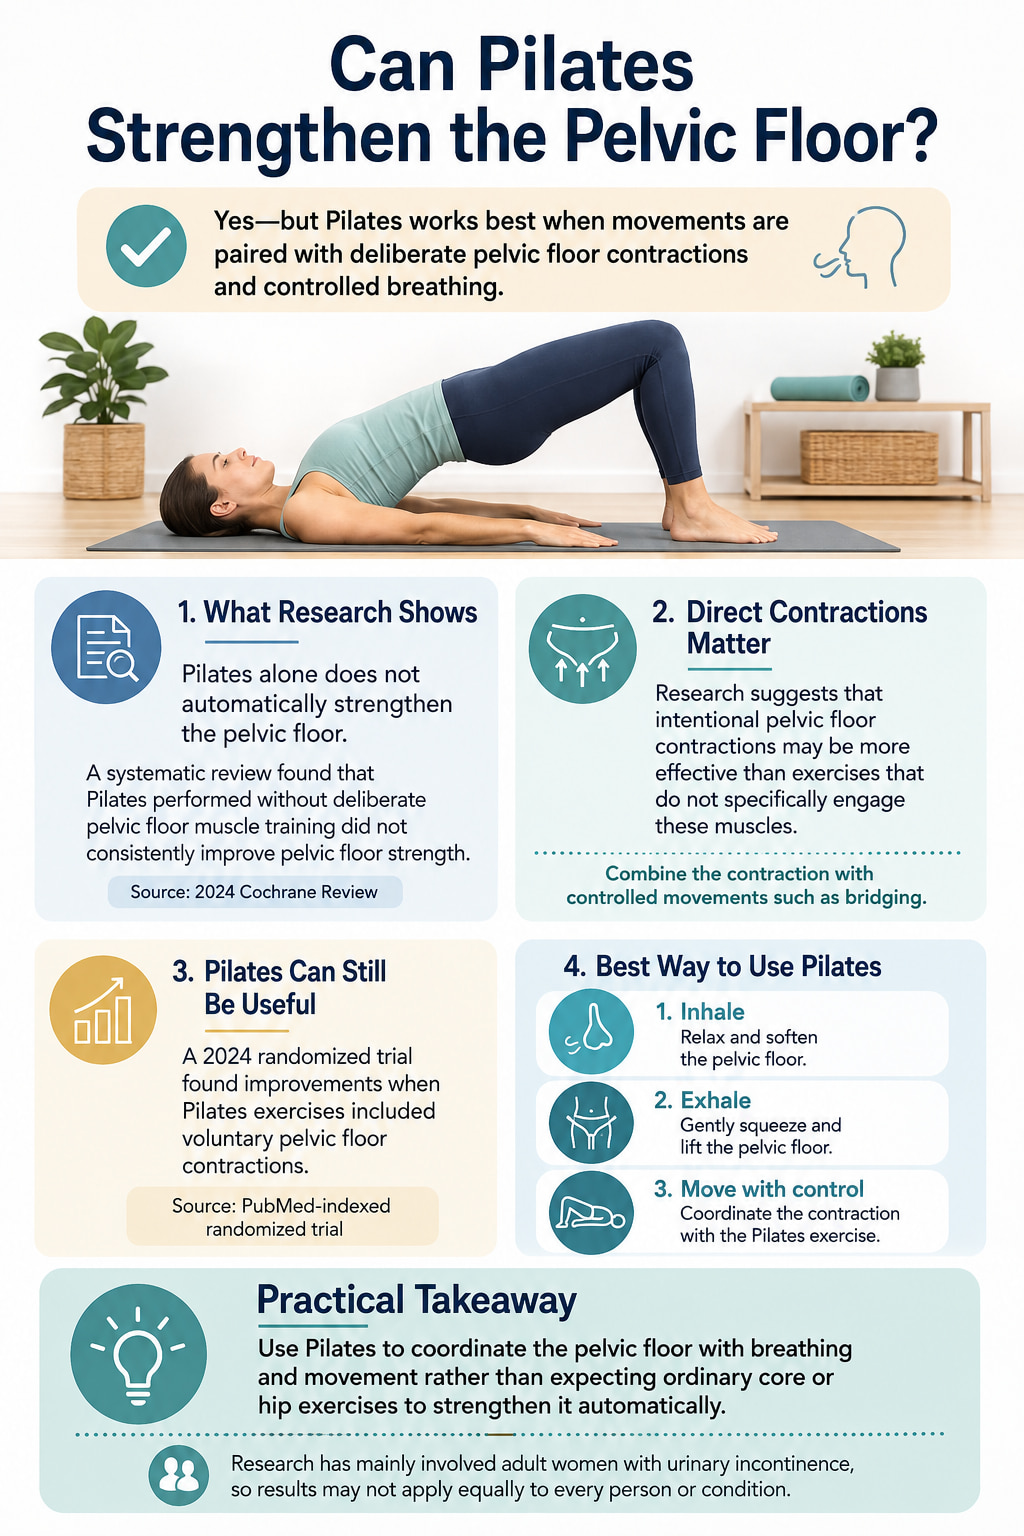
Pilates may support pelvic floor training, but the way you perform the exercises matters.
A systematic review found that Pilates performed without deliberate pelvic floor muscle training did not consistently improve pelvic floor strength. A 2024 Cochrane review also found that direct pelvic floor contractions may be more effective than indirect exercises that do not intentionally engage these muscles. Coordinating pelvic floor contractions with movements such as bridging may provide an additional benefit, although the evidence remains uncertain.
In a 2024 randomized trial indexed by PubMed, both Pilates and conventional pelvic floor muscle training improved several outcomes in postmenopausal women with stress urinary incontinence when the Pilates exercises included voluntary pelvic floor contractions. Most available research has involved adult women with urinary incontinence, so the findings should not be applied equally to every person or condition.
The practical takeaway is simple: use Pilates as a way to coordinate the pelvic floor with breathing and movement rather than expecting ordinary abdominal or hip exercises to strengthen it automatically.
Pilates Exercises to Strengthen Pelvic Floor at a Glance
| Exercise | Main training purpose | Beginner starting dose |
|---|---|---|
| Pilates breathing with pelvic floor lift | Learn the contraction-and-release pattern | 5 controlled breaths |
| Pelvic tilt | Develop pelvic awareness and deep core control | 6–8 reps |
| Bent-knee fallout | Control the pelvis while one hip moves | 6 reps per side |
| Heel slide | Coordinate the pelvic floor with leg movement | 6 reps per side |
| Single-leg knee fold | Increase the core-control challenge | 5–8 reps per side |
| Shoulder bridge | Combine pelvic floor, glute, and trunk strength | 8–10 reps |
| Side-lying clam | Strengthen the outer hips and pelvic stabilizers | 8–12 reps per side |
| Quadruped arm-and-leg reach | Build whole-core coordination | 5–8 reps per side |
The sets and repetitions in this guide are conservative general-exercise starting points. They are not a clinical treatment prescription for incontinence, prolapse, pelvic pain, or recovery from surgery.
How to Contract the Pelvic Floor Correctly
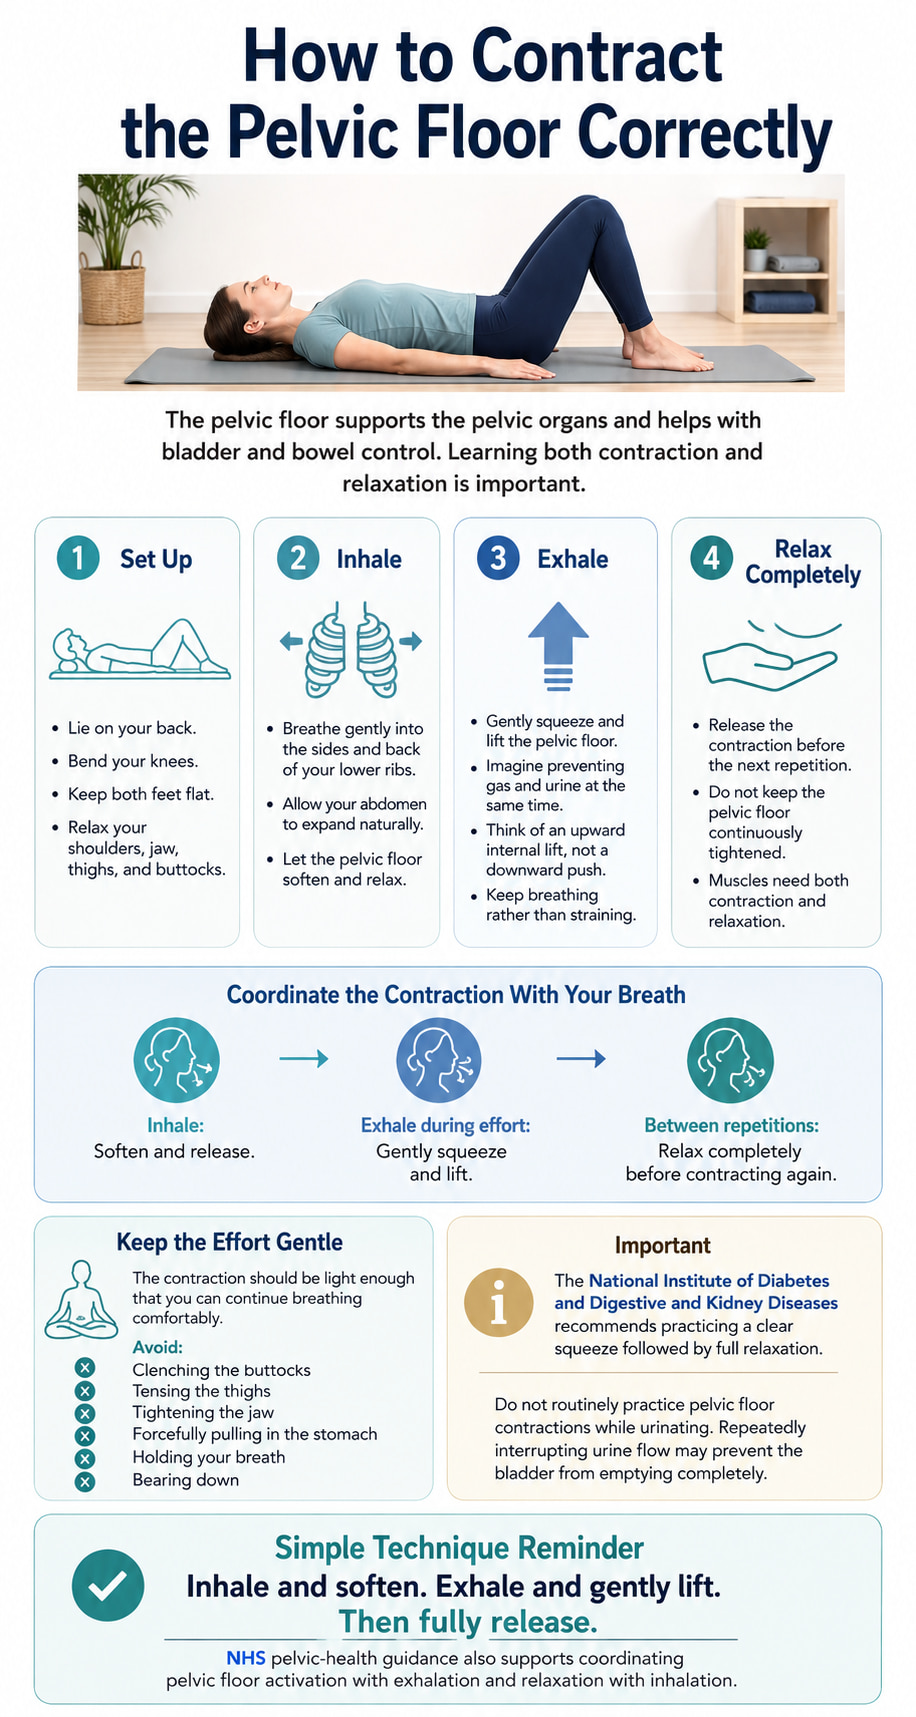
The pelvic floor muscles support the pelvic organs and help control bladder and bowel function. Both men and women have pelvic floor muscles and may benefit from learning how to contract and relax them correctly.
Before adding a pelvic floor contraction to Pilates, practice the following basic pattern:
- Lie on your back with your knees bent and feet flat.
- Inhale gently into the sides and back of your lower ribs.
- Allow your abdomen and pelvic floor to soften as you inhale.
- As you exhale, imagine gently preventing yourself from passing gas and urine at the same time.
- Feel a subtle internal squeeze and upward lift rather than a downward push.
- Release the contraction completely before repeating.
The contraction should be gentle enough that you can continue breathing. Keep your thighs, jaw, and buttocks relaxed. A small response from the lower abdominal muscles is normal, but avoid forcefully pulling in your stomach.
The National Institute of Diabetes and Digestive and Kidney Diseases recommends practicing a clear squeeze followed by full relaxation. It also advises against routinely performing pelvic floor exercises while urinating because repeatedly interrupting urine flow may prevent the bladder from emptying completely.
Coordinate the Contraction With Your Breath
A useful Pilates breathing pattern is:
- Inhale: soften and release the pelvic floor.
- Exhale during the effort: gently squeeze and lift.
- Between repetitions: allow a complete release before contracting again.
NHS pelvic-health guidance similarly recommends coordinating pelvic floor activation with exhalation and relaxation with inhalation.
Do not keep the pelvic floor tightly contracted throughout the entire workout. Muscles need to relax as well as contract.
When Strengthening May Not Be Appropriate
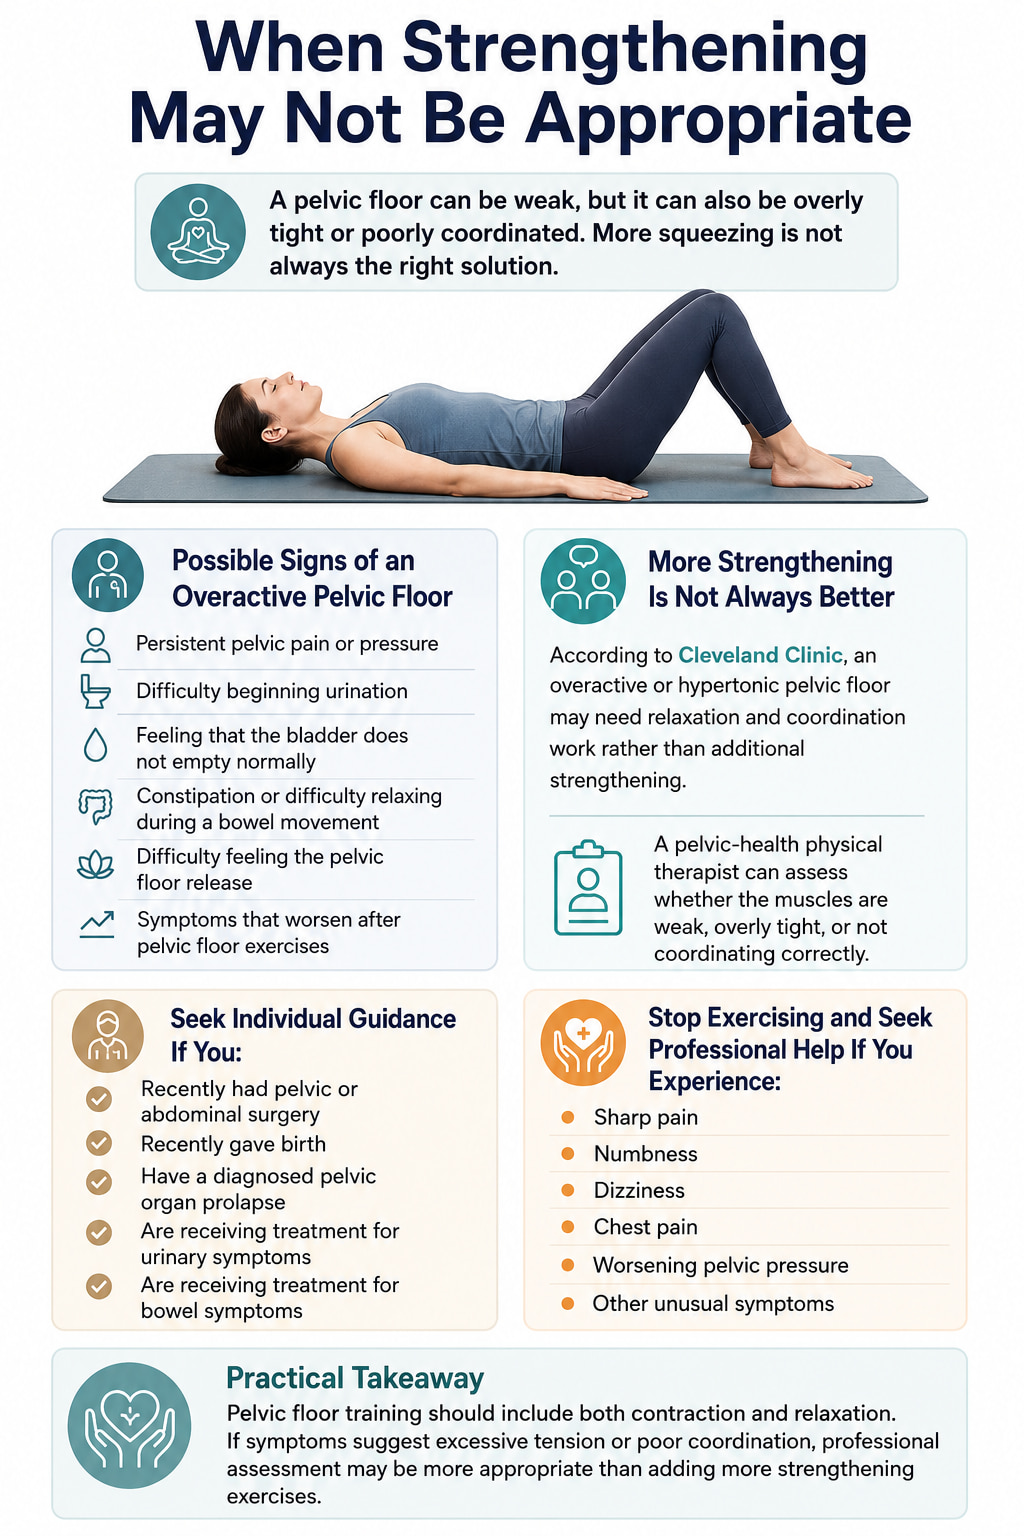
A pelvic floor can be weak, but it can also be overly tight or poorly coordinated. More squeezing is not always the correct solution.
An overactive or hypertonic pelvic floor may be associated with:
- Persistent pelvic pain or pressure
- Difficulty beginning urination
- A feeling that the bladder does not empty normally
- Constipation or difficulty relaxing during a bowel movement
- Difficulty feeling the pelvic floor release
- Symptoms that become worse after pelvic floor exercises
According to Cleveland Clinic, these symptoms may require relaxation and coordination work rather than additional strengthening. A pelvic-health physical therapist can assess whether the muscles are weak, overactive, or not coordinating correctly.
Seek individualized guidance before beginning if you recently had pelvic or abdominal surgery, recently gave birth, have a diagnosed pelvic organ prolapse, or are following treatment for urinary or bowel symptoms.
Stop exercising and seek professional help if you experience sharp pain, numbness, dizziness, chest pain, worsening pelvic pressure, or other unusual symptoms.
8 Pilates Exercises to Strengthen Pelvic Floor Safely
These 8 Pilates exercises combine controlled movement, breathing, and gentle pelvic floor activation to build strength and coordination safely. Start slowly, focus on full relaxation between contractions, and progress only when you can maintain good form without straining.
1. Pilates Breathing With Pelvic Floor Lift
Best for: Learning how to coordinate the pelvic floor with the diaphragm before adding larger movements.
Muscles worked: Pelvic floor, diaphragm, and deep abdominal muscles.
Equipment needed: Exercise mat; a small pillow is optional.
Sets, reps, and rest: Perform 1–2 sets of 5 controlled breaths. Take one fully relaxed breath between contractions when needed.
How to Do It
- Lie on your back with your knees bent, feet flat, and arms relaxed.
- Keep your pelvis in a comfortable neutral position rather than pressing your lower back forcefully into the mat.
- Inhale through your nose and allow your lower ribs and abdomen to expand gently.
- As you exhale slowly, perform a light pelvic floor squeeze and internal lift.
- Maintain the lift only through the comfortable part of the exhale.
- Inhale again and feel the pelvic floor soften completely.
Common mistakes: Using a maximum-effort squeeze, clenching the buttocks, pressing the heels into the floor, holding the breath, or pushing downward instead of lifting.
Regression or progression: Begin in a side-lying or supported seated position if lying on your back is uncomfortable. Progress by holding a gentle contraction for up to three seconds while continuing to breathe normally.
Coaching cue: Think “gently lift, then fully let go.”
2. Pelvic Tilt
Best for: Improving pelvic awareness and learning to coordinate the pelvic floor with small spinal and abdominal movements.
Muscles worked: Pelvic floor, deep abdominal muscles, and spinal stabilizers.
Equipment needed: Exercise mat.
Sets, reps, and rest: Perform 1–2 sets of 6–8 repetitions. Rest for 30 seconds between sets.
How to Do It
- Lie on your back with your knees bent and feet approximately hip-width apart.
- Begin with a small natural space beneath your lower back.
- Inhale and allow your pelvis and pelvic floor to relax.
- Exhale, gently lift the pelvic floor, and tip your pelvis so the front of your pelvis rotates slightly toward your ribs.
- Allow your lower back to move closer to the mat without pressing it down forcefully.
- Inhale as you return to neutral and completely release the pelvic floor.
Common mistakes: Squeezing the buttocks to create the movement, pushing through the feet, using a large rocking motion, flattening the back aggressively, or holding the breath.
Regression or progression: Make the tilt extremely small if you cannot keep the surrounding muscles relaxed. Progress by maintaining a comfortable neutral pelvis during the heel-slide exercise.
Coaching cue: Move the pelvis gently rather than forcing the back into the floor.
3. Bent-Knee Fallout
Best for: Teaching the pelvis to remain stable while one hip moves.
Muscles worked: Pelvic floor, deep abdominals, hip rotators, and inner-thigh muscles.
Equipment needed: Exercise mat.
Sets, reps, and rest: Perform 1–2 sets of 6 repetitions per side. Rest for 30–45 seconds between sets.
How to Do It
- Lie on your back with your knees bent and feet flat.
- Position your feet and knees approximately hip-width apart.
- Inhale to prepare while keeping the pelvis level.
- Exhale, gently lift the pelvic floor, and allow one knee to open to the side.
- Stop before the opposite side of your pelvis begins to lift or rotate.
- Inhale as you return the knee to the starting position and release the pelvic floor.
- Alternate sides.
Common mistakes: Letting the pelvis roll with the leg, dropping the knee too far, pressing the opposite foot into the floor, gripping the buttocks, or moving quickly.
Regression or progression: Use a smaller leg movement as the regression. Progress by moving the knee slightly farther while keeping both sides of the pelvis equally weighted.
Coaching cue: Let the thigh move while the pelvis remains quiet.
4. Pilates Heel Slide
Best for: Coordinating the pelvic floor and deep core while lengthening one leg.
Muscles worked: Pelvic floor, deep abdominal muscles, hip flexors, and muscles around the pelvis.
Equipment needed: Exercise mat; socks or a towel under the heel may help it slide.
Sets, reps, and rest: Perform 1–2 sets of 6 repetitions per side. Rest for 30–45 seconds between sets.
How to Do It
- Lie on your back with both knees bent and your pelvis neutral.
- Inhale and allow your ribs and abdomen to expand gently.
- Exhale, perform a light pelvic floor lift, and slowly slide one heel away from your body.
- Stop before your lower back arches, your ribs flare, or your pelvis tips.
- Inhale as you slide the foot back and release the pelvic floor.
- Repeat on the other side.
Common mistakes: Straightening the leg farther than you can control, forcefully flattening the lower back, tensing the neck, holding the breath, or dragging the foot quickly.
Regression or progression: Shorten the slide until you can keep the pelvis still. Progress by extending the leg farther or allowing the heel to hover slightly above the mat.
Coaching cue: Make the leg longer without changing the shape of your trunk.
5. Single-Leg Knee Fold
Best for: Progressing from a supported heel slide to lifting one foot from the floor.
Muscles worked: Pelvic floor, deep abdominal muscles, hip flexors, and spinal stabilizers.
Equipment needed: Exercise mat.
Sets, reps, and rest: Perform 1–2 sets of 5–8 repetitions per side. Rest for 30–45 seconds between sets.
How to Do It
- Lie on your back with your knees bent and feet flat.
- Keep your ribs relaxed and your pelvis level.
- Inhale to prepare.
- Exhale, gently lift the pelvic floor, and raise one foot several inches from the mat.
- Keep the knee bent and bring the thigh only as far as you can without rocking the pelvis.
- Inhale as you lower the foot quietly and release the pelvic floor.
- Alternate legs.
Common mistakes: Pulling the knee tightly toward the chest, rocking from side to side, arching the lower back, holding the breath, or lifting both legs before you are ready.
Regression or progression: Begin by lifting only the heel while keeping the toes on the floor. Progress to a slow alternating tabletop march, but keep one foot supported until you can control the movement comfortably.
Coaching cue: Make the leg feel light instead of pulling it upward.
6. Shoulder Bridge
Best for: Combining pelvic floor coordination with glute, hamstring, and trunk strengthening.
Muscles worked: Pelvic floor, gluteus maximus, hamstrings, deep abdominals, and spinal stabilizers.
Equipment needed: Exercise mat.
Sets, reps, and rest: Perform 2 sets of 8–10 repetitions. Rest for 45–60 seconds between sets.
How to Do It
- Lie on your back with your knees bent, feet hip-width apart, and arms beside you.
- Keep your knees pointing in the same general direction as your toes.
- Inhale to prepare.
- Exhale, gently lift the pelvic floor, press evenly through both feet, and raise your hips.
- Stop when your shoulders, hips, and knees form a comfortable diagonal line.
- Inhale at the top without gripping your buttocks or pushing your ribs upward.
- Exhale as you lower with control.
- Once your pelvis is on the mat, take a full inhale and release the pelvic floor completely.
Common mistakes: Lifting too high, arching the lower back, pushing the ribs forward, letting the knees fall inward or outward, holding the breath, or maintaining a hard pelvic floor contraction after the repetition.
Regression or progression: Perform a mini bridge by lifting the hips only a few inches. Progress with a slightly longer pause at the top or a light resistance band above the knees.
Coaching cue: Lift through the hips without pushing pressure downward.
7. Side-Lying Clam
Best for: Strengthening the outer hips, which help stabilize the pelvis during standing and walking.
Muscles worked: Gluteus medius, gluteus maximus, deep core, and pelvic floor through coordinated contraction.
Equipment needed: Exercise mat; a light mini band is optional for progression.
Sets, reps, and rest: Perform 2 sets of 8–12 repetitions per side. Rest for 30–45 seconds when changing sides.
How to Do It
- Lie on your side with your head supported and your knees comfortably bent.
- Stack your hips and shoulders rather than rolling backward.
- Keep your feet together.
- Inhale to prepare.
- Exhale, gently lift the pelvic floor, and open the top knee without allowing the pelvis to roll.
- Inhale as you lower the knee and release the pelvic floor.
- Complete the repetitions before changing sides.
Common mistakes: Rolling the pelvis backward, separating the feet, lifting the knee too high, gripping the waist, or using momentum.
Regression or progression: Reduce the opening range if the pelvis moves. Progress by placing a light resistance band above the knees while keeping the same controlled movement.
Coaching cue: Open the hip without opening the whole body.
8. Quadruped Arm-and-Leg Reach
Best for: Integrating pelvic floor control with the shoulders, hips, and trunk in a weight-bearing position.
Muscles worked: Pelvic floor, deep abdominals, glutes, spinal stabilizers, shoulders, and upper-back muscles.
Equipment needed: Exercise mat; folded padding may be placed under the knees.
Sets, reps, and rest: Perform 1–2 sets of 5–8 repetitions per side. Rest for 45 seconds between sets.
How to Do It
- Begin on your hands and knees with your hands beneath your shoulders and knees beneath your hips.
- Keep your spine long and your weight distributed evenly.
- Inhale without allowing your stomach to drop heavily toward the floor.
- Exhale, gently lift the pelvic floor, and slide one leg backward.
- When you can control the leg movement, reach the opposite arm forward.
- Keep your pelvis facing the floor and lift the limbs only as high as you can without arching or rotating.
- Inhale as you return your hand and knee to the mat and release the pelvic floor.
- Repeat on the other side.
Common mistakes: Lifting the arm or leg too high, twisting the pelvis, arching the lower back, shifting heavily onto one hand, or holding the breath.
Regression or progression: Move only one arm or one leg at a time. Progress by pausing briefly with the opposite arm and leg extended rather than lifting them higher.
Coaching cue: Reach long in both directions while keeping your trunk still.
Beginner Pilates Pelvic Floor Workout
Perform this routine two or three times per week as a general strengthening session.
Workout Structure
- Pilates breathing with pelvic floor lift: 5 breaths
- Pelvic tilt: 6–8 reps
- Bent-knee fallout: 6 reps per side
- Heel slide: 6 reps per side
- Single-leg knee fold: 5–8 reps per side
- Shoulder bridge: 8–10 reps
- Side-lying clam: 8–12 reps per side
- Quadruped arm-and-leg reach: 5 reps per side
Begin with one round. Progress to two rounds when you can:
- Breathe normally throughout every exercise
- Feel both the pelvic floor lift and its complete release
- Keep the pelvis controlled
- Finish without increased pain, pressure, or leakage
- Maintain the same form during the final repetition as the first
Rest for approximately 30–60 seconds between exercises. The session should feel light to moderately challenging, not exhausting.
This routine is separate from a clinical pelvic floor muscle training prescription. For women with stress or mixed urinary incontinence, NICE recommends an individualized, supervised pelvic floor muscle training program lasting at least three months as a first-line treatment.
Common Pelvic Floor Training Mistakes
Bearing Down Instead of Lifting
A correct contraction should feel like a gentle internal lift. Pressure moving downward, pelvic heaviness, or visible abdominal straining may indicate that you are bearing down.
Using a Maximum-Effort Squeeze
Harder is not always better. Excessive effort can make it difficult to breathe, isolate the correct muscles, or relax afterward. Begin with a light contraction you can clearly control.
Holding Your Breath
Breath-holding increases trunk pressure and makes coordination more difficult. Exhale during the challenging phase of each movement.
Clenching the Buttocks and Thighs
These muscles may assist during bridges and clams, but they should not replace the pelvic floor contraction. Practice the breathing exercise separately when you are unsure which muscles you feel.
Never Fully Relaxing
Every contraction should be followed by a clear release. Constant gripping does not provide better training and may aggravate symptoms in someone with an overactive pelvic floor.
Progressing the Exercise Before Controlling the Pelvis
A longer leg position is not useful when the back arches, ribs flare, pelvis rotates, or breath stops. Reduce the range and rebuild control.
Practicing While Urinating
Stopping urine flow may help you recognize the general area of the pelvic floor muscles, but it should not become a regular exercise method. Practice the contraction away from urination instead.
How to Progress Safely
Use the following order rather than making several exercises harder at once:
- Improve your ability to feel a gentle contraction.
- Learn to release the contraction completely.
- Maintain normal breathing.
- Increase repetitions to the top of the recommended range.
- Add a second set.
- Increase the arm or leg range gradually.
- Add light resistance only when bodyweight repetitions remain controlled.
Progress only one variable at a time. More repetitions, longer holds, larger ranges, and stronger resistance should not all be added during the same session.
Reduce the difficulty if you notice breath-holding, abdominal straining, pelvic pressure, leakage, pain, or difficulty relaxing after the exercise.
Frequently Asked Questions
Can Pilates Replace Kegel Exercises?
Not necessarily. Kegel exercises directly involve repeated pelvic floor contractions, while many Pilates exercises train the surrounding trunk and hip muscles.
Pilates becomes more relevant to the pelvic floor when you deliberately coordinate a contraction with the movement. Current evidence does not support assuming that Pilates movements alone provide the same training effect as direct pelvic floor muscle training.
How Often Should I Perform These Exercises?
Perform the complete Pilates routine two or three times per week as a general strength and coordination workout. You may practice a few relaxed breathing repetitions more frequently if they do not cause symptoms.
Clinical pelvic floor programs may use a different frequency or daily schedule. Research has not identified one ideal training dose that is appropriate for everyone, so follow an individualized plan when addressing a specific pelvic floor condition.
Should I Hold the Pelvic Floor Contraction Throughout Every Exercise?
No. Use a gentle lift during the effort phase, then release it completely. Holding a strong contraction throughout an entire set can interfere with breathing and prevent the muscles from relaxing normally.
How Hard Should I Squeeze?
Use the lightest contraction that produces a clear squeeze-and-lift sensation. You should still be able to breathe and keep your buttocks, thighs, jaw, and shoulders relaxed.
A strong maximum-effort squeeze is not required for every Pilates repetition.
What If I Cannot Feel My Pelvic Floor Muscles Working?
Return to the first breathing exercise and practice in a quiet lying or seated position. Reduce the effort and focus on a subtle internal lift rather than tightening every muscle around the pelvis.
Many people initially have difficulty identifying the correct muscles. A healthcare professional or pelvic-health physical therapist can assess your technique and provide individualized feedback when needed.
Are Pelvic Floor Exercises Only for Women?
No. People of all sexes have pelvic floor muscles involved in bladder, bowel, pelvic-organ, and trunk support. However, anatomy, symptoms, surgical history, and appropriate exercise programming can differ, so individualized guidance may be needed.
Can I Perform This Routine With Leakage, Prolapse, or After Childbirth?
Some of these exercises may be appropriate, but a general online routine cannot determine whether your pelvic floor is weak, tight, injured, or poorly coordinated.
Seek guidance from a pelvic-health professional if you have persistent leakage, a feeling of pelvic heaviness or bulging, pain, recent childbirth, or recent pelvic surgery. Use the exercise range and contraction strategy recommended for your situation rather than automatically increasing repetitions.
Conclusion
Pilates exercises can support pelvic floor strength when you deliberately coordinate a gentle internal lift with breathing and controlled movement. Begin with the breathing exercise, master complete relaxation, and then progress through the leg, hip, and quadruped exercises without straining.
Good pelvic floor training is not about squeezing as hard or as often as possible. Focus on three skills: lift without bearing down, breathe without straining, and fully release before repeating.
This content is for informational purposes only and is not a substitute for medical advice.
Here are the 6 best and most relevant references for your article “8 Pilates Exercises to Strengthen Pelvic Floor Safely.” These provide the strongest support for Pilates, pelvic floor muscle training, technique, and safety.
References
- Gonzaga S, et al. (2024). Comparative analysis of pelvic floor muscle training and Pilates in managing urinary incontinence among postmenopausal women: a randomized controlled trial.
View study on PubMed - Okdemir Dimli B, et al. (2024). Comparison of the effects of pelvic floor muscle training and modified Pilates exercises in elderly women with stress urinary incontinence: A randomized clinical trial.
View study on PubMed - Jacomo RH, et al. (2020). Exercise regimens other than pelvic floor muscle training cannot increase pelvic muscle strength: A systematic review.
View systematic review on PubMed - Lemos AQ, et al. (2019). The Pilates method in the function of pelvic floor muscles: Systematic review and meta-analysis.
View systematic review on PubMed - Cochrane. Pelvic Floor Muscle Training for Urinary Incontinence in Women.
View Cochrane evidence review - National Institute of Diabetes and Digestive and Kidney Diseases (NIDDK). Kegel Exercises.
View NIDDK pelvic floor exercise guidance