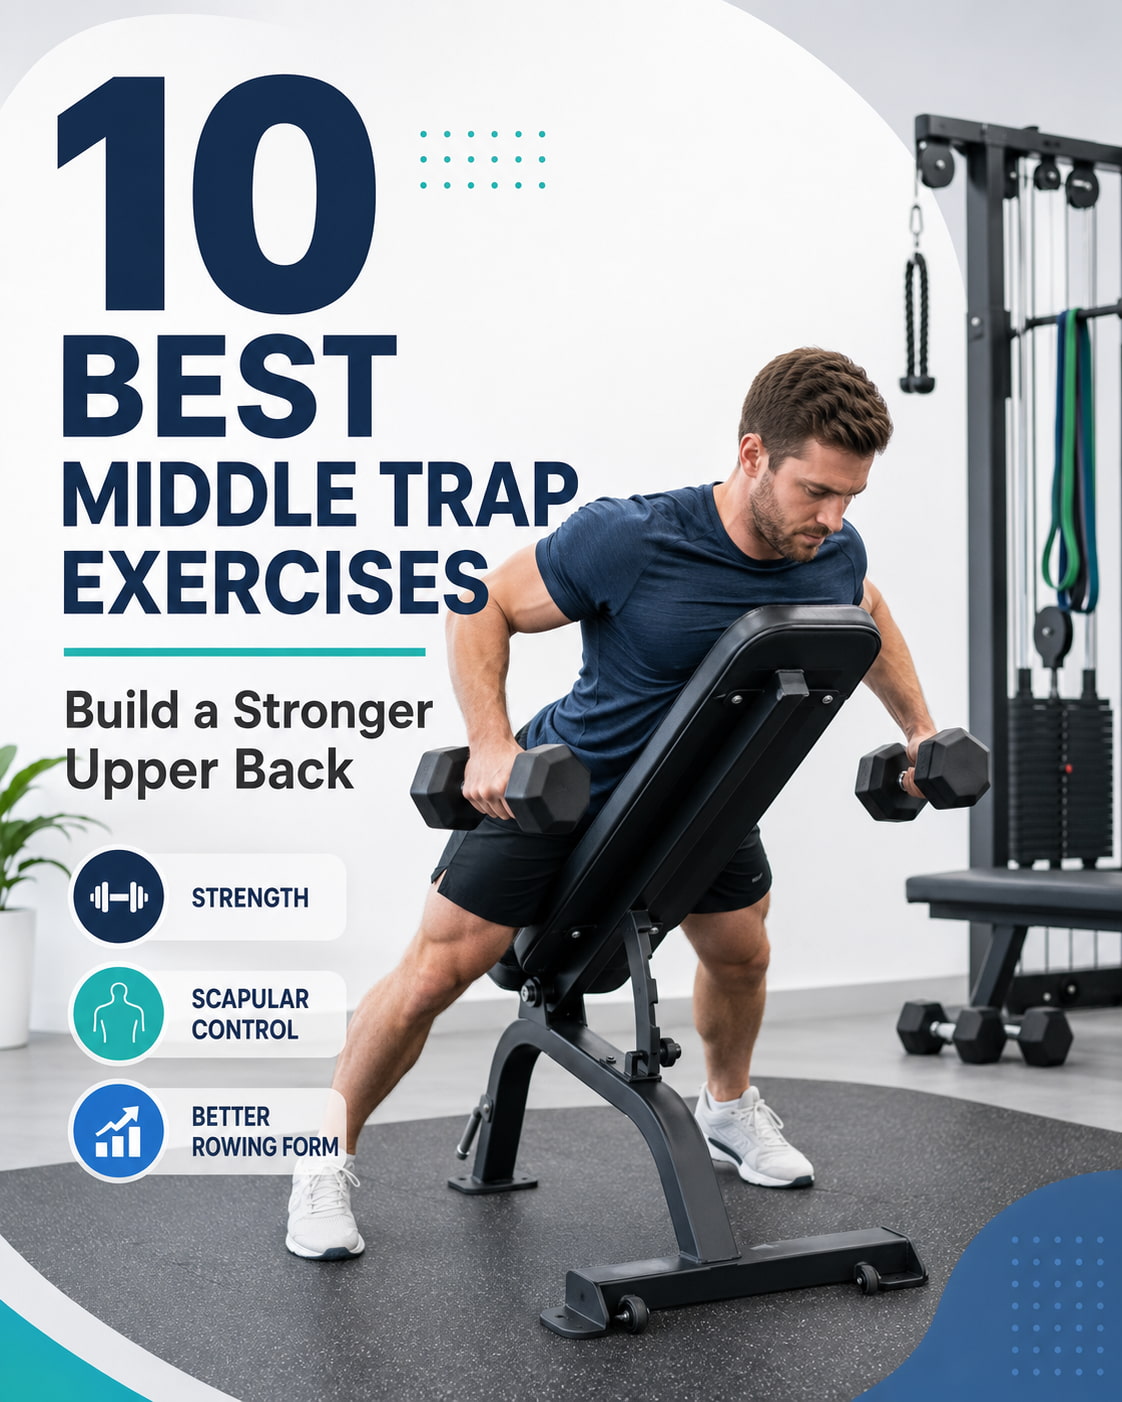
The best middle trap exercises use controlled rowing, horizontal arm movement, and shoulder-blade retraction to strengthen the center of your upper back. Chest-supported rows, prone T raises, cable reverse flys, and band pull-aparts are among the most practical options.
This guide explains how to perform 10 middle trap exercises correctly, which muscles they work, how to prevent your upper traps from taking over, and how to organize the movements into an effective workout.
What Are the Middle Traps?
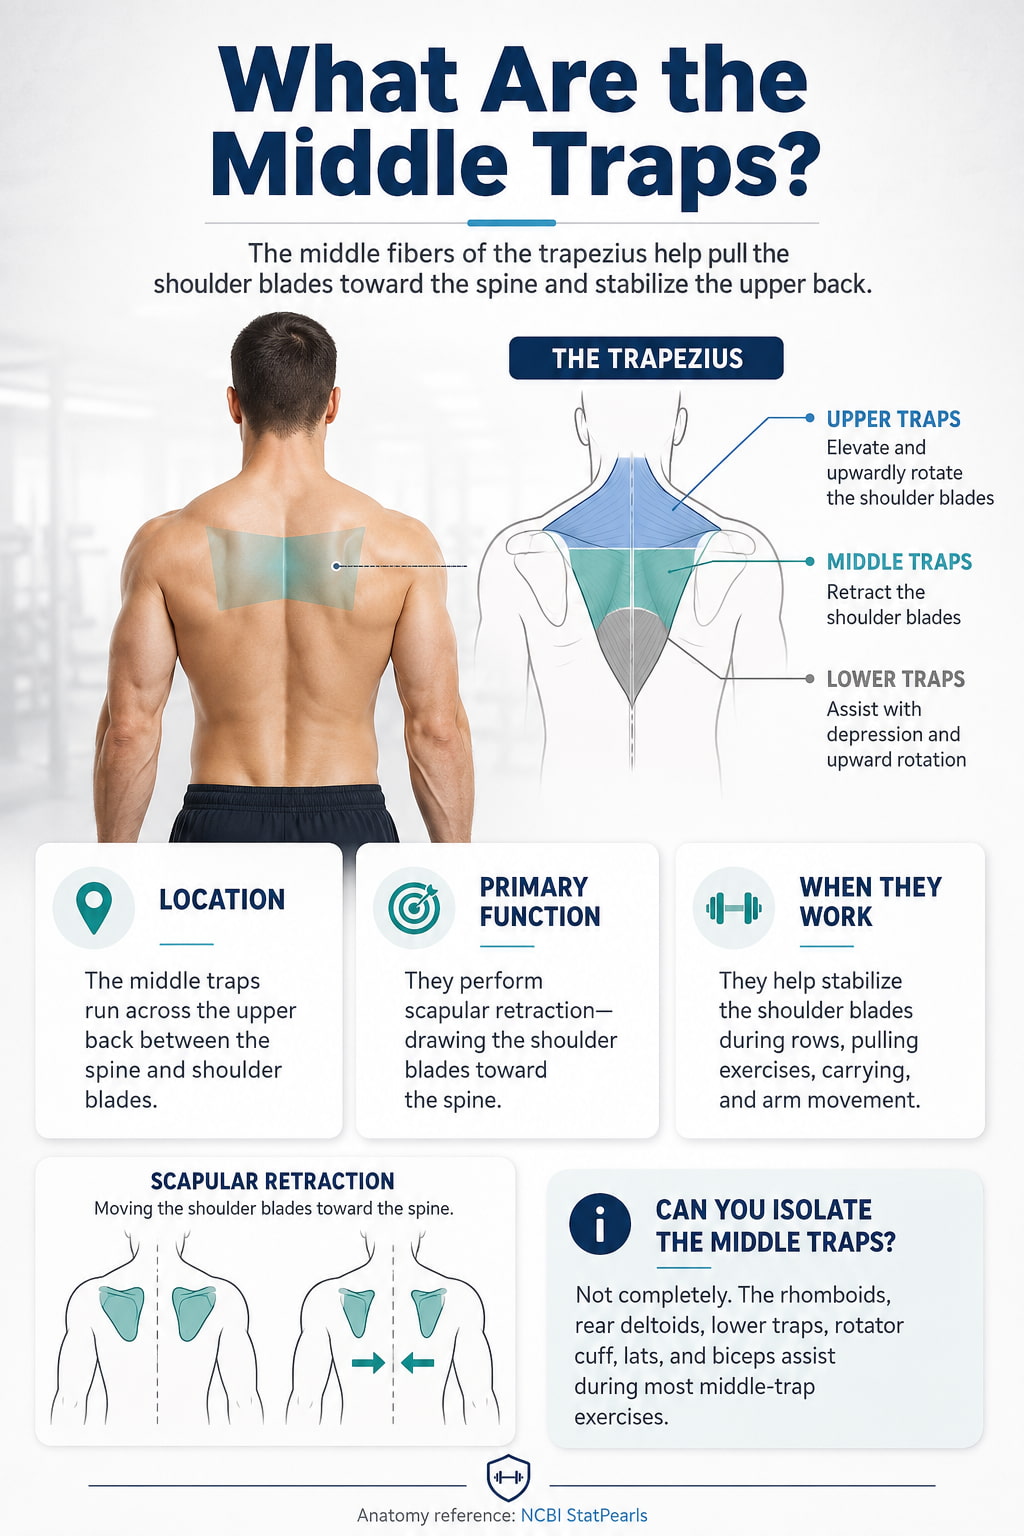
The trapezius is a broad muscle covering much of the upper back. It is commonly divided into upper, middle, and lower regions based on the direction and function of its fibers.
The middle fibers run across the upper back between the spine and shoulder blades. Their primary function is scapular retraction, which means drawing the shoulder blades toward the spine. They also help stabilize the scapula while you row, pull, carry, and move your arms.
According to the NCBI overview of trapezius anatomy, the upper fibers primarily elevate and upwardly rotate the scapula, the middle fibers retract it, and the lower fibers assist with depression and upward rotation.
You cannot completely isolate the middle traps. The rhomboids, rear deltoids, lower traps, rotator cuff, lats, biceps, and other upper-back muscles assist during most exercises.
Benefits of Middle Trap Exercises
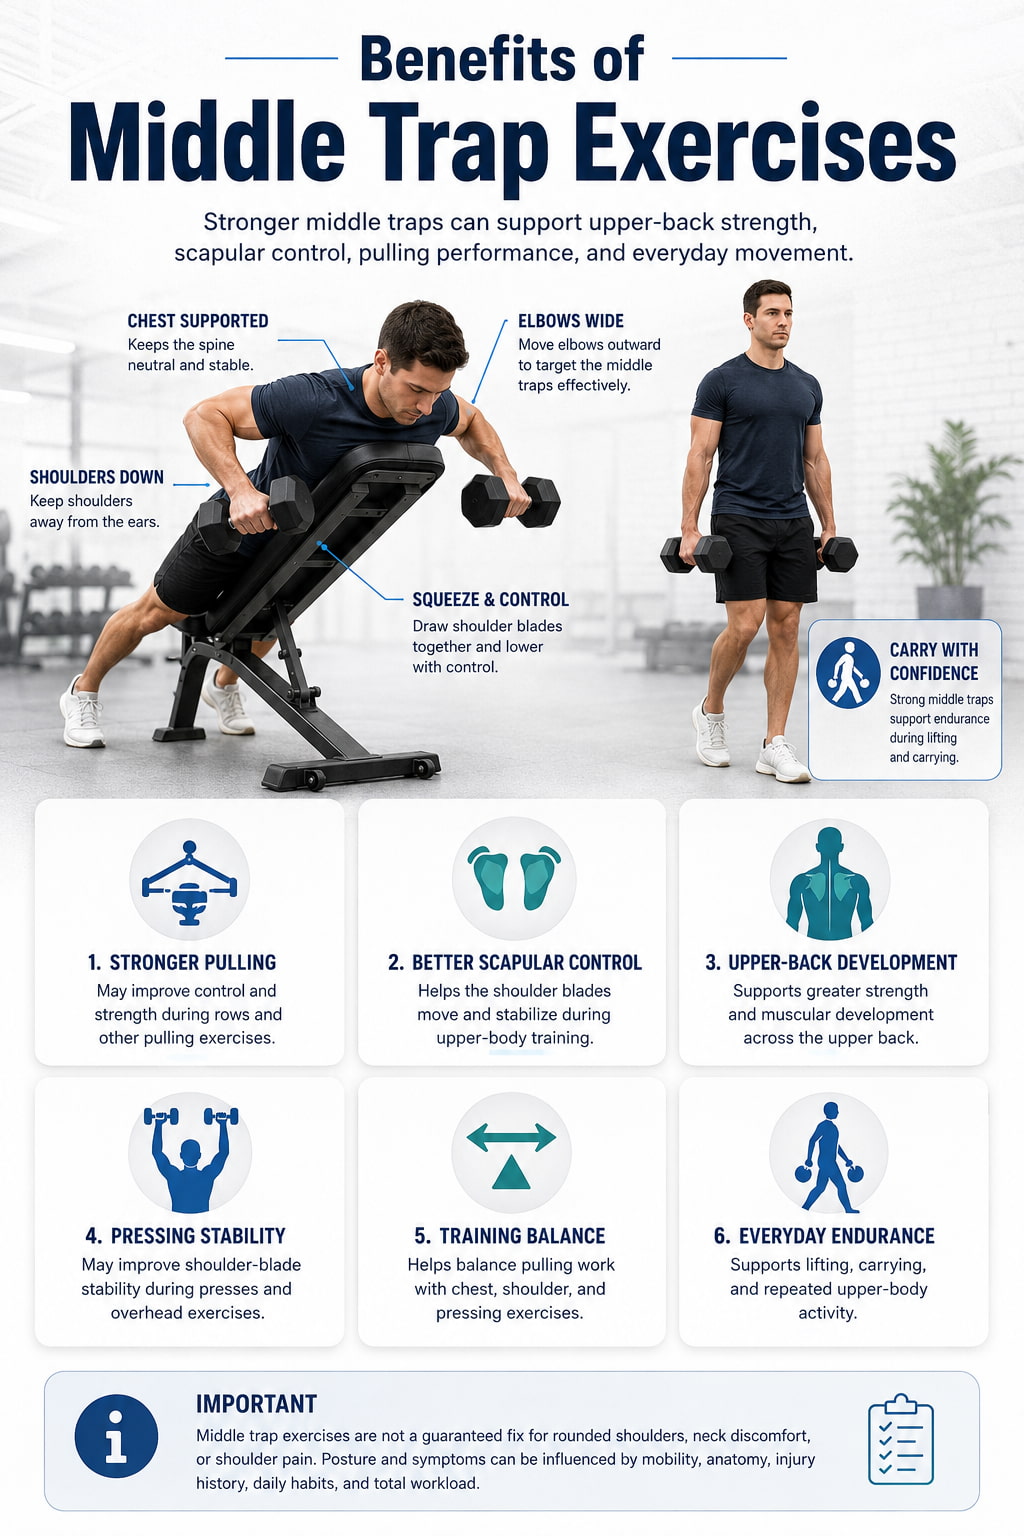
Middle trap exercises can help you build a thicker, stronger upper back while improving your control during horizontal pulling movements.
Regular training may help support:
- Stronger rowing and pulling movements
- Better control of the shoulder blades
- More upper-back muscular development
- Improved stability during presses and overhead exercises
- Better balance between pulling and pressing volume
- Greater endurance during lifting, carrying, and daily activities
Middle trap training should not be presented as a guaranteed fix for rounded shoulders, neck discomfort, or shoulder pain. Posture and pain can be affected by many factors, including mobility, training habits, injury history, anatomy, daily activity, and overall workload.
How to Target the Middle Traps
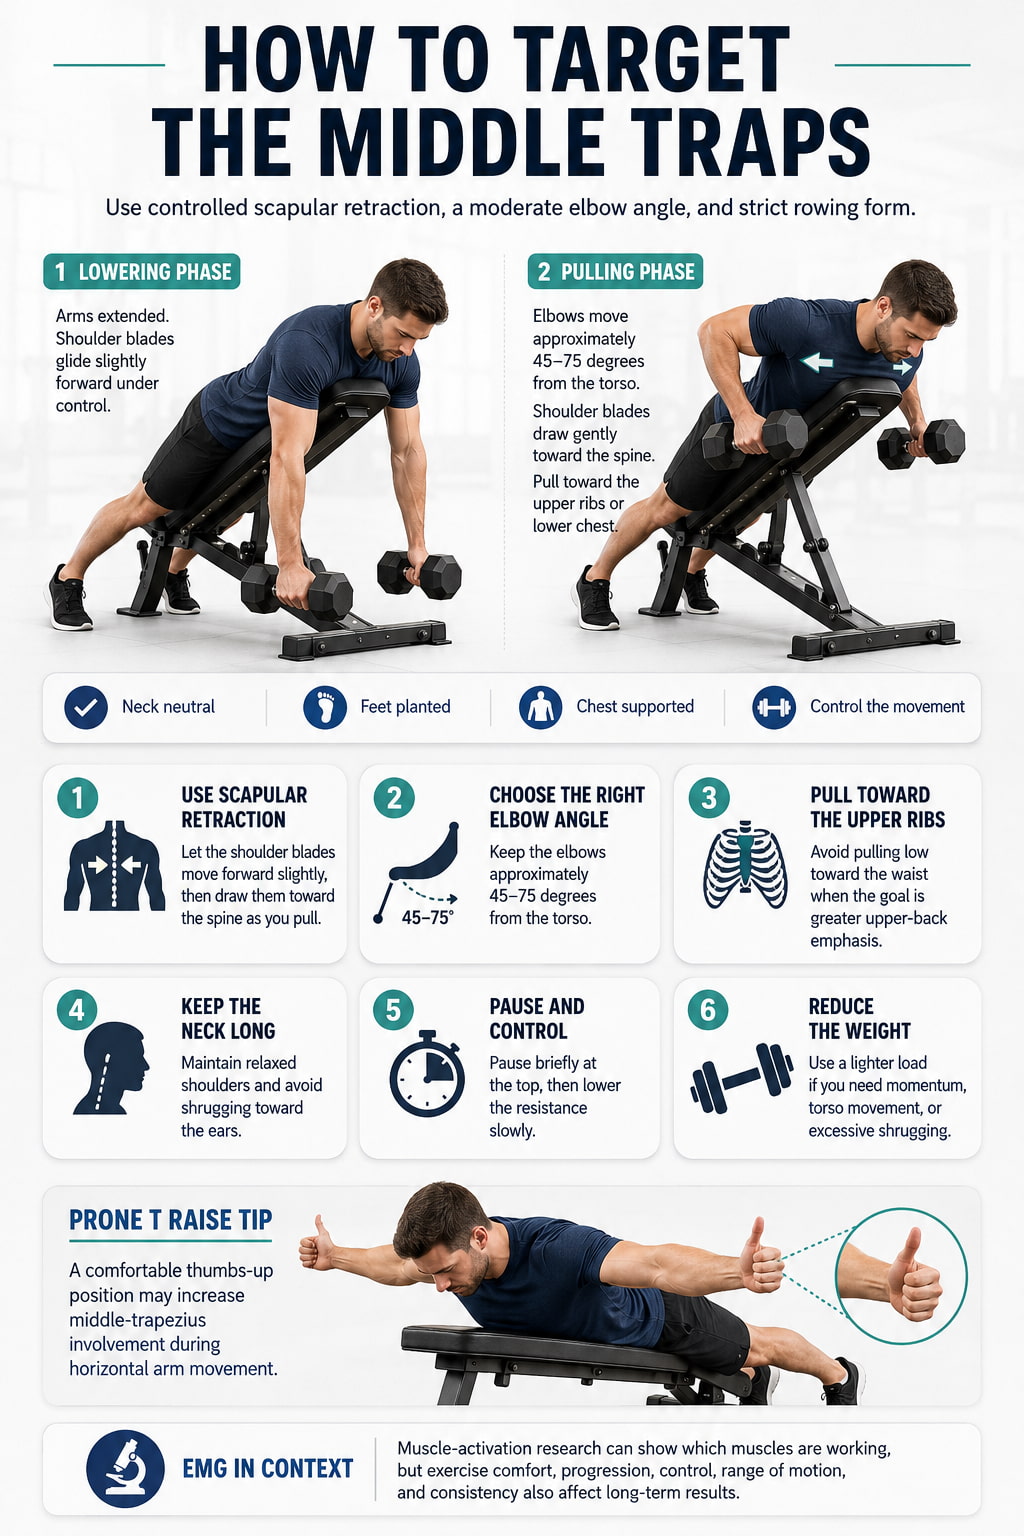
The main movement to emphasize is scapular retraction.
During a row or reverse fly, allow your shoulder blades to move forward slightly during the lowering phase. Then draw them back toward the spine as you pull. Avoid keeping them aggressively pinned together through the entire repetition.
Your arm angle also affects which muscles contribute. Rows performed with the elbows moderately away from the torso generally place more emphasis on the upper back and rear deltoids than rows performed with the elbows tight against the ribs.
For most middle-trap-focused rows:
- Keep the elbows approximately 45–75 degrees from the torso.
- Pull toward the upper ribs or lower chest.
- Keep the neck long and shoulders away from the ears.
- Pause briefly when the shoulder blades come together.
- Lower the resistance under control.
- Use less weight if you need momentum to finish the repetition.
Research has found high middle-trapezius activity during prone horizontal abduction with external shoulder rotation. A thumbs-up arm position may therefore be useful during prone T raises when it feels comfortable.
EMG findings can help identify which muscles are active during an exercise, but they do not prove that the exercise with the highest short-term reading will always produce the most muscle growth. Exercise comfort, load progression, range of motion, control, and consistency also matter.
Best Middle Trap Exercises at a Glance
| Exercise | Best use | Equipment |
|---|---|---|
| Chest-supported wide-elbow row | Overall strength and muscle | Dumbbells and incline bench |
| Prone T raise | Scapular control and direct emphasis | Floor, bench, or light dumbbells |
| Wide-grip seated cable row | Progressive gym training | Cable machine |
| Cable reverse fly | Constant resistance and control | Dual cable station |
| Face pull with external rotation | Upper-back and shoulder accessory work | Rope and cable |
| Incline dumbbell reverse fly | Beginner-friendly dumbbell training | Dumbbells and incline bench |
| Inverted row | Bodyweight upper-back strength | Bar or suspension trainer |
| Resistance-band pull-apart | Home training and warm-ups | Resistance band |
| Standing band row with pause | Beginner row technique | Resistance band |
| Chest-supported scapular retraction | Direct retraction practice | Bench and dumbbells or barbell |
10 Best Middle Trap Exercises
These 10 middle trap exercises combine rows, reverse flys, band movements, and scapular-control drills to build a stronger, more stable upper back. Choose one heavier rowing exercise and one lighter isolation movement to improve strength, control, and muscle development without unnecessary volume.
1. Chest-Supported Wide-Elbow Row
Best for: Building middle-trap strength and upper-back thickness without relying heavily on lower-back support.
Muscles worked: Middle trapezius, rhomboids, rear deltoids, lower trapezius, lats, biceps, and forearms.
Equipment needed: Adjustable bench and dumbbells.
Why it stands out: Supporting your chest reduces the opportunity to swing your torso. The wider elbow path and pull toward the upper ribs place more emphasis on the muscles around the shoulder blades than a narrow, lat-focused row.
Suggested sets and reps: Perform 3–4 sets of 8–12 repetitions.
Beginners: Start with light dumbbells and a bench angle of approximately 30–45 degrees.
Intermediate: Use a one-second pause at the top of every repetition.
Advanced: Use heavier dumbbells while maintaining a two- to three-second lowering phase.
Rest: Rest 90–150 seconds between sets.
How to do it:
- Set an incline bench to approximately 30–45 degrees.
- Lie face down with your chest supported and feet firmly planted.
- Hold a dumbbell in each hand with your arms hanging below your shoulders.
- Brace your core and keep your forehead or neck in a neutral position.
- Pull your elbows up and out toward the upper ribs.
- Draw your shoulder blades together without shrugging.
- Pause briefly when your upper arms reach approximately torso level.
- Lower the dumbbells slowly and allow the shoulder blades to move apart naturally.
Common mistakes: Using too much weight, lifting the chest off the bench, pulling toward the waist, shrugging, or forcing the elbows far behind the body.
Expert tip: Think “elbows wide, shoulders down” rather than trying to squeeze your shoulder blades as hard as possible.
2. Prone T Raise
Best for: Learning middle-trap control with very little resistance.
Muscles worked: Middle trapezius, lower trapezius, rear deltoids, rhomboids, infraspinatus, and teres minor.
Equipment needed: Floor, flat bench, or incline bench; very light dumbbells are optional.
Why it stands out: Prone horizontal abduction with external rotation has produced high middle-trapezius activity in multiple EMG studies. The movement is most effective when performed slowly with a light load and minimal upper-trap involvement.
Suggested sets and reps: Perform 2–3 sets of 10–20 repetitions.
Beginners: Use no weight and practice holding the top position for one second.
Intermediate: Hold 1–5-pound dumbbells while maintaining strict control.
Advanced: Use a three-second lowering phase and a two-second top pause.
Rest: Rest 45–75 seconds between sets.
How to do it:
- Lie face down on a bench or the floor.
- Extend your arms out to the sides to form a T shape.
- Point your thumbs upward or use a comfortable neutral hand position.
- Brace your abdomen gently and keep your forehead supported.
- Lift your arms by drawing the shoulder blades toward the spine.
- Stop when your arms are approximately level with your torso.
- Pause without lifting your shoulders toward your ears.
- Lower your arms slowly.
Common mistakes: Using heavy weights, lifting the head, arching the lower back, bending the elbows excessively, or turning the exercise into a shrug.
Expert tip: The arms should follow the shoulder blades. Do not throw the hands upward first.
3. Wide-Grip Seated Cable Row
Best for: Progressive middle-trap training with stable, adjustable resistance.
Muscles worked: Middle trapezius, rhomboids, rear deltoids, lower trapezius, lats, biceps, and forearms.
Equipment needed: Seated cable row station and wide bar or long handle.
Why it stands out: A cable provides steady resistance and makes it easy to increase the load gradually. Pulling toward the lower chest with the elbows moderately flared shifts more work toward the upper back than pulling a narrow handle toward the waist.
Suggested sets and reps: Perform 3–4 sets of 8–15 repetitions.
Beginners: Use a moderate-width grip and practice smooth shoulder-blade movement.
Intermediate: Pause for one second with the handle near the chest.
Advanced: Use heavier resistance while controlling the return for three seconds.
Rest: Rest 90–150 seconds between sets.
How to do it:
- Sit at the cable station with your feet braced.
- Hold a wide bar slightly wider than shoulder width.
- Sit tall with your ribs stacked over your pelvis.
- Begin with your arms extended and shoulder blades slightly forward.
- Pull the bar toward your lower chest or upper ribs.
- Guide your elbows out and back without raising your shoulders.
- Pause when the shoulder blades come together comfortably.
- Extend your arms slowly and allow the scapulae to move forward.
Common mistakes: Leaning far backward, pulling toward the stomach, jerking the handle, shrugging, or holding the shoulder blades rigid throughout the set.
Expert tip: Keep your torso nearly still. The cable should move because your arms and shoulder blades move, not because you rock backward.
4. Cable Reverse Fly
Best for: Training the middle traps and rear deltoids through controlled horizontal abduction.
Muscles worked: Middle trapezius, rear deltoids, rhomboids, lower trapezius, infraspinatus, and teres minor.
Equipment needed: Dual adjustable cable station.
Why it stands out: Cables maintain resistance across more of the movement than dumbbells. They also allow small weight increases, which can be useful for an exercise that does not require heavy loads.
Suggested sets and reps: Perform 2–4 sets of 10–20 repetitions.
Beginners: Set the cables around shoulder height and use very light resistance.
Intermediate: Add a one-second pause with the arms open.
Advanced: Use a split stance and perform controlled unilateral repetitions.
Rest: Rest 60–90 seconds between sets.
How to do it:
- Set both cable pulleys near shoulder height.
- Hold the opposite cable in each hand so the cables cross in front of you.
- Step backward until the cables are under tension.
- Stand tall with soft knees and a braced torso.
- Keep a small, fixed bend in your elbows.
- Open your arms out to the sides.
- Draw your shoulder blades together without arching your back.
- Return your hands forward slowly.
Common mistakes: Turning the movement into a row, bending and straightening the elbows, using momentum, flaring the ribs, or pulling the hands too far behind the shoulders.
Expert tip: Imagine spreading the room apart with your arms rather than pulling the handles backward.
5. Face Pull With External Rotation
Best for: Accessory training that combines upper-back work with shoulder external rotation.
Muscles worked: Middle trapezius, rear deltoids, lower trapezius, rhomboids, infraspinatus, teres minor, and biceps.
Equipment needed: Cable station and rope attachment.
Why it stands out: The face pull combines scapular retraction, horizontal abduction, and external rotation. It is especially useful near the end of an upper-body or shoulder workout.
Suggested sets and reps: Perform 2–3 sets of 12–20 repetitions.
Beginners: Pull the rope toward the nose or upper chest without forcing a large external-rotation finish.
Intermediate: Finish with the hands beside the temples and elbows slightly below shoulder height.
Advanced: Add a two-second pause while maintaining a stable rib cage.
Rest: Rest 60–90 seconds between sets.
How to do it:
- Attach a rope to a cable set around upper-chest or face height.
- Hold the ends of the rope with your thumbs facing behind you.
- Step back and extend your arms.
- Brace your torso and keep your shoulders away from your ears.
- Pull the rope toward your face.
- Separate the rope as your elbows move out and back.
- Finish with your hands near your temples if that position feels comfortable.
- Return to the starting position slowly.
Common mistakes: Using too much weight, leaning far backward, pulling toward the stomach, raising the shoulders, or forcing the hands behind the head.
Expert tip: Finish with the rope apart, but do not sacrifice shoulder comfort to create a larger range of motion.
6. Incline Dumbbell Reverse Fly
Best for: Beginner-friendly upper-back training with common gym equipment.
Muscles worked: Middle trapezius, rear deltoids, rhomboids, lower trapezius, infraspinatus, and teres minor.
Equipment needed: Incline bench and dumbbells.
Why it stands out: Chest support reduces torso movement and helps you focus on controlled horizontal abduction. The ACE incline reverse-fly guide recommends keeping the torso against the bench, bracing the core, and lifting without excessive back arching.
Suggested sets and reps: Perform 2–4 sets of 10–20 repetitions.
Beginners: Use very light dumbbells and stop when the arms reach torso height.
Intermediate: Add a short top pause.
Advanced: Use a three-second lowering phase while maintaining the same elbow angle.
Rest: Rest 60–90 seconds between sets.
How to do it:
- Set a bench to approximately 30–60 degrees.
- Lie face down with your chest against the pad.
- Hold the dumbbells below your shoulders with your palms facing inward.
- Keep a slight bend in your elbows.
- Raise the dumbbells out and slightly back.
- Bring the shoulder blades together without shrugging.
- Stop when your arms are near shoulder height.
- Lower the weights slowly.
Common mistakes: Choosing heavy dumbbells, lifting the chest, swinging, changing the elbow angle, or raising the hands far behind the shoulders.
Expert tip: Lead with your elbows rather than your hands.
7. Inverted Row
Best for: Building bodyweight pulling strength and upper-back control.
Muscles worked: Middle trapezius, rhomboids, lats, rear deltoids, lower trapezius, biceps, forearms, glutes, and core.
Equipment needed: Secure bar, Smith machine, rings, or suspension straps.
Why it stands out: The inverted row trains the upper back while requiring the body to remain rigid. Research comparing rowing variations found strong upper-back activation with relatively low lumbar loading during the inverted row.
Suggested sets and reps: Perform 3–4 sets of 6–15 repetitions.
Beginners: Set the bar high and keep your body relatively upright.
Intermediate: Lower the bar or straighten your legs.
Advanced: Elevate your feet, add a weighted vest, or use rings.
Rest: Rest 90–150 seconds between sets.
How to do it:
- Set a secure bar between waist and chest height.
- Lie underneath and hold it slightly wider than shoulder width.
- Extend your legs or bend your knees based on your strength.
- Brace your core and keep your body in a straight line.
- Pull your upper chest toward the bar.
- Guide your elbows moderately out from your torso.
- Draw your shoulder blades together at the top.
- Lower yourself until your arms are straight and controlled.
Common mistakes: Letting the hips sag, reaching with the chin, shrugging, bouncing, or shortening the lowering phase.
Expert tip: Move your chest toward the bar rather than stretching your neck toward it.
8. Resistance-Band Pull-Apart
Best for: Home workouts, warm-ups, high-repetition accessory work, and travel.
Muscles worked: Middle trapezius, rear deltoids, rhomboids, lower trapezius, infraspinatus, and teres minor.
Equipment needed: Light resistance band.
Why it stands out: Band pull-aparts require little space and can be performed almost anywhere. Research confirms that changing the movement direction and technique alters shoulder-girdle muscle activity, so the band should be light enough to allow controlled arm movement.
Suggested sets and reps: Perform 2–3 sets of 12–25 repetitions.
Beginners: Use a long, light band and a comfortable grip width.
Intermediate: Pause for two seconds with the band touching or approaching the chest.
Advanced: Use a stronger band while maintaining straight wrists and controlled shoulders.
Rest: Rest 45–75 seconds between sets.
How to do it:
- Hold a resistance band at shoulder height.
- Place your hands slightly wider than shoulder width.
- Keep your elbows soft but nearly straight.
- Brace your torso and keep your ribs down.
- Pull the band apart by moving your arms out to the sides.
- Draw the shoulder blades together without shrugging.
- Stop before your shoulders roll forward or your back arches.
- Return slowly until the band regains its starting length.
Common mistakes: Using a band that is too strong, bending the wrists, turning the movement into a press-down, arching the back, or moving too quickly.
Expert tip: Widen your grip before switching to a lighter band if you cannot complete the movement cleanly.
9. Standing Resistance-Band Row With a Pause
Best for: Beginners learning how to coordinate the arms and shoulder blades during a row.
Muscles worked: Middle trapezius, rhomboids, rear deltoids, lats, lower trapezius, biceps, and forearms.
Equipment needed: Resistance band and secure anchor.
Why it stands out: The resistance is easy to adjust by changing your distance from the anchor. The pause helps teach the difference between simply bending the elbows and finishing the row with controlled scapular retraction.
Suggested sets and reps: Perform 2–4 sets of 10–20 repetitions.
Beginners: Stand close to the anchor and use a light band.
Intermediate: Step farther back and pause for two seconds.
Advanced: Perform a single-arm version while resisting torso rotation.
Rest: Rest 60–90 seconds between sets.
How to do it:
- Secure the band around a stable anchor near chest height.
- Hold one end in each hand and step backward.
- Stand tall with soft knees and extended arms.
- Allow your shoulder blades to move slightly forward.
- Pull your elbows back and moderately away from your torso.
- Draw your shoulder blades together.
- Pause for one to two seconds.
- Straighten your arms slowly.
Common mistakes: Leaning backward, shrugging, pulling the elbows too far behind the body, or allowing the band to snap forward.
Expert tip: Maintain the same upright body position from the first repetition to the last.
10. Chest-Supported Scapular Retraction
Best for: Learning to move the shoulder blades without relying on a large amount of elbow movement.
Muscles worked: Middle trapezius, rhomboids, lower trapezius, and other scapular stabilizers.
Equipment needed: Incline bench and light dumbbells or a barbell.
Why it stands out: Sometimes called a Kelso shrug, this movement trains horizontal scapular retraction rather than the upward shoulder elevation used in a standard shrug.
Suggested sets and reps: Perform 2–3 sets of 10–15 repetitions or 15–30-second holds.
Beginners: Practice without weights by letting the arms hang and moving only the shoulder blades.
Intermediate: Hold light dumbbells and pause at the top.
Advanced: Use a barbell or heavier dumbbells without bending the elbows.
Rest: Rest 60–90 seconds between sets.
How to do it:
- Lie face down on a low incline bench.
- Hold light dumbbells with your arms hanging straight down.
- Keep your elbows extended without forcefully locking them.
- Allow your shoulder blades to separate slightly.
- Draw your shoulder blades toward the spine.
- Keep your shoulders away from your ears.
- Pause briefly in the retracted position.
- Release the shoulder blades forward under control.
Common mistakes: Bending the elbows, performing an upward shrug, lifting the chest, using a large load, or forcing excessive retraction.
Expert tip: The weights should move only a small distance. Focus on shoulder-blade motion rather than how high the dumbbells travel.
Common Middle Trap Exercise Mistakes
Shrugging the Shoulders
Repeatedly lifting the shoulders toward the ears can shift more work toward the upper traps. Reduce the load and think about keeping your neck long.
Pulling Only With the Arms
Bending the elbows without moving the shoulder blades can make a row feel mainly like a biceps exercise. Start the pull by allowing the scapulae to move toward the spine.
Using Too Much Weight
Middle-trap exercises do not need to be extremely heavy. If the load causes swinging, shrugging, shortened repetitions, or neck tension, it is too heavy for the intended technique.
Forcing the Shoulder Blades Together
More retraction is not always better. Stop when the shoulder blades have moved together comfortably and your upper arms are approximately level with your torso.
Holding the Scapulae Rigid
The shoulder blades should generally move during rows. Allow them to glide slightly forward as you extend your arms, then retract them as you pull.
Arching the Lower Back
A large back arch may create the appearance of a greater range of motion without adding useful middle-trap work. Brace your abdomen and keep your ribs controlled.
Turning Every Exercise Into a Rear-Delt Movement
Reverse flys involve both the rear deltoids and middle traps. To emphasize the scapular muscles, use a light load, move slowly, and deliberately finish with controlled shoulder-blade retraction.
How to Add Middle Trap Exercises to Your Workout
Most people do not need to perform all 10 exercises in the same session. Choose one loadable row and one lighter accessory exercise.
The American College of Sports Medicine’s 2026 resistance-training guidance emphasizes consistency, individualized programming, and training major muscle groups at least twice weekly. Bands, bodyweight exercises, machines, and free weights can all be effective.
Beginner Home Middle Trap Workout
Perform this workout twice weekly with at least one recovery day between sessions.
| Exercise | Sets | Reps | Rest |
|---|---|---|---|
| Standing band row with pause | 3 | 10–15 | 75 seconds |
| Band pull-apart | 2 | 15–20 | 45 seconds |
| Unloaded prone T raise | 2 | 10–15 | 45 seconds |
Use an effort level of approximately 6–7 out of 10. Each set should end while you can still complete two or three controlled repetitions.
Gym Middle Trap Workout
Perform this workout once or twice weekly as part of an upper-body, back, or pull session.
| Exercise | Sets | Reps | Rest |
|---|---|---|---|
| Chest-supported wide-elbow row | 4 | 8–12 | 120 seconds |
| Cable reverse fly | 3 | 12–18 | 75 seconds |
| Face pull | 2 | 15–20 | 60 seconds |
Stop each set when you have approximately one to three good repetitions remaining. Training to complete muscular failure is not necessary for every set.
How Often Should You Train the Middle Traps?
Training the middle traps two times per week works well for most people. Experienced lifters may train them three times weekly when the individual sessions contain fewer sets.
Remember that rows, pull-ups, reverse flys, face pulls, and some shoulder exercises already contribute to your upper-back training volume. Count these sets before adding extra middle-trap isolation work.
A practical starting point is approximately 6–10 challenging weekly sets of rows and direct upper-back exercises combined. Increase the volume only when you are recovering well and maintaining good exercise quality.
How to Progress Middle Trap Exercises
Use a double-progression method:
- Select a repetition range, such as 8–12.
- Begin with a resistance you can control at the bottom of the range.
- Add repetitions over several workouts.
- Increase the resistance after completing all sets at the top of the range.
- Return to the lower end of the range and repeat.
For light exercises such as prone T raises and reverse flys, increasing the pause, slowing the lowering phase, or improving the range of motion may be more useful than making a large jump in weight.
Progress only when you can keep your shoulders down, control the return, and complete every repetition without swinging.
Safety Tips
Warm up with five minutes of general movement followed by light rows, arm circles, or band pull-aparts.
Start with a resistance that allows smooth, pain-free movement. Do not force your arms to shoulder height if that position feels uncomfortable. A lower elbow angle or neutral grip may be more suitable.
Stop the exercise and seek professional guidance if you experience sharp pain, numbness, tingling, chest pain, dizziness, sudden weakness, or unusual symptoms. Consult a qualified healthcare professional before using these exercises after shoulder surgery, nerve injury, a recent upper-body injury, or a diagnosed shoulder condition.
Frequently Asked Questions
What is the best exercise for the middle traps?
The chest-supported wide-elbow row is one of the best overall options because it is stable, easy to progress, and allows you to use more resistance than a reverse fly or prone raise.
The prone T raise is an excellent lighter option for learning controlled scapular retraction.
Can you isolate the middle traps?
You cannot completely isolate them. The rhomboids, rear deltoids, lower traps, rotator cuff, and other upper-back muscles assist during most middle-trap exercises.
You can still emphasize the middle traps by using controlled retraction, an appropriate elbow angle, and a load that does not cause shrugging.
Are rows enough to build the middle traps?
Rows can build the middle traps when they include a controlled scapular movement and suitable elbow path. However, combining rows with a lighter horizontal-abduction exercise may provide a more complete approach.
A chest-supported row paired with a prone T raise or cable reverse fly is a practical combination.
Why do my upper traps take over?
Common reasons include using too much weight, raising the shoulders toward the ears, extending the neck, or forcing a range of motion you cannot control.
Reduce the resistance and focus on moving the shoulder blades toward the spine without lifting them upward.
Why do I feel middle trap exercises in my rear delts?
The rear deltoids assist with horizontal shoulder abduction, so feeling them during reverse flys, wide rows, and prone T raises is normal.
The goal is not to remove rear-delt involvement completely. Use controlled scapular retraction to keep the middle traps contributing.
Should I squeeze my shoulder blades throughout a row?
No. Allow your shoulder blades to glide forward slightly as your arms extend. Then retract them as you pull.
Keeping them permanently pinned together may restrict natural scapular movement and shorten the exercise range.
Can middle trap exercises improve posture?
They may help strengthen muscles that support scapular control, but posture is influenced by more than one muscle. Daily positions, mobility, training balance, anatomy, fatigue, and individual habits also contribute.
Middle trap exercises should be part of a balanced program rather than treated as a guaranteed posture correction.
Conclusion
The most effective middle trap exercises combine controlled scapular retraction with rowing or horizontal arm movement. Start with a stable row, add a lighter exercise such as a prone T raise or reverse fly, and prioritize control over heavy resistance.
Train the middle traps around twice weekly, allow the shoulder blades to move naturally, and progress only when you can complete every repetition without shrugging, swinging, or creating pain.
References
- NCBI StatPearls: Anatomy, Back, Trapezius
- Ekstrom et al.: Surface Electromyographic Analysis of Exercises for the Trapezius and Serratus Anterior
- Cools et al.: Rehabilitation of Scapular Muscle Balance—Which Exercises to Prescribe?
- Kara et al.: Shoulder-Abduction Angle and Trapezius Activity During Scapular Retraction
- Fenwick et al.: Comparison of Rowing Exercises and Lumbar-Spine Loading
- American Academy of Orthopaedic Surgeons: Shoulder Conditioning Program
4 thoughts on “10 Best Middle Trap Exercises for a Stronger Upper Back”