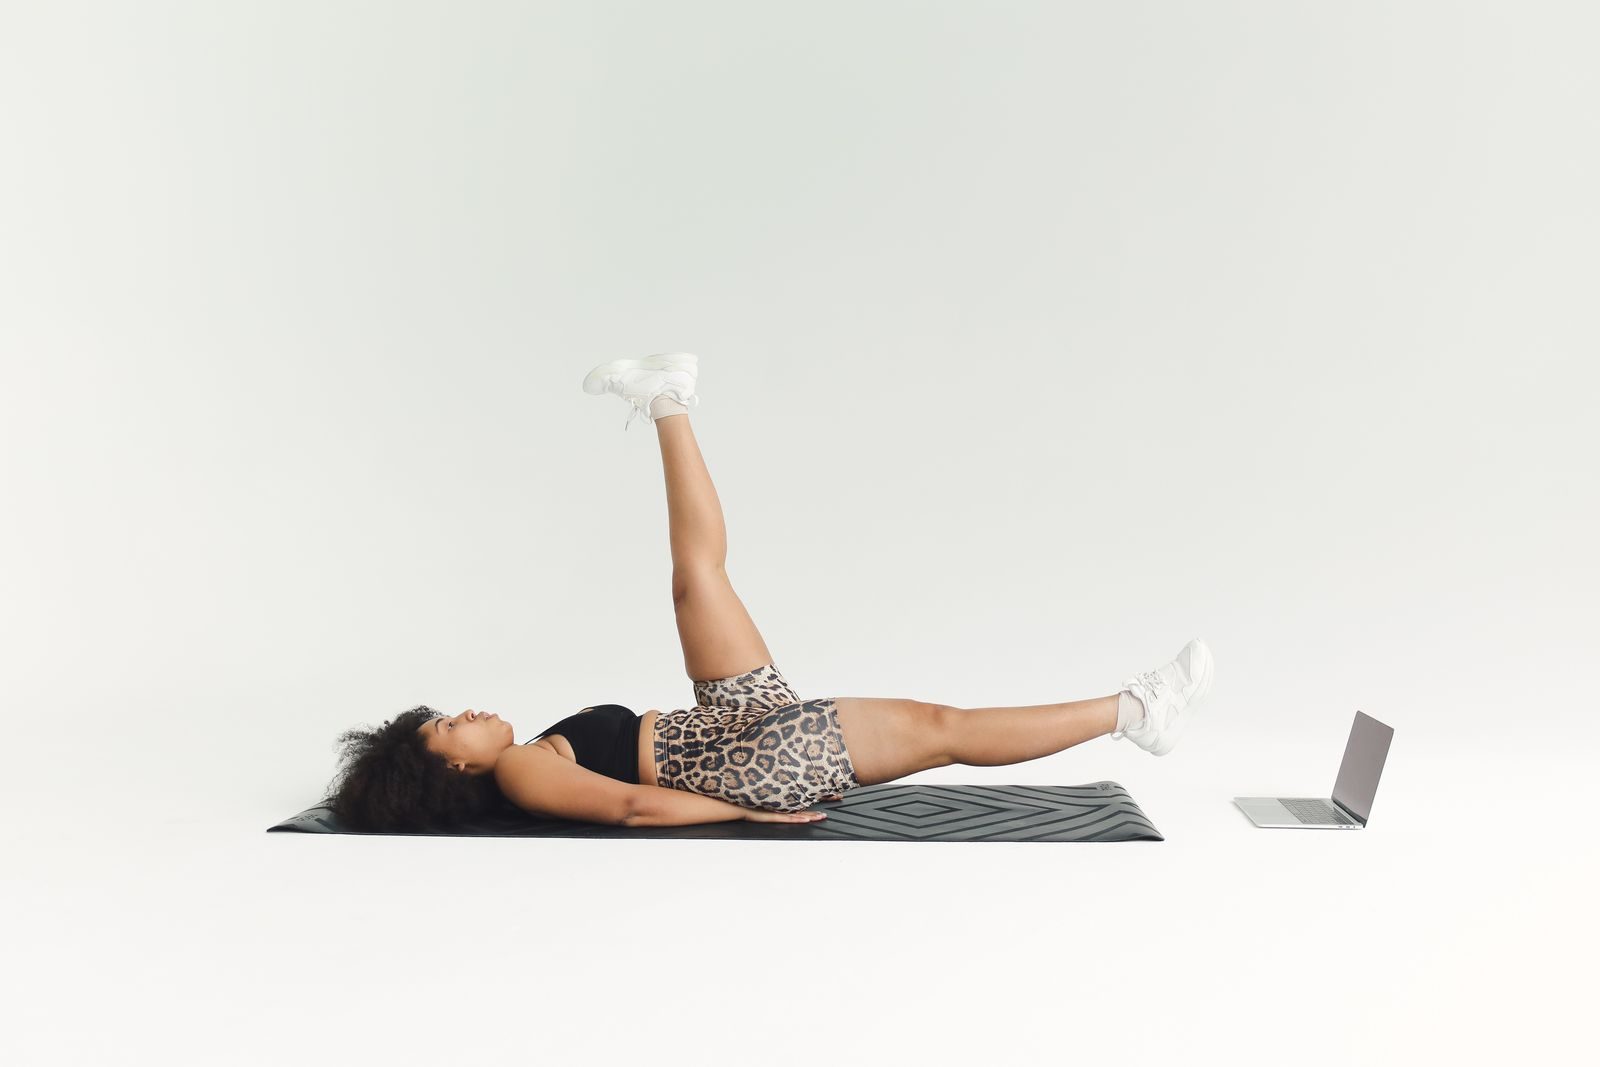
Leg exercises for bad knees should strengthen the quadriceps, hamstrings, glutes, hips, and calves without forcing painful ranges of motion. The best starting exercises are controlled, adjustable, and easy to modify based on how your knee feels.
The nine exercises below begin with supported movements that require relatively little knee motion. They then progress to functional exercises such as standing from a chair and stepping onto a low platform.
“Bad knees” is a general phrase, not a diagnosis. Knee discomfort can have many causes, so a movement that feels comfortable for one person may not suit another.
Are Leg Exercises Good for Bad Knees?
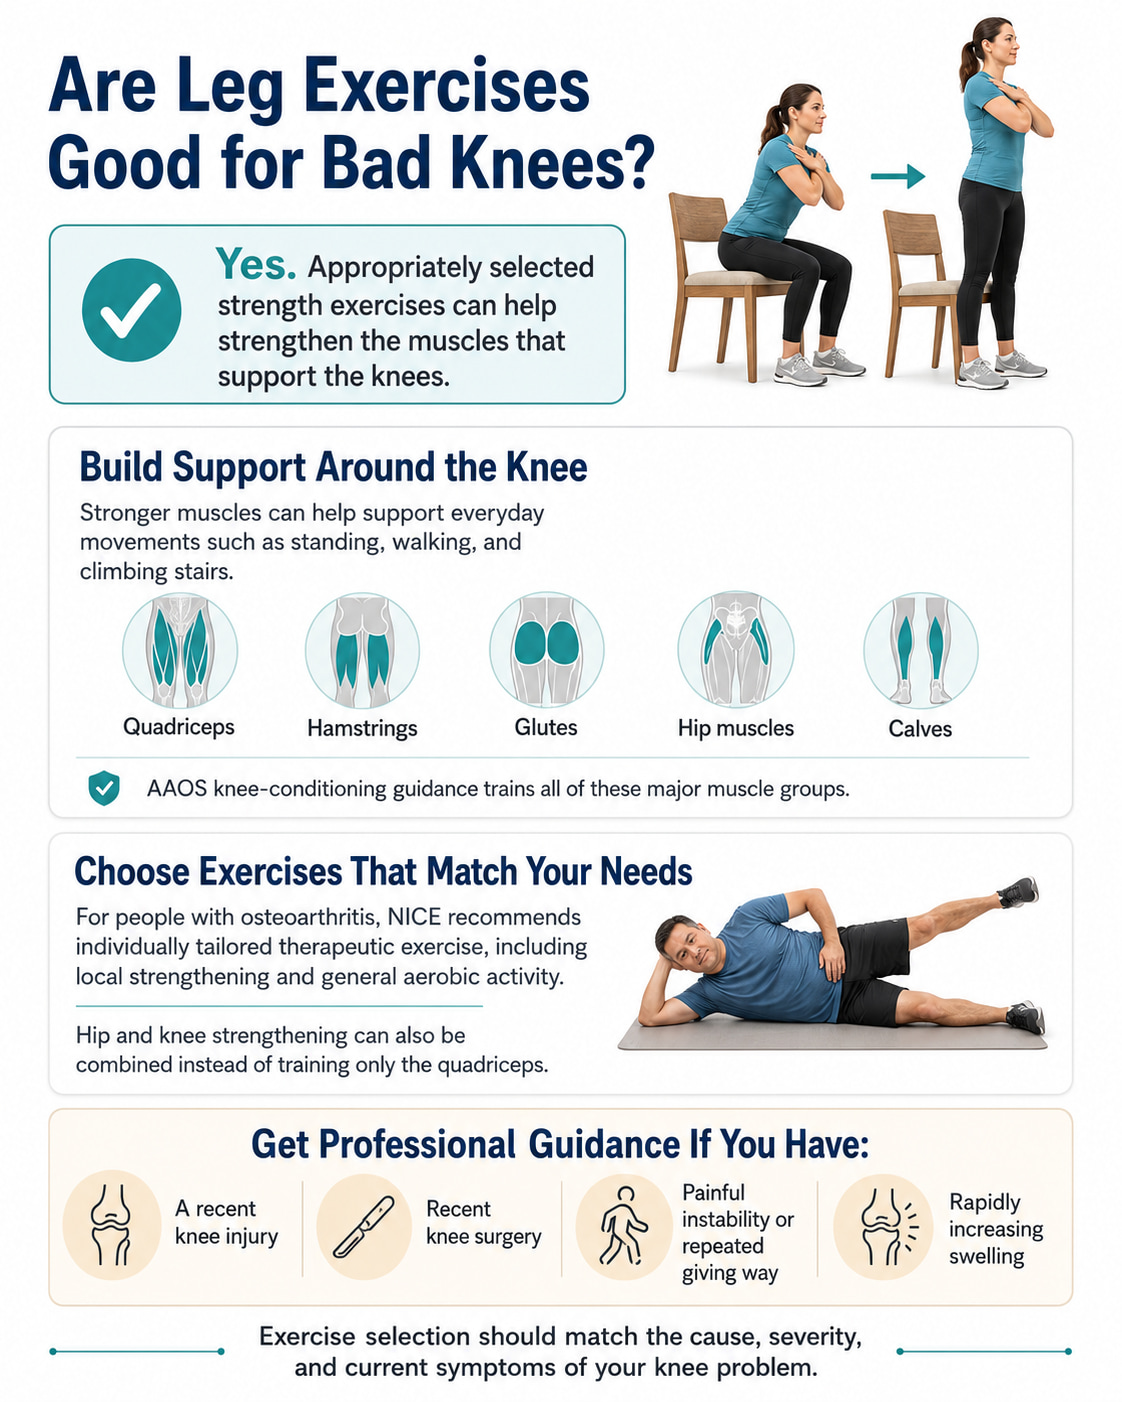
In many cases, appropriately selected strength exercises can be useful for people with knee discomfort.
Stronger thigh, hip, and lower-leg muscles may help support the knee during standing, walking, and climbing stairs. The American Academy of Orthopaedic Surgeons knee-conditioning program includes exercises for the quadriceps, hamstrings, hip muscles, glutes, and calves.
For people with osteoarthritis, NICE recommends therapeutic exercise tailored to the individual, including local muscle strengthening and general aerobic activity. Clinical guidance for patellofemoral pain also supports combining hip- and knee-targeted exercises rather than training only the quadriceps.
Exercise selection still needs to match the cause and severity of your symptoms. A recent injury, knee surgery, painful instability, or rapidly increasing swelling requires more individualized guidance.
When Knee Pain Needs Professional Assessment
Do not begin a general online workout when you cannot comfortably bear weight, have very severe pain after an injury, or notice a visible change in the knee’s shape.
Seek prompt medical advice when:
- The knee is hot, red, or significantly swollen.
- You have a fever or feel generally unwell.
- Your pain or swelling is getting progressively worse.
- The knee repeatedly locks or gives way.
- You have numbness or tingling after an injury.
- Your symptoms interfere with sleep or normal daily activities.
The NHS recommends urgent assessment for a hot, swollen joint accompanied by illness or fever, and immediate help when a person cannot walk or bear weight after an injury.
People recovering from knee surgery or a diagnosed ligament, tendon, cartilage, or bone injury should follow the restrictions provided by their doctor or physical therapist.
How to Prepare for Knee-Friendly Leg Exercises
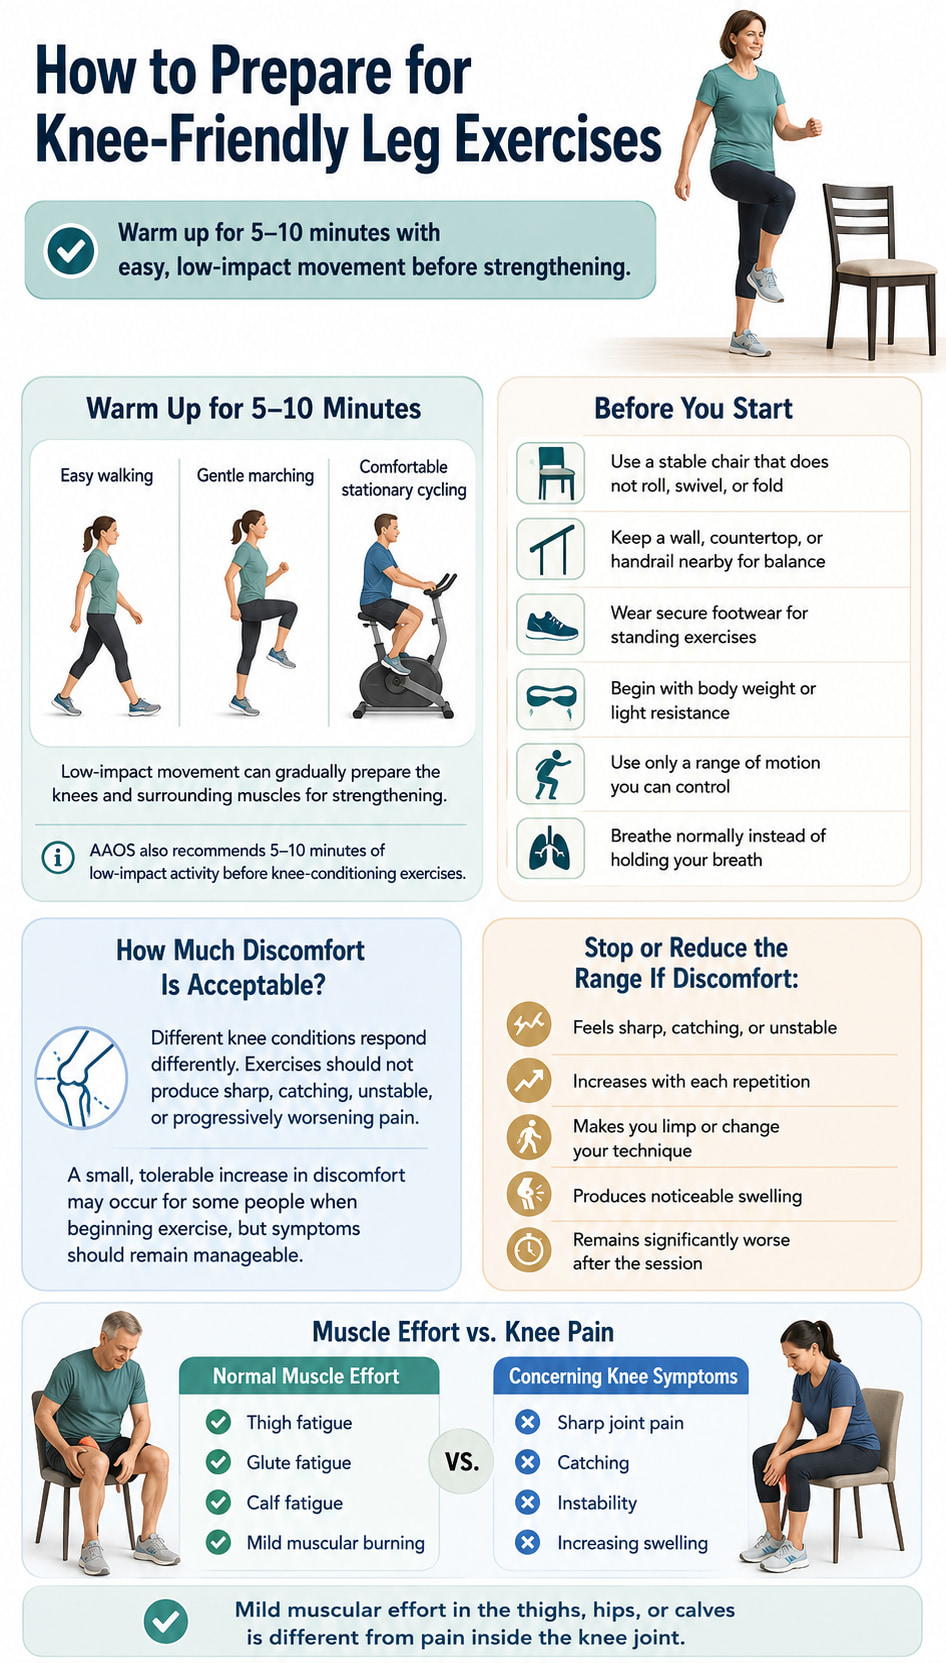
Warm up for 5–10 minutes before strengthening. Easy walking, gentle marching, or comfortable stationary cycling can gradually prepare the knees and surrounding muscles. AAOS also recommends 5–10 minutes of low-impact activity before its knee-conditioning exercises.
Before starting:
- Use a stable chair that does not roll, swivel, or fold.
- Keep a wall, countertop, or handrail nearby for balance.
- Wear secure footwear for standing exercises.
- Begin with body weight or light resistance.
- Move through the range you can control without forcing the knee.
- Breathe normally instead of holding your breath.
How Much Discomfort Is Acceptable?
Pain guidance varies because different knee conditions respond differently. AAOS advises that knee-conditioning exercises should not be painful, while some NHS osteoarthritis resources note that a small, tolerable increase in discomfort can occur when beginning exercise.
A conservative approach is to stop or reduce the range when discomfort:
- Feels sharp, catching, or unstable
- Increases with each repetition
- Makes you limp or change your technique
- Produces noticeable swelling
- Remains significantly worse after the session
Mild muscular effort in the thighs, hips, or calves is different from pain inside the knee joint.
9 Best Leg Exercises for Bad Knees
These exercises are arranged roughly from lower-motion options to more demanding functional movements. They are not ranked from best to worst, and you do not need to perform all nine in one session.
1. Straight-Leg Raise
Best for: Strengthening the quadriceps without repeatedly bending and straightening the working knee.
Muscles worked: Quadriceps, with assistance from the hip flexors and abdominal stabilizers.
Equipment needed: An exercise mat, carpeted floor, or firm bed.
Sets, reps, and rest: Begin with 1–2 sets of 8–12 repetitions per side. Rest for 45–60 seconds.
How to Do It
- Lie on your back with one knee bent and that foot flat.
- Extend the other leg along the floor.
- Tighten the thigh of the straight leg as though gently pressing the back of the knee downward.
- Keeping the knee straight, lift the leg until it is approximately level with the opposite thigh.
- Pause briefly and lower it slowly.
- Complete all repetitions before changing sides.
Common Mistakes
Avoid swinging the leg, lifting it so high that your lower back arches, or allowing the knee to bend. The movement should come from the hip while the quadriceps keeps the knee straight.
Progression or Regression
For an easier option, keep the leg on the floor and practice tightening the quadriceps for 3–5 seconds. Progress by adding repetitions, a longer pause, or a very light ankle weight after you can control the bodyweight version comfortably.
Straight-leg raises are included in orthopedic and NHS knee-strengthening resources as an introductory quadriceps exercise.
2. Seated Knee Extension
Best for: Directly strengthening the quadriceps through an adjustable range.
Muscles worked: Quadriceps.
Equipment needed: A stable chair. A light ankle weight or resistance band is optional for progression.
Sets, reps, and rest: Perform 1–3 sets of 8–15 repetitions per leg. Rest for 45–60 seconds.
How to Do It
- Sit upright with your back supported and both feet on the floor.
- Brace your abdomen lightly and keep your thighs still.
- Slowly straighten one knee through a comfortable range.
- Pause while tightening the front of your thigh.
- Lower your foot under control.
- Complete the set and change legs.
Common Mistakes
Do not kick the foot upward, drop it quickly, or lean far backward to complete the repetition. Avoid forcing a hard lockout if the final portion of knee extension feels uncomfortable.
Progression or Regression
Use a smaller range if fully straightening the knee is uncomfortable. Progress by increasing the range, adding repetitions, or using a light ankle weight or resistance band.
The Musculoskeletal Matters NHS service recommends beginning seated knee extensions with a controlled range and gradually increasing repetitions as tolerated.
3. Side-Lying Hip Abduction
Best for: Strengthening the outer hip without repeatedly loading the working knee.
Muscles worked: Gluteus medius, gluteus minimus, and other hip abductors.
Equipment needed: An exercise mat or firm bed.
Sets, reps, and rest: Perform 2 sets of 10–15 repetitions per side. Rest for 45–60 seconds.
How to Do It
- Lie on one side with your head supported.
- Bend the bottom knee slightly for stability and keep the top leg straight.
- Stack your hips so you are not rolling backward.
- Point the top foot mostly forward.
- Lift the top leg approximately 8–12 inches without moving your pelvis.
- Pause, then lower slowly.
Common Mistakes
Avoid rotating the toes toward the ceiling, rolling the pelvis backward, hiking the hip, or swinging the leg. A smaller controlled lift is more useful than a high, uncontrolled one.
Progression or Regression
Reduce the height of the leg lift to make the exercise easier. Progress by pausing for 2–3 seconds at the top or adding a light resistance band above the knees.
Hip strengthening can be particularly useful when combined with knee-targeted exercises. The Journal of Orthopaedic & Sports Physical Therapy clinical practice guideline for patellofemoral pain recommends training both the hip and knee rather than relying only on isolated knee exercises.
4. Glute Bridge
Best for: Building glute and hamstring strength while the body remains supported on the floor.
Muscles worked: Gluteus maximus and hamstrings, with assistance from the inner thighs and trunk stabilizers.
Equipment needed: An exercise mat or firm surface.
Sets, reps, and rest: Perform 2–3 sets of 8–12 repetitions. Rest for 60 seconds.
How to Do It
- Lie on your back with your knees bent and feet flat.
- Position your feet approximately hip-width apart.
- Brace your abdomen gently and squeeze your glutes.
- Press through your feet and lift your hips.
- Stop when your shoulders, hips, and knees form a comfortable line.
- Pause briefly before lowering under control.
Common Mistakes
Do not force the hips upward by arching the lower back. Keep the knees from collapsing inward, and avoid pushing only through the toes. If the front of the knee feels uncomfortable, move the feet slightly farther from the hips and use a smaller lift.
Progression or Regression
Begin with a small-range bridge or practice glute squeezes without lifting. Progress with a longer pause, a resistance band above the knees, or a light weight across the hips.
The Sussex Community NHS Foundation Trust includes bridge variations in its knee-osteoarthritis rehabilitation resources as a way to strengthen muscles around the hips and thighs.
5. Standing Hamstring Curl
Best for: Strengthening the back of the thigh with light or no equipment.
Muscles worked: Hamstrings, with the calves assisting.
Equipment needed: A sturdy chair, countertop, or wall for support.
Sets, reps, and rest: Perform 1–3 sets of 10–15 repetitions per side. Rest for 45–60 seconds.
How to Do It
- Stand tall while lightly holding a stable support.
- Keep your thighs next to each other.
- Bend one knee and bring the heel toward the back of your thigh.
- Stop at the point where the movement remains comfortable.
- Pause briefly and lower the foot slowly.
- Complete the set before changing sides.
Common Mistakes
Avoid swinging the leg, leaning the torso forward, allowing the working thigh to move ahead of the supporting thigh, or forcing the heel toward the glutes.
Progression or Regression
Use a shorter range if bending the knee deeply is uncomfortable. Progress by adding a light ankle weight or resistance band once you can perform the exercise without momentum.
Standing hamstring curls are also included in the AAOS knee-conditioning program, with a chair or wall used for balance when needed.
6. Supported Calf Raise
Best for: Strengthening the calves and ankles with minimal knee movement.
Muscles worked: Gastrocnemius, soleus, and smaller muscles around the ankle.
Equipment needed: A stable chair, wall, or countertop.
Sets, reps, and rest: Perform 2–3 sets of 10–15 repetitions. Rest for 45–60 seconds.
How to Do It
- Stand with your feet approximately hip-width apart.
- Hold a secure support with both hands.
- Keep your knees straight but not forcefully locked.
- Press through the balls of your feet and raise both heels.
- Pause at the top without rolling the ankles outward.
- Lower your heels slowly to the floor.
Common Mistakes
Do not bounce, rush the lowering phase, or allow the ankles to roll inward or outward. Avoid pulling heavily on the chair to lift yourself.
Progression or Regression
Perform seated calf raises if standing is uncomfortable or balance is limited. Progress by using less hand support, holding a light weight, or gradually working toward one-leg calf raises.
Supported calf raises are another exercise used in the AAOS knee-conditioning program to strengthen the gastrocnemius and soleus muscles.
7. Resistance-Band Leg Press
Best for: Strengthening several leg muscles while the back and hips remain supported.
Muscles worked: Quadriceps, gluteus maximus, hamstrings, and calves.
Equipment needed: A long resistance band and an exercise mat.
Sets, reps, and rest: Perform 2–3 sets of 8–15 repetitions per leg. Rest for 60–90 seconds.
How to Do It
- Lie on your back and bring one knee toward your chest through a comfortable range.
- Place the middle of the band securely across the middle of your foot.
- Hold one end of the band in each hand with your elbows close to the floor.
- Press the foot away until the leg is nearly straight.
- Avoid snapping or forcefully locking the knee.
- Slowly return to the starting position.
Check the band for damage before each session and keep it positioned across the midfoot rather than the toes.
Common Mistakes
Avoid allowing the knee to collapse inward, losing control as the knee bends, using excessive resistance, or letting the band slide toward the toes.
Progression or Regression
Use a lighter band, less band tension, or a shorter pressing range to make the exercise easier. Progress by increasing the range or using a slightly stronger band.
Elastic-band leg presses are also used in the AAOS knee-conditioning program as a resistance exercise for the thigh and hip muscles.
8. Chair Sit-to-Stand
Best for: Building strength for getting out of chairs, standing from a toilet, and other everyday tasks.
Muscles worked: Quadriceps, glutes, hamstrings, adductors, calves, and trunk stabilizers.
Equipment needed: A stable, non-wheeled chair. A countertop or rail can provide additional support.
Sets, reps, and rest: Perform 2–3 sets of 6–12 repetitions. Rest for 60–90 seconds.
How to Do It
- Sit near the front half of the chair.
- Place your feet approximately hip-width apart and slightly behind your knees.
- Lean your torso forward while keeping your back comfortably neutral.
- Press through your whole feet and stand.
- Straighten your hips without forcefully locking your knees.
- Push your hips backward and lower yourself to the chair slowly.
Common Mistakes
Avoid rocking repeatedly for momentum, allowing the knees to collapse inward, placing the feet too far forward, or dropping quickly onto the chair. Make sure the chair cannot slide.
Progression or Regression
Use a higher chair, place a firm cushion on the seat, or push from the armrests to make the exercise easier. Progress by using less hand assistance, slowing the lowering phase, standing from a slightly lower chair, or holding a light weight close to your chest.
NHS knee guidance recommends progressing sit-to-stands by gradually reducing hand assistance or using a lower seat.
9. Low Step-Up
Best for: Developing strength for stairs, curbs, and other single-leg daily activities.
Muscles worked: Quadriceps, glutes, hamstrings, calves, and hip stabilizers.
Equipment needed: A low exercise step or the bottom stair, plus a handrail or secure support.
Sets, reps, and rest: Begin with 1–2 sets of 5–10 repetitions per side. Rest for 60–90 seconds.
How to Do It
- Stand close to a low step and hold a rail if needed.
- Place your entire working foot on the step.
- Lean slightly forward from the hips.
- Press through the foot on the step to lift your body.
- Keep the working knee moving in the same direction as the toes.
- Step down slowly and repeat.
Common Mistakes
Do not begin with a high step, push excessively from the foot on the floor, allow the knee to collapse inward, or drop quickly during the descent.
Progression or Regression
For an easier option, tap one foot onto the step and return it to the floor without lifting your body. You can also continue practicing sit-to-stands before adding step-ups.
Progress by adding repetitions first. Increase the step height only after the low version feels stable and controlled.
NHS knee-strengthening guidance recommends beginning on the bottom stair, using a handrail when needed, and progressing to a higher step gradually.
How to Make Leg Exercises More Knee-Friendly
Adjust the Range Before Removing the Exercise
A shorter range often allows you to continue training without forcing an uncomfortable joint position. For example, use a higher chair for sit-to-stands or bend the knee less during band presses and hamstring curls.
Use Support Without Depending on It
A countertop, rail, or sturdy chair can reduce balance demands. Hold it lightly enough that your legs still perform most of the work.
Slow Down the Lowering Phase
Lower the leg, hips, or heels for approximately two or three seconds. Slower repetitions make light resistance more challenging without requiring sudden movement or heavy weight.
Control Knee Alignment
During sit-to-stands and step-ups, allow the knee to move naturally in the same general direction as the toes. Avoid letting it suddenly collapse inward.
Progress One Variable at a Time
Increase one of the following:
- Repetitions
- Range of motion
- Sets
- Resistance
- Exercise difficulty
Changing everything at once makes it harder to identify what caused a symptom increase.
Keep Some Repetitions in Reserve
End most sets while you could still perform approximately two to four controlled repetitions. You do not need to reach muscular failure to make progress.
The 2026 American College of Sports Medicine resistance-training guidance emphasizes consistency, individualization, and gradual progression. It also notes that bodyweight and resistance-band routines can support strength and physical function without requiring a traditional gym.
Beginner Leg Workout for Sensitive Knees
Perform this routine on two nonconsecutive days per week to begin. People already accustomed to strength training may eventually use three days, provided they recover well and symptoms remain controlled.
Warm-Up
Complete 5–10 minutes of easy walking, marching, or comfortable stationary cycling.
Workout
| Exercise | Sets | Repetitions |
|---|---|---|
| Straight-leg raise | 2 | 8–12 per leg |
| Side-lying hip abduction | 2 | 10–15 per side |
| Glute bridge | 2 | 8–12 |
| Seated knee extension | 2 | 8–12 per leg |
| Supported calf raise | 2 | 10–15 |
| Chair sit-to-stand or band leg press | 2 | 6–12 |
Rest for 45–90 seconds between sets. Use a range that feels smooth, and finish each set with two to four good repetitions still available.
The low step-up is better treated as a later progression if stairs currently cause significant pain or instability.
How to Progress the Routine
Use the same exercises for several sessions before making them harder. Constantly changing movements makes it difficult to judge whether you are improving.
A simple progression method is:
- Begin at the bottom of the recommended repetition range.
- Add one or two repetitions when all sets feel controlled.
- Continue until you reach the top of the range.
- Add a small amount of resistance or a slightly larger range.
- Return to the lower end of the repetition range.
For example, you might progress a sit-to-stand from 2 sets of 6 repetitions to 2 sets of 10. After that, you could use a slightly lower chair and return to 6 repetitions.
Increase only when your form remains stable and the current version does not cause a meaningful symptom increase.
Should You Also Walk, Cycle, or Swim?
Strength exercises do not need to be your only activity. Walking, cycling, swimming, tai chi, and water exercise can provide additional movement and aerobic training when they are comfortable.
The Centers for Disease Control and Prevention identifies these as joint-friendly activities and recommends choosing activities that produce little or no joint pain and can be performed consistently.
Start with short sessions. Even 5–10 minutes can be useful when a longer session feels unrealistic. Increase duration gradually rather than making a large jump in one week.
Frequently Asked Questions
Can You Strengthen Your Legs When You Have Bad Knees?
In many cases, yes. Begin with exercises that use a comfortable range and manageable resistance. Strengthen the quadriceps, hamstrings, glutes, hips, and calves rather than focusing on only one muscle.
People with a recent injury, significant swelling, instability, or unexplained severe pain should receive professional guidance first.
Are Squats Bad for Painful Knees?
Squats are not automatically harmful, but the depth, load, speed, and type of knee problem all matter.
A high-chair sit-to-stand is often easier to adjust than an unsupported deep squat. Begin with a shallow range, use support when needed, and progress only when the movement feels controlled.
Are Seated Leg Extensions Safe for Sensitive Knees?
They can be useful because the range and resistance are easy to adjust. Begin without added weight and avoid kicking, dropping the leg, or forcing an uncomfortable lockout.
Some people tolerate only part of the range. Others may need a different quadriceps exercise, such as a straight-leg raise or supported sit-to-stand.
How Often Should You Perform Knee-Strengthening Exercises?
Two nonconsecutive strength sessions per week are a practical starting point. Some people can progress to three sessions, while others need more recovery between workouts.
Follow a physical therapist’s instructions when you have a diagnosed knee condition or are recovering from surgery.
Should Your Knee Hurt During Exercise?
Sharp, catching, unstable, or progressively increasing pain is a reason to stop. Mild muscle fatigue around the thighs or hips is expected.
Some people with diagnosed osteoarthritis may experience a small temporary increase in discomfort when beginning exercise, but it should remain tolerable. Reduce the range, resistance, or number of sets when symptoms increase noticeably.
What Is the Best Exercise for Bad Knees?
There is no single best exercise for every knee problem. Straight-leg raises and hip exercises require relatively little working-knee motion, while sit-to-stands and step-ups provide more functional training.
The best exercise is one that targets the muscles you need, matches your current ability, and can be progressed without worsening your symptoms.
Is Walking Good for Bad Knees?
Walking can be a useful low-impact activity when it produces little or no pain. Begin on a flat surface at a comfortable pace and use shorter sessions if needed.
Cycling, swimming, and water exercise may be alternatives when longer walks are uncomfortable.
Conclusion
Effective leg exercises for bad knees do not need to be complicated or completely pain-free in every situation. They do need to be controlled, adjustable, and appropriate for the cause and severity of your symptoms.
Start with four to six exercises you can perform smoothly. Build repetitions before adding resistance, use a smaller range when necessary, and progress from supported exercises toward sit-to-stands and low step-ups as your control improves.
This content is for informational purposes only and is not a substitute for medical advice.
References
- American Academy of Orthopaedic Surgeons — Knee Conditioning Program
- American Academy of Orthopaedic Surgeons — Management of Osteoarthritis of the Knee Clinical Practice Guideline
- NICE — Osteoarthritis in Over 16s: Diagnosis and Management
- EULAR — Recommendations for Non-Pharmacological Management of Hip and Knee Osteoarthritis
- Journal of Orthopaedic & Sports Physical Therapy — Patellofemoral Pain Clinical Practice Guideline
- PubMed — Hip Muscle Strengthening for Knee Osteoarthritis: Systematic Review