The dumbbell incline row is a chest-supported pulling exercise that trains the lats, rhomboids, middle trapezius, rear deltoids, and arm muscles without requiring you to hold a bent-over position. The bench supports your torso, making it easier to limit momentum and concentrate on moving the dumbbells with your back.
This guide explains how to set up the bench, perform each repetition, adjust your elbow position, avoid common mistakes, and program the dumbbell incline row for strength and muscle development.
What Is a Dumbbell Incline Row?
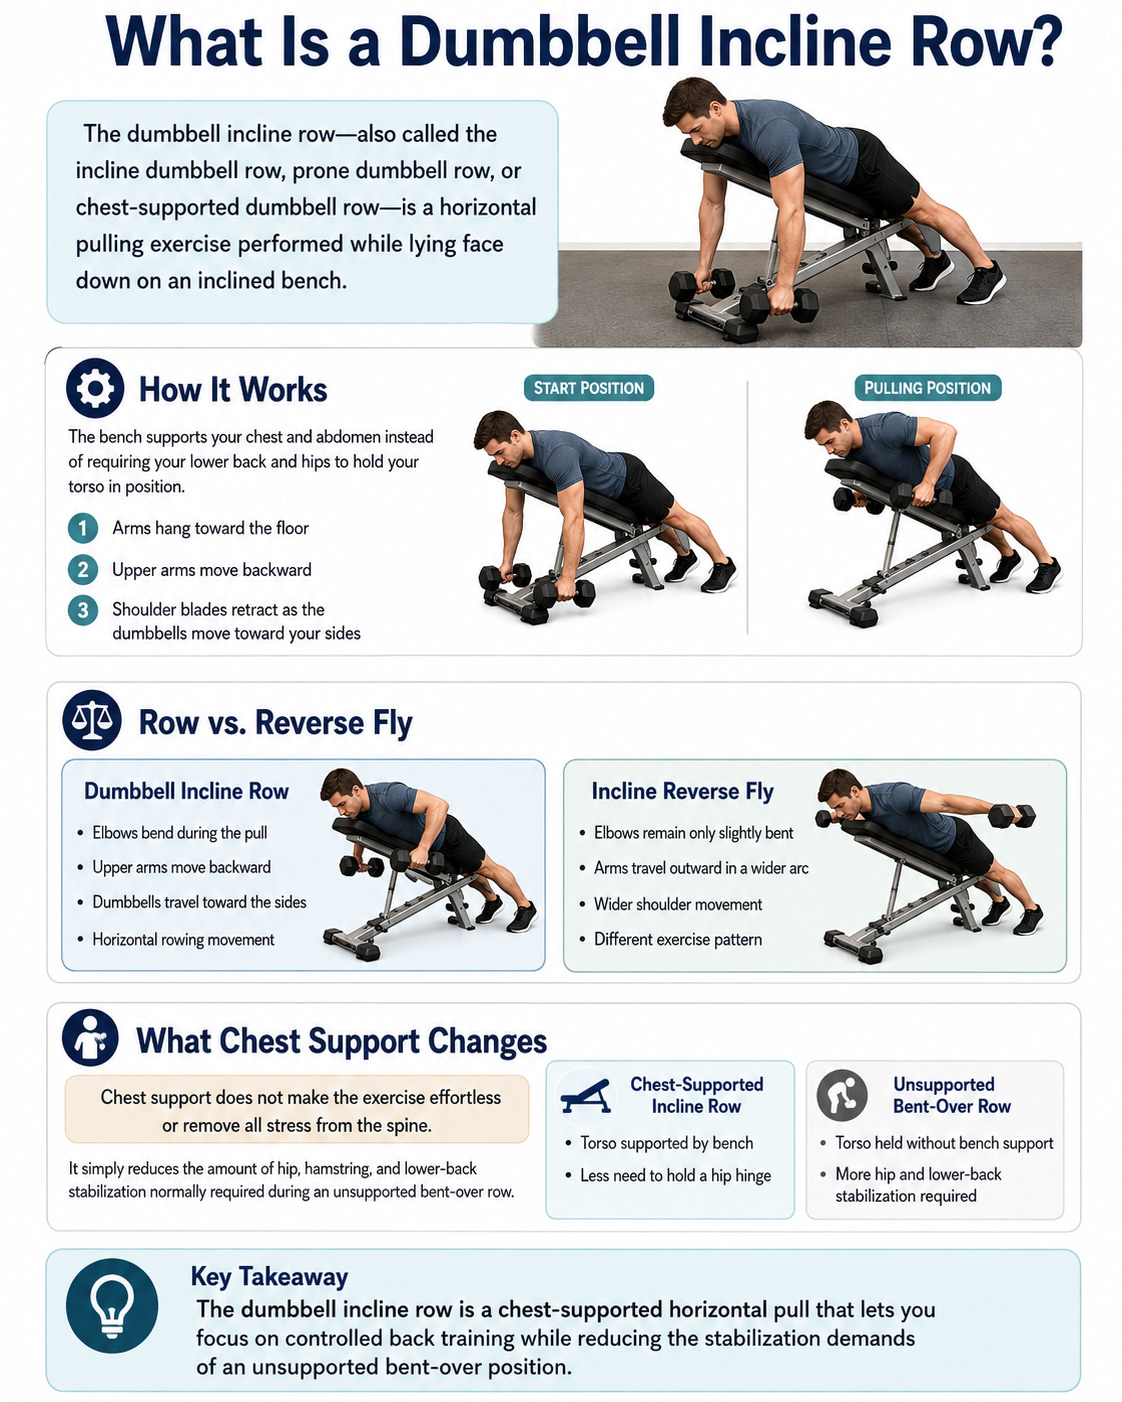
The dumbbell incline row—also called the incline dumbbell row, prone dumbbell row, or chest-supported dumbbell row—is a horizontal pulling exercise performed while lying face down on an inclined bench.
Instead of using your lower back and hips to hold your torso in position, the bench supports your chest and abdomen. Your arms hang toward the floor, and you pull the dumbbells toward your sides by moving your upper arms backward and retracting your shoulder blades.
The movement differs from an incline reverse fly. During a row, you bend your elbows and pull your upper arms backward. During an incline reverse fly, the elbows remain only slightly bent while the arms travel outward in a wider arc. The ACE incline reverse fly guide demonstrates this wider arm path.
Chest support does not make the exercise effortless or remove all stress from the spine. It simply reduces the amount of hip, hamstring, and lower-back stabilization normally required during an unsupported bent-over row.
Dumbbell Incline Row at a Glance
| Category | Practical guidance |
|---|---|
| Best for | Controlled back training with chest support |
| Primary muscles | Latissimus dorsi, rhomboids, middle trapezius |
| Assisting muscles | Posterior deltoids, teres major, biceps, brachialis, forearms |
| Equipment | Two dumbbells and a stable adjustable bench |
| Suggested bench angle | Approximately 30–45 degrees |
| Beginner starting volume | 2–3 sets of 10–15 repetitions |
| Muscle-building range | 3–4 sets of 8–15 repetitions |
| Rest | 60–150 seconds, depending on the load |
| Effort | Finish most sets with 1–3 controlled repetitions remaining |
| Main cue | Keep your chest supported and drive your elbows back |
| Difficulty | Beginner to intermediate |
These are starting points rather than fixed rules. Adjust the dumbbell weight, repetitions, bench angle, and range of motion to suit your proportions, experience, and training goal.
How to Do the Dumbbell Incline Row
Best for: Training the back with less opportunity to swing the torso.
Muscles worked: Lats, rhomboids, middle trapezius, posterior deltoids, teres major, biceps, brachialis, and forearms.
Equipment needed: Two matching dumbbells and a securely locked adjustable bench.
Sets, reps, and rest: Start with 2–3 sets of 10–15 repetitions. Rest for 60–90 seconds when learning the exercise. Heavier sets may require 90–150 seconds.
Step-by-Step Instructions
- Set the bench. Adjust the backrest to approximately 30–45 degrees and confirm that the locking mechanism is secure.
- Position the dumbbells. Place one dumbbell on each side of the bench where you can reach them without twisting.
- Get supported. Lie face down with your chest and abdomen against the bench. Keep your head above the top edge so your neck can remain neutral.
- Plant your feet. Position your feet wide enough to feel stable. Keep them flat on the floor or press firmly through the balls of your feet if the bench height prevents full-foot contact.
- Take a neutral grip. Hold the dumbbells with your palms facing each other and let your arms hang naturally beneath your shoulders.
- Brace lightly. Tighten your abdomen and glutes enough to keep your torso stable. Keep your ribs controlled and your head aligned with your spine.
- Begin the pull. Drive your elbows backward and slightly toward your hips. Allow the shoulder blades to move toward each other as the dumbbells rise.
- Reach a controlled top position. Stop when your upper arms are approximately level with your torso or slightly beyond it, provided your shoulders remain comfortable and your chest stays on the bench.
- Lower slowly. Extend your elbows and lower the dumbbells under control until your arms are straight and your back reaches a comfortable stretch.
- Repeat without bouncing. Begin the next repetition from a stable position rather than jerking the weights from the bottom.
ACE’s dumbbell-row instructions similarly emphasize bracing the trunk, keeping the head aligned with the spine, moving the upper arm backward, and avoiding torso rotation.
Breathing
Exhale as you pull the dumbbells upward and inhale as you lower them. Avoid holding your breath throughout an entire set.
More experienced lifters may briefly brace during demanding repetitions, but breathing should resume between repetitions rather than remaining restricted.
Coaching Cue
Keep your chest heavy on the bench and move your elbows, not just the dumbbells.
Best Bench Angle for the Dumbbell Incline Row
A bench angle of approximately 30–45 degrees works well for many lifters, but there is no single angle that is ideal for everyone.
Choose an angle that allows you to:
- Keep your chest and abdomen supported
- Let your arms hang without the dumbbells hitting the floor
- Maintain a comfortable neck position
- Pull through a useful range without the bench blocking your arms
- Keep your feet securely planted
Lower Bench Angle
A lower angle places your torso closer to horizontal. This can create a more traditional horizontal-row position, but it may also reduce dumbbell clearance and make it harder to keep your head comfortably above the bench.
Higher Bench Angle
A higher angle can make setup easier and provide more room beneath the dumbbells. However, an excessively upright bench may change the direction of the pull and make the exercise feel more like a high row.
Do not choose the angle only because someone labels it the “best” setting. Your bench design, arm length, dumbbell size, and body proportions all affect the setup.
Grip and Elbow Position
Grip and elbow position influence the direction in which the upper arm moves. They do not completely isolate one part of the back, but they can shift the exercise’s emphasis.
| Training goal | Grip and elbow path |
|---|---|
| Balanced back development | Neutral grip with elbows approximately 30–45 degrees from the torso |
| Greater lat emphasis | Neutral grip with elbows closer to the sides and moving slightly toward the hips |
| Greater upper-back and rear-delt emphasis | Pronated grip with elbows moving farther outward |
| More biceps involvement | Neutral or underhand grip, provided the wrists remain comfortable |
Research on seated cable rows found greater latissimus activation when the upper arms stayed closer to the torso, while greater shoulder-abduction angles increased middle-trapezius, upper-trapezius, and posterior-deltoid activity. Because the study examined cable rows and short-term muscle activation—not dumbbell incline rows or long-term muscle growth—its findings are best used as a technique guide rather than a guarantee of superior results.
Neutral Grip
A neutral grip, with the palms facing each other, is the most practical starting position. It usually allows a comfortable wrist position and makes it easy to keep the elbows moderately tucked.
Pronated Grip
With a pronated grip, the palms face behind you or toward your feet. This grip often encourages the elbows to travel farther outward, increasing the upper-back and rear-delt emphasis.
Use lighter dumbbells than you would for a neutral-grip row because the wide-elbow position may reduce how much weight you can control.
Underhand Grip
An underhand grip can increase biceps involvement and may encourage a close elbow path. However, it is not automatically better for the lats.
Keep your wrists straight. Do not force the grip if it causes discomfort in your wrists, elbows, or shoulders.
Dumbbell Incline Row Muscles Worked
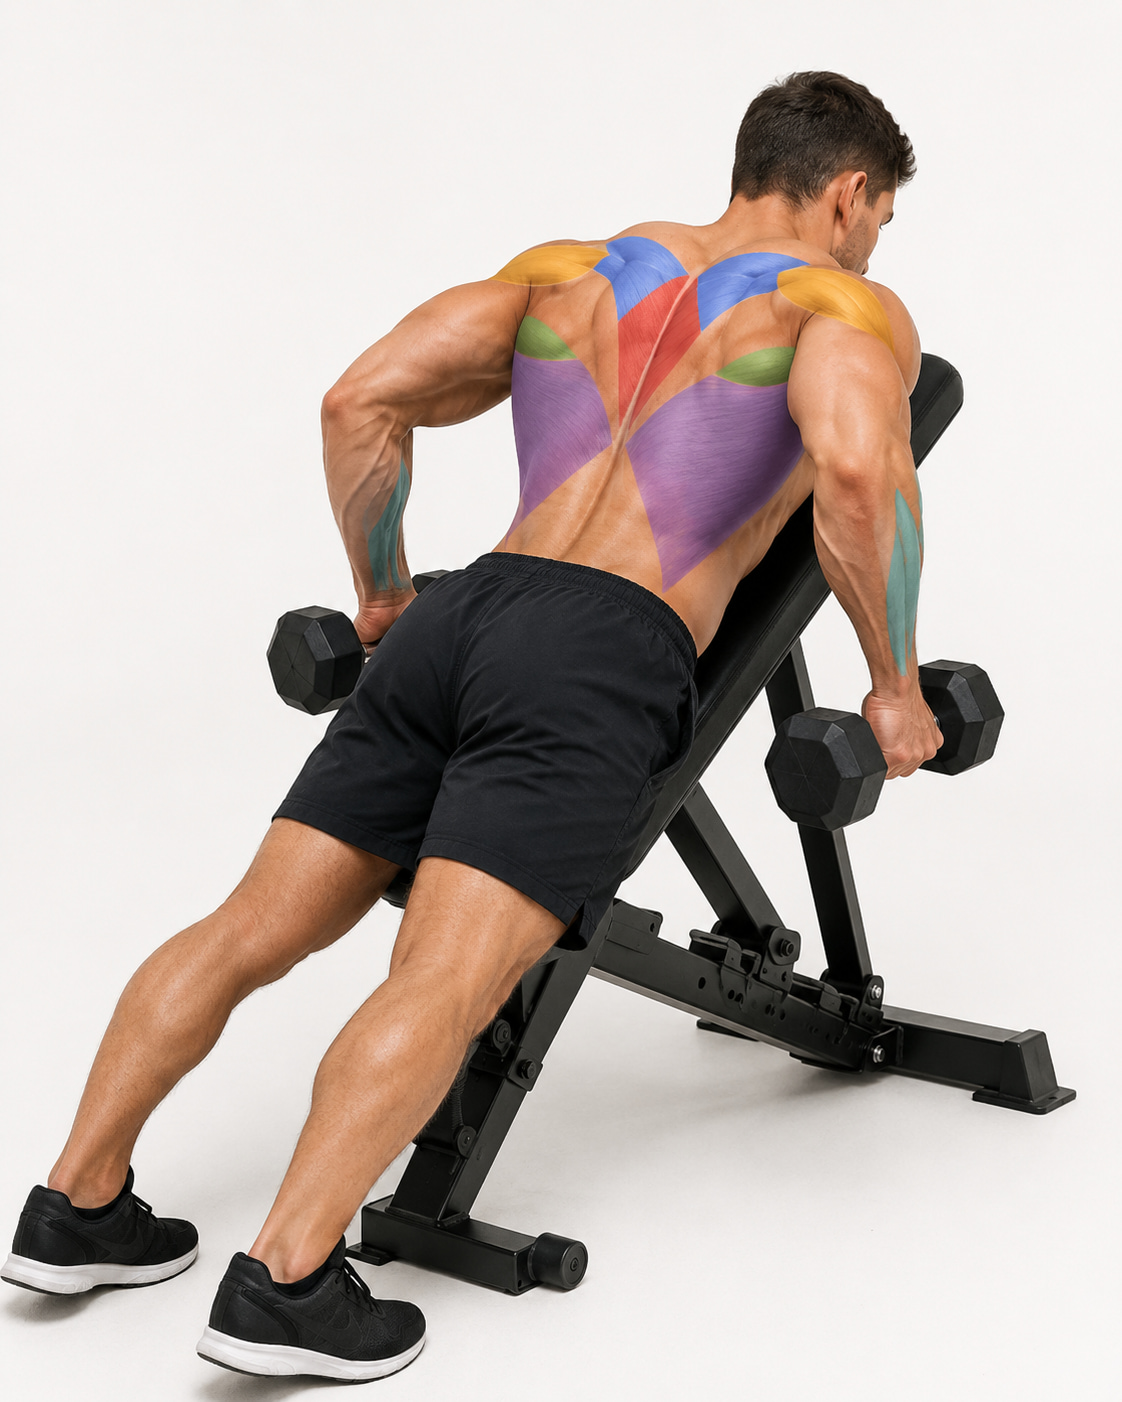
The dumbbell incline row is a compound exercise. Several muscles work together to move the upper arms, retract the shoulder blades, bend the elbows, and stabilize the shoulder joints.
1. Latissimus Dorsi
The latissimus dorsi, commonly called the lats, are the large muscles covering much of the middle and lower back. They help extend and adduct the upper arm, both of which occur as you pull your elbows backward and toward your torso.
The NCBI Bookshelf overview of latissimus dorsi anatomy describes the lats as working with the teres major during upper-arm extension.
You will generally emphasize the lats more when you:
- Use a neutral grip
- Keep your elbows relatively close to your sides
- Pull your elbows slightly toward your hips
- Avoid shrugging your shoulders
- Stop before your shoulders roll forward or your chest leaves the bench
You do not need to force your elbows tightly against your ribs. A small amount of space between your elbows and torso is usually comfortable and allows a natural rowing path.
2. Rhomboids
The rhomboid major and minor lie between the shoulder blades and spine. They help retract the scapulae as you pull the dumbbells upward.
They work throughout the repetition but become especially noticeable near the top, when the shoulder blades move toward each other. The goal is controlled retraction—not squeezing so aggressively that the shoulders roll forward or the chest lifts off the bench.
3. Middle Trapezius
The middle trapezius also contributes to scapular retraction. According to the NCBI Bookshelf overview of trapezius anatomy, the middle fibers draw the scapulae inward.
The middle trapezius usually receives more emphasis when the elbows travel farther away from the torso. However, the exact muscular contribution varies with your elbow angle, grip, body structure, and range of motion.
4. Posterior Deltoids
The posterior deltoids, or rear delts, assist with moving the upper arms behind the torso. The NCBI Bookshelf overview of deltoid anatomy identifies the posterior deltoid as an upper-arm extensor that works with the latissimus dorsi.
The rear delts generally contribute more as your elbows move farther away from your sides. A moderately flared or wide-elbow incline row can therefore be useful when upper-back and rear-delt development is the main goal.
5. Teres Major
The teres major is a smaller muscle near the upper portion of the latissimus dorsi. It assists with extending and adducting the upper arm during the pulling phase.
Although you may not feel the teres major working separately, it contributes alongside the lats when the elbows move backward.
6. Biceps and Brachialis
The biceps and brachialis bend the elbows as the dumbbells travel upward. Their involvement is normal and unavoidable because the incline row is a compound pulling exercise.
A neutral or underhand grip may make the elbow flexors more noticeable. However, the exercise should not turn into a dumbbell curl. Think about moving your elbows rather than simply lifting your hands.
7. Forearms and Grip Muscles
The forearm muscles maintain your grip and keep the wrists stable. Grip fatigue may become limiting when you use heavier dumbbells or perform high-repetition sets.
Before using lifting straps, make sure the dumbbell weight is appropriate and that you are not squeezing the handles harder than necessary. Straps may be useful for experienced lifters whose grip consistently fails before their back muscles, but they are not required.
8. Rotator Cuff and Other Stabilizers
The rotator cuff helps control the head of the upper-arm bone as the shoulder moves. Your core, glutes, legs, and neck muscles also work at a lower level to maintain a stable body position against the bench.
The bench reduces stabilization demands, but you still need firm foot pressure, a lightly braced trunk, and a controlled head position.
Benefits of the Dumbbell Incline Row
Provides Chest Support
The bench supports your torso, reducing the need to maintain a prolonged hip-hinge position. This can make the exercise useful after squats, deadlifts, or other movements that have already fatigued the lower back and hamstrings.
Chest support does not remove the need for good positioning, but it generally makes torso movement easier to control.
Makes Momentum Easier to Notice
When your chest remains against the bench, it becomes harder to swing your torso to lift the dumbbells. If your chest repeatedly leaves the pad, the load is probably too heavy or the set has continued beyond your ability to maintain proper form.
Trains Several Back Muscles Together
The incline row trains upper-arm extension, scapular retraction, and elbow flexion in one movement. This allows the lats, rhomboids, trapezius, rear delts, and arm muscles to work together.
Allows Each Arm to Move Independently
Dumbbells do not lock your hands into one fixed bar position. Each shoulder can follow a comfortable path, and one arm cannot directly lift the other arm’s dumbbell.
This does not automatically correct strength differences, but it can make side-to-side differences easier to notice.
Offers Several Useful Variations
Small changes in grip, elbow angle, range of motion, or tempo can alter the exercise without requiring new equipment.
For example, you can use:
- A close-elbow row for more lat emphasis
- A wide-elbow row for more upper-back and rear-delt emphasis
- A pause at the top for greater positional control
- A slower lowering phase to make lighter dumbbells more challenging
- A single-arm version to focus on one side at a time
Fits Muscle-Building Workouts Well
The supported position makes it practical to perform controlled moderate- and high-repetition sets. However, muscle development still depends on adequate effort, progressive training, weekly volume, nutrition, and recovery—not on the exercise alone.
The current ACSM resistance-training position stand emphasizes consistent training, individualized loading, and goal-appropriate weekly volume rather than one universally perfect routine.
Common Dumbbell Incline Row Mistakes
Using Too Much Weight
Heavy dumbbells are not useful when they cause you to shorten the range, jerk each repetition, shrug your shoulders, or lift your chest away from the bench.
Choose a load you can lower under control while keeping approximately 1–3 good repetitions in reserve.
Lifting the Chest From the Bench
Your chest should remain supported during the repetition. Repeatedly lifting it from the pad turns the exercise into a partially unsupported row and adds momentum.
A small amount of natural breathing movement is normal. Deliberately arching away from the bench is not.
Shrugging the Shoulders
Pulling the shoulders toward the ears can shift more work toward the upper trapezius and may make the neck feel tense.
Keep your neck long and think about moving the elbows backward without raising the shoulders.
Turning the Exercise Into a Curl
The elbows must bend, so the biceps will work. However, focusing only on bringing the dumbbells toward your shoulders can make the movement feel like a curl.
Drive your elbows behind you while allowing your hands to follow.
Flaring the Elbows Without Intending To
Flared elbows are not automatically incorrect. They simply change the exercise’s emphasis.
Keep your elbows closer to your sides when your goal is greater lat involvement. Let them travel farther outward when you intentionally want more upper-back and rear-delt work.
Pulling Too Far
More range is not always better. Pulling the elbows excessively behind the torso may cause the shoulders to roll forward, the chest to lift, or the wrists to bend.
Stop when you reach the end of your controllable shoulder range.
Pinning the Shoulder Blades Too Rigidly
The scapulae naturally move during a row. Allow a controlled reach at the bottom and a smooth retraction during the pull.
Do not force your shoulder blades forward into an extreme stretch, but do not keep them squeezed together so rigidly that your arms cannot extend comfortably. The rhomboids and middle trapezius are active during rowing-related scapular retraction.
Dropping the Dumbbells
Lowering the weights quickly removes muscular control and may pull the shoulders into an uncomfortable position.
Take approximately two seconds to lower the dumbbells, especially while learning the exercise.
Bending the Wrists
Keep the knuckles aligned with the forearms. Allowing the wrists to bend can make grip less efficient and may create unnecessary wrist or forearm discomfort.
Beginner Regressions and Modifications
Use Lighter Dumbbells
Start with a load that allows 12–15 controlled repetitions. Learning the movement with lighter weights is more productive than struggling through short, jerky repetitions.
Raise the Bench Slightly
A somewhat higher bench angle can provide more dumbbell clearance and make it easier to get into position.
Avoid raising the bench so high that your chest loses support or the row becomes excessively upright.
Perform a Single-Arm Incline Row
Hold the bench with one hand or allow the nonworking arm to hang while rowing one dumbbell at a time. This may help you concentrate on the path of each elbow.
Keep your hips and chest square to the bench rather than rotating toward the working side.
Use a Chest-Supported Row Machine
A chest-supported machine row follows the same general horizontal-pulling pattern while providing a fixed setup. It can be a useful alternative when balancing two dumbbells or getting into position is difficult.
Shorten the Range Temporarily
Use a comfortable range while developing control, then gradually increase it. Do not force the dumbbells higher or lower if doing so causes pinching, sharp pain, or loss of positioning.
Dumbbell Incline Row Progressions and Variations
Pause Dumbbell Incline Row
Pause for one or two seconds at the top without lifting your chest or shrugging. This makes it harder to rely on momentum.
Slow-Eccentric Incline Row
Take three or four seconds to lower each repetition. A slower lowering phase can make moderate dumbbells challenging while reinforcing control.
Wide-Elbow Incline Row
Use a pronated grip and move the elbows outward. This variation increases the emphasis on the upper back and posterior deltoids.
Use less weight and avoid pulling the elbows far beyond shoulder level.
Single-Arm Dumbbell Incline Row
Row one dumbbell at a time while keeping your torso centered on the bench. This allows greater attention to each side and may provide a slightly longer range.
Alternating Incline Row
Hold both dumbbells but row one side at a time. Keep the nonworking arm extended without allowing your torso to twist.
Heavier Neutral-Grip Incline Row
Once your form is consistent, gradually increase the load while maintaining full control. Do not treat the supported position as permission to use weights you cannot lower smoothly.
Dumbbell Incline Row vs. Bent-Over Row
Both exercises train the back through a horizontal pulling pattern, but their setup and stabilization demands differ.
| Feature | Dumbbell incline row | Dumbbell bent-over row |
|---|---|---|
| Torso position | Supported by an incline bench | Held in a hip-hinge position |
| Lower-back demand | Generally lower stabilization demand | Greater isometric stabilization demand |
| Hamstring and glute involvement | Limited | Higher |
| Opportunity to use momentum | Lower when chest contact is maintained | Higher if the torso moves |
| Equipment | Dumbbells and adjustable bench | Dumbbells only |
| Best use | Controlled back training and higher-quality repetitions | Back training combined with hip and trunk stabilization |
| Main limitation | Requires bench access and dumbbell clearance | Lower-back or hamstring fatigue may limit the set |
Neither variation is universally better.
Choose the dumbbell incline row when you want to focus on your back without making the hip-hinge position a major part of the exercise. Choose a bent-over row when you also want to train the ability to stabilize an unsupported torso.
They can also be used in the same program on different training days.
Sets, Reps, Rest, and Frequency
For Beginners
- Sets: 2–3
- Repetitions: 10–15
- Rest: 60–90 seconds
- Effort: Finish with approximately 3 repetitions in reserve
- Frequency: 1–2 times per week
Use the first few sessions to learn the setup and elbow path. Add weight only after you can keep your chest supported and lower every repetition under control.
For Muscle Development
- Sets: 3–4
- Repetitions: 8–15
- Rest: 90–150 seconds
- Effort: Finish with approximately 1–3 repetitions in reserve
- Frequency: 1–2 times per week
The incline row can be your primary horizontal row or an accessory movement after a heavier pull.
For General Pulling Strength
- Sets: 3–4
- Repetitions: 6–10
- Rest: Approximately 2 minutes
- Effort: Finish with approximately 1–3 repetitions in reserve
Do not use very low repetitions if the heavier weight makes your range inconsistent. The incline row is most useful when the load remains controllable.
How to Progress
Use a simple double-progression method:
- Select a repetition range, such as 8–12.
- Choose dumbbells you can row for at least eight controlled repetitions.
- Keep the same weight until you can complete all sets near the top of the range.
- Confirm that your chest remains supported and that you still have approximately 1–2 repetitions in reserve.
- Increase each dumbbell by the smallest practical amount.
- Build your repetitions back toward the top of the range.
You do not need to increase the weight every workout. Adding a repetition, improving the lowering control, or using a cleaner range of motion also counts as progress.
Sample Back Workout With Dumbbell Incline Rows
This beginner-to-intermediate workout combines one vertical pull, one horizontal row, a rear-delt movement, and direct arm training.
Warm-Up
Perform 5–10 minutes of easy activity, followed by one or two light warm-up sets of the first pulling exercise. The American Academy of Orthopaedic Surgeons recommends warming up with 5–10 minutes of low-impact activity before shoulder strengthening.
Workout
- Lat pulldown or assisted pull-up
3 sets of 8–12 repetitions
Rest 90–120 seconds - Dumbbell incline row
3 sets of 8–12 repetitions
Rest 90–150 seconds - Incline reverse fly
2 sets of 12–15 repetitions
Rest 60–90 seconds - Dumbbell hammer curl
2 sets of 10–15 repetitions
Rest 60–90 seconds
Perform the workout once or twice per week. Finish most sets with approximately two controlled repetitions remaining.
When you reach the top of a repetition range with consistent technique, increase the weight slightly or add one repetition per set.
Dumbbell Incline Row Safety Tips
- Confirm that the bench is securely locked before lying on it.
- Keep the dumbbells clear of the bench frame and floor.
- Use a weight you can pick up and return safely.
- Maintain a natural head and neck position.
- Keep the chest supported rather than extending the lower back.
- Control both the lifting and lowering phases.
- Do not force an uncomfortable shoulder range.
- Avoid dropping the dumbbells while lying on the bench.
- Ask for assistance when handling weights that are difficult to position.
Stop the exercise if you experience sharp shoulder, elbow, neck, or back pain. Numbness, dizziness, chest pain, unusual weakness, or other unexpected symptoms are reasons to stop training and seek appropriate professional guidance. AAOS advises exercisers not to ignore pain during shoulder exercise.
Frequently Asked Questions
Is the dumbbell incline row the same as a chest-supported row?
The dumbbell incline row is one type of chest-supported row. “Chest-supported row” is a broader term that may also describe machine, barbell, cable, or T-bar variations performed with the torso supported.
What angle should the bench be for incline dumbbell rows?
Approximately 30–45 degrees is a practical starting range. Adjust the angle so your chest remains supported, your head clears the top of the bench, and the dumbbells can hang without hitting the floor or frame.
A slightly higher angle may be easier when using large dumbbells or a low bench.
Are dumbbell incline rows good for the lats?
Yes. The lats extend the upper arms as the elbows travel behind the torso. To emphasize them, use a neutral grip, keep the elbows relatively close to your sides, and pull the elbows slightly toward your hips.
The rhomboids, trapezius, rear delts, biceps, and other muscles will still contribute.
Should the elbows stay tucked?
They should stay relatively close to the torso when greater lat emphasis is the goal. They do not need to touch your ribs.
Allow the elbows to move farther outward when you intentionally want more upper-back and rear-delt emphasis.
How high should I row the dumbbells?
Row until your upper arms reach approximately torso level or slightly beyond it without shrugging, bending your wrists, or lifting your chest from the bench.
Your controllable shoulder range matters more than touching the dumbbells to the bench.
Why do I feel the exercise in my biceps?
The biceps and brachialis bend your elbows, so some arm involvement is expected.
To keep the back as the main focus, use a manageable load, initiate the movement by driving the elbows backward, and avoid curling the dumbbells toward your shoulders.
Is the incline row better than the bent-over row?
Not universally. The incline row provides chest support and usually makes momentum easier to control. The bent-over row requires more stabilization from the hips, trunk, hamstrings, and lower back.
Use the version that matches your training goal and that you can perform with consistent technique.
Conclusion
The dumbbell incline row is a practical way to train the lats, rhomboids, middle trapezius, rear delts, and elbow flexors with the torso supported.
Start with a stable 30–45-degree bench, a neutral grip, and elbows traveling slightly away from your sides. Keep your chest against the pad, lower the dumbbells under control, and progress only when the same technique can be maintained across every repetition.
References
- American College of Sports Medicine: Updated Resistance Training Guidelines
- American Council on Exercise: Single-Arm Row Exercise Guide
- American Council on Exercise: Incline Reverse Fly Exercise Guide
- NCBI Bookshelf: Latissimus Dorsi Anatomy
- NCBI Bookshelf: Trapezius Anatomy
- NCBI Bookshelf: Deltoid Muscle Anatomy
- International Journal of Strength and Conditioning: Grip and Shoulder-Abduction Angle During Seated Rows
- American Academy of Orthopaedic Surgeons: Shoulder Conditioning Program
This content is for informational purposes only and is not a substitute for medical advice.