Dumbbell back exercises at home can build muscle when you use enough resistance, controlled form, and progressive overload. You do not need a full gym to train your lats, traps, rhomboids, rear delts, and posterior chain. You need the right exercises, good setup, and a plan that lets you add reps, weight, or control over time.
This guide covers the best dumbbell back exercises at home, how to do each one, which muscles they train, common mistakes, beginner-friendly options, and a simple workout you can follow.
Can You Build Your Back With Dumbbells at Home?
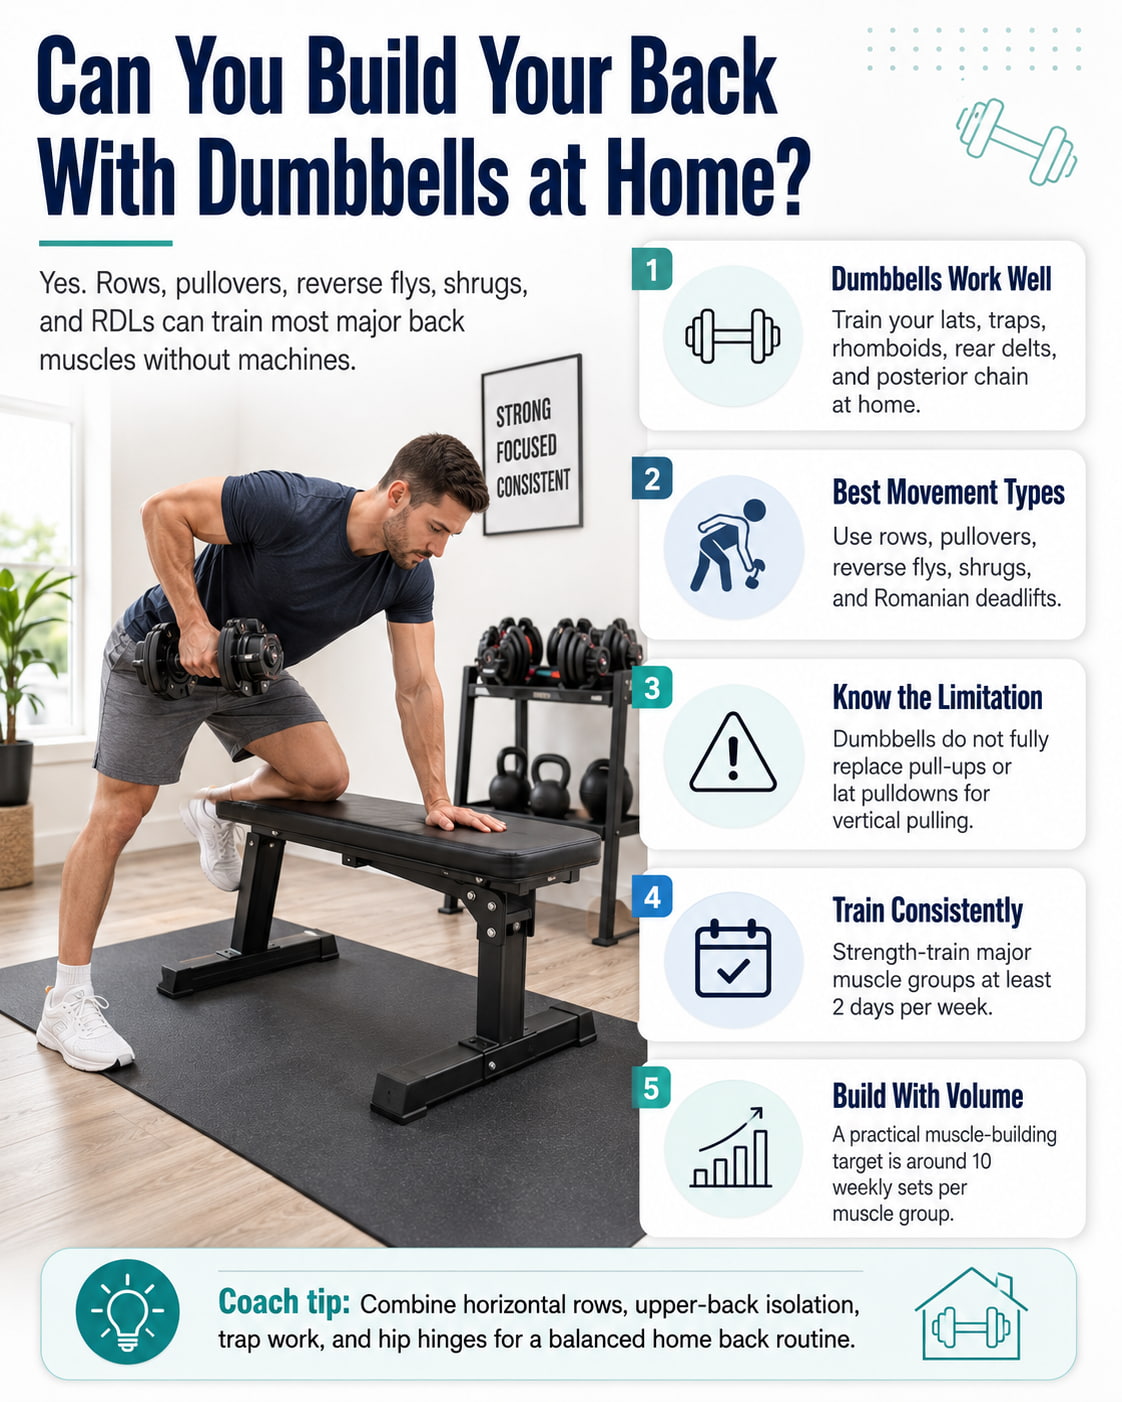
Yes, dumbbells can build a stronger back at home. Rows, pullovers, reverse flys, shrugs, and Romanian deadlifts can train most of the major muscles of your back without machines.
The main limitation is vertical pulling. Dumbbells cannot fully replace pull-ups or lat pulldowns because those movements train the back from an overhead pulling angle. Still, you can build an impressive home back routine with dumbbells by combining horizontal rows, upper-back isolation, trap work, and hip-hinge exercises.
The CDC adult physical activity guidelines recommend muscle-strengthening activities on at least 2 days per week that work all major muscle groups, including the back. The 2026 ACSM resistance training update also notes that muscle growth is supported by higher weekly training volume, with around 10 weekly sets per muscle group used as a practical hypertrophy target.
Muscles Worked by Dumbbell Back Exercises at Home
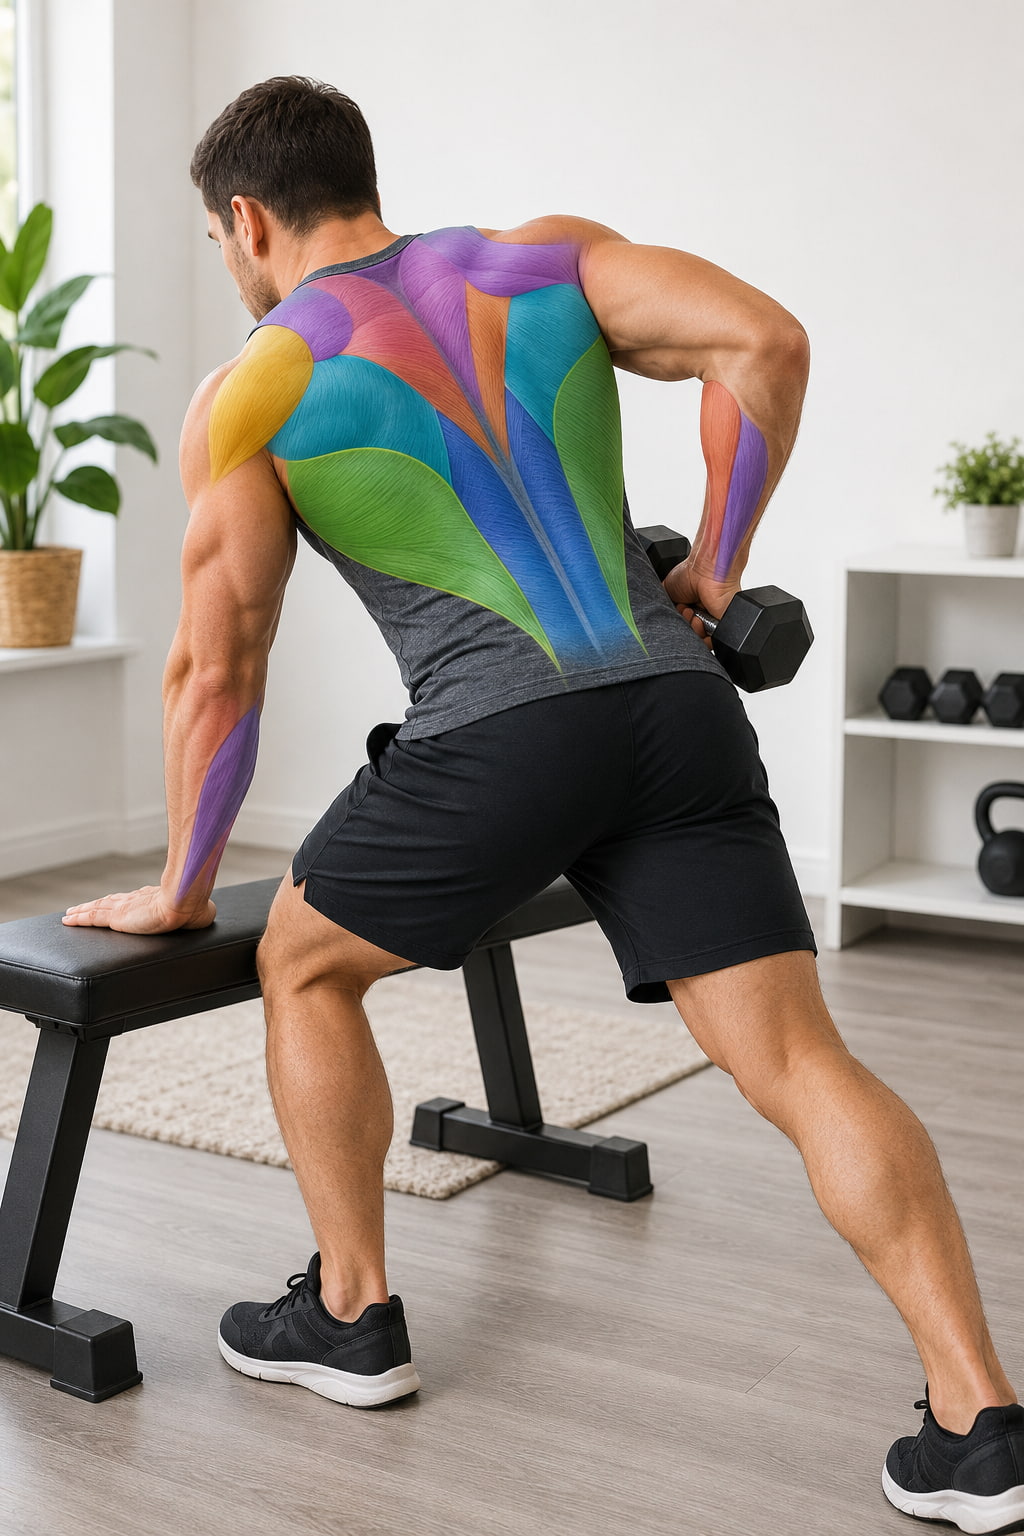
Dumbbell back exercises mainly train the lats, rhomboids, trapezius, rear delts, erector spinae, biceps, forearms, and core.
Your lats help pull your upper arm toward your body. Your rhomboids and mid-traps help pull your shoulder blades back. Your rear delts support shoulder extension and upper-back balance. Your erector spinae help maintain a strong, neutral torso during rows and hip hinges.
Cleveland Clinic explains that dumbbell rows target the mid- and upper-back muscles, including the latissimus dorsi, trapezius, and rhomboids.
How to Choose the Right Dumbbell Weight
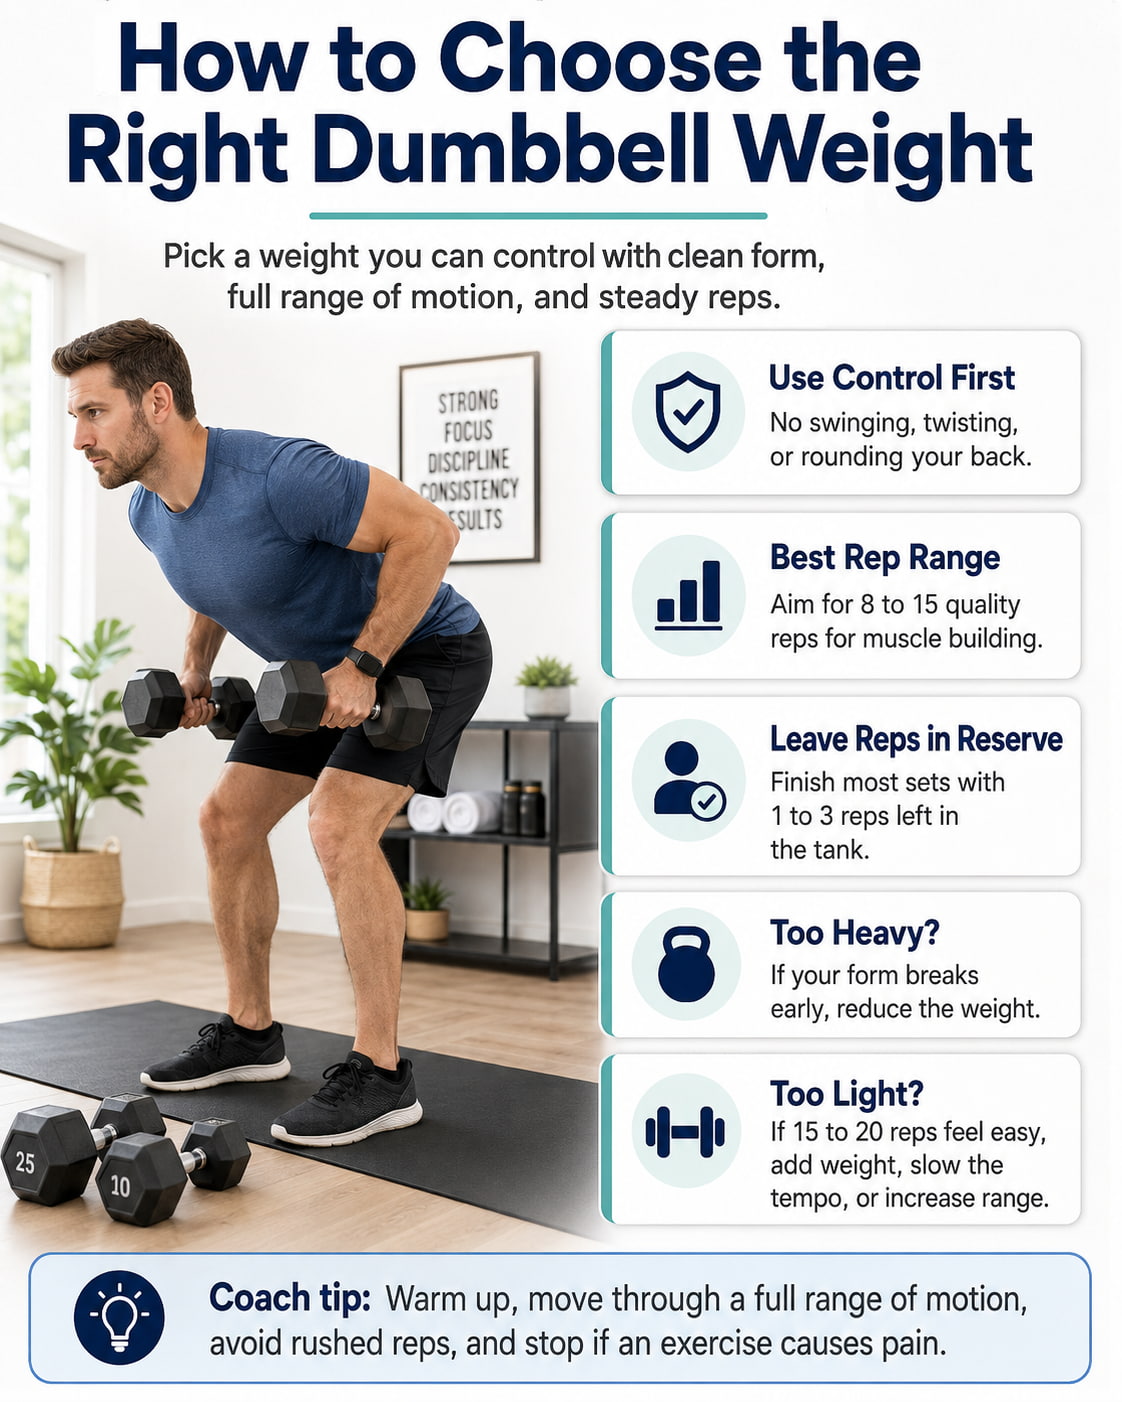
Choose a weight you can control through the full range of motion without swinging, twisting, or rounding your back. For muscle building, most people do well with a load that allows 8 to 15 quality reps while finishing with about 1 to 3 reps left in reserve.
If your form breaks before the target reps, the dumbbells are too heavy. If you can easily pass 15 to 20 reps on every set, the load may be too light for muscle growth unless you slow the tempo or add more range of motion.
Mayo Clinic recommends using proper technique, moving through a full range of motion, warming up, avoiding rushed reps, and stopping an exercise if it causes pain.
12 Dumbbell Back Exercises at Home
Dumbbell back exercises at home can help you build your lats, traps, rhomboids, rear delts, and lower back without machines or a full gym setup.
Use controlled rows, pullovers, shrugs, and hip-hinge movements with steady progression to build muscle safely and effectively.
1. Single-Arm Supported Dumbbell Row
Best for: Building the lats and mid-back while using support to reduce lower-back fatigue.
Muscles worked: Latissimus dorsi, rhomboids, middle traps, rear delts, biceps, forearms, and core.
Equipment needed: One dumbbell and a bench, chair, sofa edge, or sturdy table for support.
Why it stands out: This is one of the best dumbbell back exercises at home because it lets you train one side at a time, use a strong range of motion, and focus on pulling with your back instead of swinging your torso. ACE cues a flat back, braced core, head aligned with the spine, and no trunk rotation during the single-arm row.
Suggested sets and reps: Do 3 to 4 sets of 8 to 12 reps per side.
Beginners: Start with one hand supported and use a lighter dumbbell. Focus on keeping your hips and shoulders square.
Intermediate: Use a heavier dumbbell and pause for 1 second at the top of each rep.
Advanced: Use a slower lowering phase of 3 seconds or add a dead-stop reset at the bottom of each rep.
Rest: Rest 60 to 90 seconds between sides or 90 to 120 seconds between full sets.
How to do it:
- Place one hand on a bench, chair, or sturdy surface.
- Step your feet into a stable stance and hinge slightly at your hips.
- Hold the dumbbell under your shoulder with your arm straight.
- Brace your core and keep your spine neutral.
- Pull your elbow toward your hip without twisting your torso.
- Squeeze your back briefly at the top.
- Lower the dumbbell under control until your arm is straight again.
Common mistakes: Twisting the torso, pulling the elbow too high toward the shoulder, shrugging the neck, rounding the lower back, and bouncing the dumbbell.
Expert tip: Think “elbow to back pocket” instead of “dumbbell to chest” to keep the movement more lat-focused.
Exercise variations: You can do this from a bench, chair, split stance, or three-point stance with both feet on the floor.
Easier variation: Use a lighter dumbbell and place your free hand on a higher support to reduce torso angle.
Harder variation: Perform a 2-second squeeze at the top of every rep.
2. Two-Dumbbell Bent-Over Row
Best for: Training both sides of the back at the same time with a simple home setup.
Muscles worked: Lats, rhomboids, traps, rear delts, spinal erectors, biceps, forearms, glutes, hamstrings, and core.
Equipment needed: Two dumbbells.
Why it stands out: The bent-over row gives you a strong back-building movement without a bench. It also teaches you to hold a hip-hinge position while pulling, which makes it useful for full-body strength and posture control.
Suggested sets and reps: Do 3 to 4 sets of 8 to 12 reps.
Beginners: Use light dumbbells and keep your torso slightly higher until your hinge feels stable.
Intermediate: Hinge deeper and pull both dumbbells toward your lower ribs.
Advanced: Use a slow tempo, such as 2 seconds up and 3 seconds down.
Rest: Rest 90 to 120 seconds between sets.
How to do it:
- Stand with your feet about hip-width to shoulder-width apart.
- Hold a dumbbell in each hand.
- Soften your knees and hinge your hips back.
- Keep your spine neutral and your chest angled toward the floor.
- Let the dumbbells hang under your shoulders.
- Pull both elbows back until the dumbbells reach your lower ribs.
- Lower the dumbbells slowly without losing your back position.
Common mistakes: Turning the row into a squat, standing too upright, jerking the dumbbells, rounding the back, and letting the shoulders roll forward.
Expert tip: Keep your ribs down and imagine holding your torso in one solid piece while your arms move.
Exercise variations: You can use a neutral grip, reverse grip, wide elbow path, or alternating reps.
Easier variation: Do one arm at a time with your other hand supported on a chair.
Harder variation: Add a 1-second pause at the top and a 3-second lowering phase.
3. Chest-Supported Dumbbell Row
Best for: Training the back with less lower-back stress.
Muscles worked: Lats, rhomboids, middle traps, rear delts, biceps, and forearms.
Equipment needed: Two dumbbells and an incline bench. At home, you can use a sturdy incline surface only if it is stable and safe.
Why it stands out: Chest support removes much of the need to hold a bent-over position, so you can focus more on the upper and mid-back. It is a strong option when your lower back gets tired before your back muscles do.
Suggested sets and reps: Do 3 sets of 10 to 15 reps.
Beginners: Use light dumbbells and a moderate incline so your chest stays supported.
Intermediate: Pull with a full range of motion and pause at the top.
Advanced: Use heavier dumbbells for 8 to 10 controlled reps or add slow eccentrics.
Rest: Rest 60 to 90 seconds between sets.
How to do it:
- Set your chest against an incline bench or stable angled support.
- Hold a dumbbell in each hand with your arms hanging down.
- Keep your neck neutral and your chest supported.
- Pull your elbows back and slightly down.
- Squeeze your shoulder blades gently at the top.
- Lower the dumbbells slowly until your arms are straight.
- Keep your chest in contact with the support throughout the set.
Common mistakes: Lifting the chest off the bench, using too much weight, pulling too high, and turning the row into a shrug.
Expert tip: Keep your sternum heavy against the support so the movement stays strict.
Exercise variations: Use neutral grip rows, wide rows, rear-delt rows, or alternating rows.
Easier variation: Use lighter dumbbells and a higher incline.
Harder variation: Use a 2-second pause at the top of each rep.
4. Dumbbell Gorilla Row
Best for: Building mid-back strength, grip, and athletic pulling power from a compact home setup.
Muscles worked: Lats, rhomboids, traps, rear delts, biceps, forearms, core, glutes, and hamstrings.
Equipment needed: Two dumbbells.
Why it stands out: The gorilla row uses a wider stance and alternating pull, which makes it useful when you want a back exercise that also challenges your hinge position and core stability.
Suggested sets and reps: Do 3 sets of 8 to 12 reps per side.
Beginners: Use light dumbbells and keep the range of motion controlled.
Intermediate: Pull each dumbbell from the floor or near the floor while keeping your torso steady.
Advanced: Use heavier dumbbells and a strong pause at the top of each rep.
Rest: Rest 90 seconds between sets.
How to do it:
- Stand with your feet wider than shoulder-width.
- Place two dumbbells between your feet.
- Hinge your hips back and keep your spine neutral.
- Grip both dumbbells with your palms facing each other.
- Row one dumbbell toward your hip while the other stays grounded.
- Lower it with control and repeat on the other side.
- Keep your hips level and your torso stable.
Common mistakes: Rocking side to side, rounding the back, lifting the chest too high, and pulling with momentum.
Expert tip: Push the non-working dumbbell into the floor to create stability.
Exercise variations: You can perform alternating reps, one-side-at-a-time reps, or dead-stop reps.
Easier variation: Raise the dumbbells on blocks or books so you do not have to hinge as low.
Harder variation: Add a slow 3-second lowering phase on each rep.
5. Dumbbell Dead-Stop Row
Best for: Building strict pulling strength without bouncing the weight.
Muscles worked: Lats, rhomboids, traps, rear delts, biceps, forearms, and core.
Equipment needed: One or two dumbbells.
Why it stands out: Each rep starts from a complete stop, which reduces momentum and forces you to create tension before pulling. This is helpful for home lifters who tend to rush rows.
Suggested sets and reps: Do 3 to 4 sets of 6 to 10 reps.
Beginners: Start with a supported single-arm version and reset the dumbbell on the floor each rep.
Intermediate: Use two dumbbells and reset both on the floor between reps.
Advanced: Use heavier loads while keeping every rep clean and controlled.
Rest: Rest 90 to 120 seconds between sets.
How to do it:
- Set up in a hinged position with the dumbbell on the floor or a low platform.
- Brace your core and keep your spine neutral.
- Grip the dumbbell without rounding your shoulders.
- Pull the dumbbell toward your lower ribs or hip.
- Pause briefly at the top.
- Lower the dumbbell fully back to the floor.
- Reset your brace before the next rep.
Common mistakes: Bouncing off the floor, losing tension between reps, twisting the torso, and rushing the reset.
Expert tip: Treat every rep like the first rep of the set.
Exercise variations: You can do this as a single-arm row, two-arm row, bench-supported row, or gorilla row.
Easier variation: Place the dumbbell on a raised surface to shorten the range.
Harder variation: Pause for 2 seconds at the top before lowering.
6. Reverse-Grip Dumbbell Row
Best for: Emphasizing the lats and lower pulling path.
Muscles worked: Lats, rhomboids, lower traps, biceps, forearms, spinal erectors, and core.
Equipment needed: Two dumbbells.
Why it stands out: The palms-up grip naturally encourages the elbows to stay closer to the body, which can make the row feel more lat-focused.
Suggested sets and reps: Do 3 sets of 8 to 12 reps.
Beginners: Start light because the grip and elbow position may feel different from a regular row.
Intermediate: Pull toward your lower ribs or waist while keeping your shoulders down.
Advanced: Use a controlled tempo and stop each set before your lower back position changes.
Rest: Rest 90 seconds between sets.
How to do it:
- Stand with two dumbbells at your sides.
- Rotate your palms forward or slightly up.
- Hinge at your hips with a neutral spine.
- Let the dumbbells hang below your shoulders.
- Pull your elbows back close to your body.
- Squeeze your lats and mid-back at the top.
- Lower the dumbbells slowly.
Common mistakes: Curling the elbows back close weight instead of rowing it, flaring the ribs, shrugging the shoulders, and standing up during the pull.
Expert tip: Keep your elbows close and pull the handles toward your pockets.
Exercise variations: You can do this supported, bent-over, chest-supported, or alternating.
Easier variation: Use one dumbbell at a time with your free hand supported.
Harder variation: Add a 1-second pause when the dumbbells reach your waist.
7. Elbow-Out Rear-Delt Row
Best for: Training the rear delts, upper back, and shoulder-blade control.
Muscles worked: Rear delts, rhomboids, middle traps, lower traps, rotator cuff muscles, and upper back.
Equipment needed: Two light to moderate dumbbells.
Why it stands out: Most home back workouts overuse narrow rows. The elbow-out rear-delt row balances that by targeting the upper-back and rear-shoulder muscles that support better pulling mechanics.
Suggested sets and reps: Do 2 to 4 sets of 10 to 15 reps.
Beginners: Use very light dumbbells and learn the elbow path first.
Intermediate: Use a chest-supported setup to make the movement stricter.
Advanced: Add slow reps and a top-position hold.
Rest: Rest 60 to 90 seconds between sets.
How to do it:
- Hold a dumbbell in each hand.
- Hinge forward with a neutral spine.
- Let your arms hang below your shoulders.
- Pull your elbows out wide toward shoulder level.
- Keep your wristsIntermediate:** Use a chest-supported setup to make the movement stricter.
Advanced: Add slow reps and a top-position hold.
Rest: Rest 60 to 90 seconds between sets.
How to do it:
- Hold stacked under your elbows.
- Squeeze your upper back briefly.
- Lower the dumbbells slowly.
Common mistakes: Going too heavy, turning it into a shrug, bending the wrists, and pulling the elbows too far behind the body.
Expert tip: Think about spreading your elbows wide instead of pulling the dumbbells high.
Exercise variations: You can do this bent-over, chest-supported, or seated with your torso leaned forward.
Easier variation: Use lighter dumbbells and limit the range until you feel the rear delts working.
Harder variation: Hold the top position for 2 seconds on every rep.
8. Dumbbell Pullover
Best for: Training the lats through a long range of motion without a cable machine.
Muscles worked: Lats, teres major, chest, triceps long head, serratus anterior, and core.
Equipment needed: One dumbbell and a bench, floor, or stable mat setup.
Why it stands out: The pullover trains the back from a different angle than rows. It is especially useful at home because it gives your lats a lengthened-position challenge without needing a pull-up bar or cable station.
Suggested sets and reps: Do 2 to 4 sets of 10 to 15 reps.
Beginners: Start on the floor to limit the range of motion and protect your shoulders.
Intermediate: Use a bench and move through a comfortable range.
Advanced: Use a slow lowering phase and stop just before your ribs flare.
Rest: Rest 60 to 90 seconds between sets.
How to do it:
- Lie on a bench or on the floor with one dumbbell held over your chest.
- Hold the inside of one dumbbell head with both hands.
- Keep your ribs down and core braced.
- Lower the dumbbell behind your head in a controlled arc.
- Stop when you feel a strong but comfortable stretch.
- Pull the dumbbell back over your chest.
- Keep your elbows slightly bent throughout the movement.
Common mistakes: Overarching the lower back, bending the elbows too much, going too heavy, and lowering past your comfortable shoulder range.
Expert tip: Keep your ribs stacked over your pelvis so the movement trains your lats instead of your lower back arch.
Exercise variations: You can do floor pullovers, bench pullovers, cross-bench pullovers, or two-dumbbell pullovers.
Easier variation: Perform the pullover on the floor with a light dumbbell.
Harder variation: Use a 3-second lowering phase and pause briefly in the stretched position.
9. Dumbbell Reverse Fly
Best for: Strengthening the rear delts and upper-back muscles with light dumbbells.
Muscles worked: Rear delts, rhomboids, middle traps, lower traps, and rotator cuff muscles.
Equipment needed: Two light dumbbells.
Why it stands out: Reverse flys help balance pressiain the smaller upper-back muscles that rows do not always isolate well. Mayo Clinic notes that reverse flys should be controlled and not performed by arching, hunching, or swinging the weights.
Suggested sets and reps: Do 2 to 4 sets of 12 to 15 reps.
Beginners: Use very light dumbbells and focus on control.
Intermediate: Hinge deeper and maintain the same torso position throughout the set.
Advanced: Use a 2-second top hold or perform the movement chest-supported.
Rest: Rest 45 to 75 seconds between sets.
How to do it:
- Stand with two light dumbbells.
- Hinge at your hips and keep your spine neutral.
- Let the dumbbells hang under your shoulders.
- Keep a slight bend in your elbows.
- Raise your arms out to the sides until they reach about shoulder height.
- Squeeze your upper back gently.
- Lower the dumbbells slowly.
Common mistakes: Swinging the weights, shrugging the shoulders, using heavy dumbbells, and turning the movement into a row.
Expert tip: Lead with your elbows, not your hands.
Exercise variations: You can perform reverse flys standing, seated, chest-supported, or lying face down on an incline bench.
Easier variation: Do the movement without weights first, then add light dumbbells.
Harder variation: Use a slow tempo with a 2-second pause at the top.
10. Incline Reverse Fly
Best for: Making reverse flys stricter and easier to control.
Muscles worked: Rear delts, rhomboids, middle traps, lower traps, and upper back.
Equipment needed: Two light dumbbells and an incline bench or safe chest-supported setup.
Why it stands out: Chest support reduces body swing, which helps you feel the rear delts and upper back more clearly. This is a good option if regular bent-over reverse flys turn into momentum.
Suggested sets and reps: Do 2 to 4 sets of 12 to 15 reps.
Beginners: Use the lightest dumbbells available and stop before shoulder discomfort.
Intermediate: Use a smooth arc and controlled squeeze at the top.
Advanced: Use partials after your full reps only if your form stays clean.
Rest: Rest 45 to 75 seconds between sets.
How to do it:
- Lie chest-down on an incline bench.
- Hold a light dumbbell in each hand.
- Let your arms hang straight down.
- Keep your neck neutral and chest supported.
- Raise the dumbbells out to the sides with a slight elbow bend.
- Pause briefly at the top.
- Lower the dumbbells slowly.
Common mistakes: Lifting the chest off the bench, using too much weight, shrugging, and forcing the arms too high.
Expert tip: Keep the movement small and clean. Rear-delt exercises do not need heavy weight to work well.
Exercise variations: Try palms-facing, thumbs-up, or slightly angled raises depending on what feels best on your shoulders.
Easier variation: Use no weight or very light dumbbells.
Harder variation: Use a 3-second lowering phase on each rep.
11. Dumbbell Shrug
Best for: Building the upper traps and improving loaded shoulder control.
Muscles worked: Upper traps, levator scapulae, grip muscles, forearms, and upper back.
Equipment needed: Two dumbbells.
Why it stands out: Shrugs directly train the upper traps, which are often underloaded in home dumbbell workouts. They are simple, but they work best when done with control instead of rolling the shoulders.
Suggested sets and reps: Do 3 to 4 sets of 10 to 15 reps.
Beginners: Use moderate dumbbells and pause at the top without forcing your neck forward.
Intermediate: Use heavier dumbbells while keeping each rep smooth.
Advanced: Use a 2-second top hold and slow lowering.
Rest: Rest 60 to 90 seconds between sets.
How to do it:
- Stand tall with one dumbbell in each hand.
- Keep your arms straight at your sides.
- Brace your core and keep your neck neutral.
- Lift your shoulders straight up toward your ears.
- Pause briefly at the top.
- Lower your shoulders slowly.
- Repeat without rolling your shoulders forward or backward.
Common mistakes: Rolling the shoulders, bending the elbows, jutting the head forward, and bouncing through reps.
Expert tip: Move straight up and straight down. Shoulder circles are not needed.
Exercise variations: You can do standard shrugs, incline shrugs, one-arm shrugs, or farmer-hold shrugs.
Easier variation: Use lighter dumbbells and shorter sets.
Harder variation: Hold the top position for 3 seconds on each rep.
12. Dumbbell Romanian Deadlift
Best for: Training the posterior chain and strengthening the hip-hinge pattern.
Muscles worked: Hamstrings, glutes, erector spinae, lats, traps, forearms, and core.
Equipment needed: Two dumbbells.
Why it stands out: The dumbbell Romanian deadlift is not a row, but it belongs in a complete dumbbell back workout because your back must brace hard while your hipmain movement. NASM lists common mistakes such as rounding the lower back, bending the knees too much, using jerky movement, and choosing dumbbells that are too heavy for proper spinal position.
Suggested sets and reps: Do 3 to 4 sets of 8 to 12 reps.
Beginners: Use light dumbbells and practice the hip hinge before increasing weight.
Intermediate: Lower the dumbbells to mid-shin while keeping your spine neutral.
Advanced: Use heavier dumbbells, slower eccentrics, or a 1-second pause near the bottom.
Rest: Rest 90 to 120 seconds between sets.
How to do it:
- Stand tall with a dumbbell in each hand.
- Keep your feet about hip-width apart.
- Soften your knees slightly.
- Push your hips back as the dumbbells travel down your thighs.
- Keep the dumbbells close to your body.
- Stop when you feel a strong hamstring stretch without rounding your back.
- Drive your hips forward to stand tall again.
Common mistakes: Squatting instead of hinging, rounding the back, letting the dumbbells drift forward, looking up too much, and rushing the lowering phase.
Expert tip: Imagine closing a car door with your hips while keeping your ribs down and spine long.
Exercise variations: You can do standard dumbbell RDLs, staggered-stance RDLs, single-leg RDLs, or suitcase RDLs.
Easier variation: Practice bodyweight hip hinges or use one light dumbbell held in front of your thighs.
Harder variation: Use a staggered-stance RDL or single-leg RDL.
Sample Dumbbell Back Workout at Home
Use this workout 1 to 2 times per week. Keep 1 to 3 reps in reserve on most sets. Rest at least one full day before training the same muscles hard again.
| Exercise | Sets | Reps | Rest |
|---|---|---|---|
| Single-Arm Supported Dumbbell Row | 3 | 8 to 12 per side | 60 to 90 sec |
| Chest-Supported Dumbbell Row | 3 | 10 to 12 | 90 sec |
| Dumbbell Pullover | 3 | 10 to 15 | 60 to 90 sec |
| Dumbbell Reverse Fly | 2 to 3 | 12 to 15 | 45 to 75 sec |
| Dumbbell Romanian Deadlift | 3 | 8 to 12 | 90 to 120 sec |
| Dumbbell Shrug | 2 to 3 | 10 to 15 | 60 to 90 sec |
For beginners, choose 4 exercises and do 2 sets each. For intermediate lifters, use the full workout and add reps before adding more weight. For advanced lifters, use heavier rows, slower lowering phases, pauses, and 10 to 16 total weekly hard sets for your back depending on recovery.
How to Progress Dumbbell Back Exercises at Home
The simplest way to progress is to add reps first. For example, if your target is 8 to 12 reps, keep the same weight until you can complete 12 clean reps on every set. Then increase the dumbbell weight and return to the lower end of the rep range.
You can also progress by slowing the lowering phase, pausing at the top of rows, increasing range of motion, adding one extra set, or reducing momentum. At home, better control often matters more than chasing heavier weight too quickly.
A good progression rule is simple: only make the exercise harder when your last set still looks controlled.
Common Dumbbell Back Exercise Mistakes
The most common mistake is using weights that are too heavy. Heavy dumbbells are useful only if you can control them. If you have to twist, bounce, or round your back to finish the set, the weight is not helping your back grow better.
Another mistake is turning every row into a shrug. Your shoulders should not climb toward your ears on every rep. Keep your neck long, pull through your elbows, and let your shoulder blades move naturally without forcing them.
Many people also rush the lowering phase. The way down is part of the rep. Lower the dumbbells with control so your back muscles stay under tension.
Safety Tips for Dumbbell Back Training at Home
Warm up before lifting. A few minutes of easy movement, bodyweight hip hinges, arm circles, light rows, and light reverse flys can help your body prepare for the session.
Keep your training area clear. Dumbbells should not roll under your feet, and your bench, chair, or support surface must be stable before you lean on it.
Stop the exercise if you feel sharp pain, numbness, diznusual symptoms. Do not force through symptoms to finish a set. Mayo Clinic’s strength training guidance also recommends stopping an exercise if it causes pain and using less weight when needed.
Frequently Asked Questions
Can dumbbell back exercises at home replace gym machines?
Dumbbell back exercises can replace many machine-based rows and upper-back exercises, but they do not perfectly replace vertical pulling movements like pull-ups and lat pulldowns. A complete home plan can still build a strong back with rows, pullovers, reverse flys, shrugs, and Romanian deadlifts.
How many dumbbell back exercises should I do in one workout?
Most people do well with 4 to 6 back exercises in one workout. A balanced session might include one heavy row, one supported row, one lat-focused movement, one rear-delt exercise, and one hinge or trap movement.
How often should I train back at home?
Training back 2 times per week works well for many people. Beginners may start with one focused back workout plus one full-body workout. More experienced lifters can split the weekly volume across two pull or upper-body sessions.
What dumbbell weight should I use for back exercises?
Use a weight that lets you complete the target reps with control and about 1 to 3 reps left in reserve. Rows usually allow heavier dumbbells than reverse flys. For reverse flys and rear-delt rows, lighter weights are usually better.
Are dumbbell rows enough for lats?
Dumbbell rows can train the lats well, especially when you pull your elbow toward your hip. However, your lats also benefit from overhead pulling angles. If possible, you can add pull-ups, assisted pull-ups, or band pulldowns later.
Should I train lower back with dumbbells?
You can train the lower-back area indirectly with dumbbell Romanian deadlifts, bent-over rows, and hip-hinge variations. The goal is not to aggressively bend and extend your spine. Keep your spine neutral and let your hips, glutes, hamstrings, and bracing muscles do the work.
Conclusion
Dumbbell back exercises at home can build real muscle when your workout includes rows, pullovers, rear-delt work, shrugs, and hip-hinge movements. Start with exercises you can control, use a full range of motion, and progress gradually by adding reps, weight, pauses, or slower tempo.
The best home back workout is not the one with the most exercises. It is the one you can perform consistently with strong form, enough effort, and steady progression.
References
- CDC Adult Physical Activity Guidelines
- ACSM Resistance Training Guidelines Update
- ACE Single Arm Row Exercise Guide
- Cleveland Clinic Dumbbell Rows Guide
- Mayo Clinic Weight Training Do’s and Don’ts
- Mayo Clinic Bent-Over Row With Dumbbell
- Mayo Clinic Reverse Fly With Dumbbell
- NASM Dumbbell Romanian Deadlift
This content is for informational purposes only and is not a substitute for professional medical advice.
7 thoughts on “12 Dumbbell Back Exercises at Home to Build Muscle”