

Resistance band exercises for women can build full-body strength when the bands provide enough resistance and the exercises are progressed over time. Bands can train your legs, glutes, back, chest, shoulders, arms, and core without requiring a full gym setup.
Below are 12 exercises covering the major muscle groups, with practical sets and reps, exact technique, common mistakes, progression options, and a verified video demonstration for each movement.
Are Resistance Band Exercises Effective for Women?
Yes. Resistance bands can be an effective strength-training tool rather than simply a warm-up accessory.
A 2026 systematic review and meta-analysis available through PubMed included 126 studies and 4,019 women and found that resistance training significantly improved muscular strength in both premenopausal and postmenopausal women. The researchers concluded that general resistance-training guidelines can broadly apply to women while still being individualized to the person.
Another systematic review available through PubMed found that elastic resistance training produced strength improvements similar to conventional resistance equipment for both the upper and lower body.
The updated American College of Sports Medicine position stand also recognizes elastic-band and home-based resistance training as effective ways to improve strength, muscle size, and physical function.
The key is progression. A band that remains very easy will eventually provide too little challenge.
What You Need Before Starting
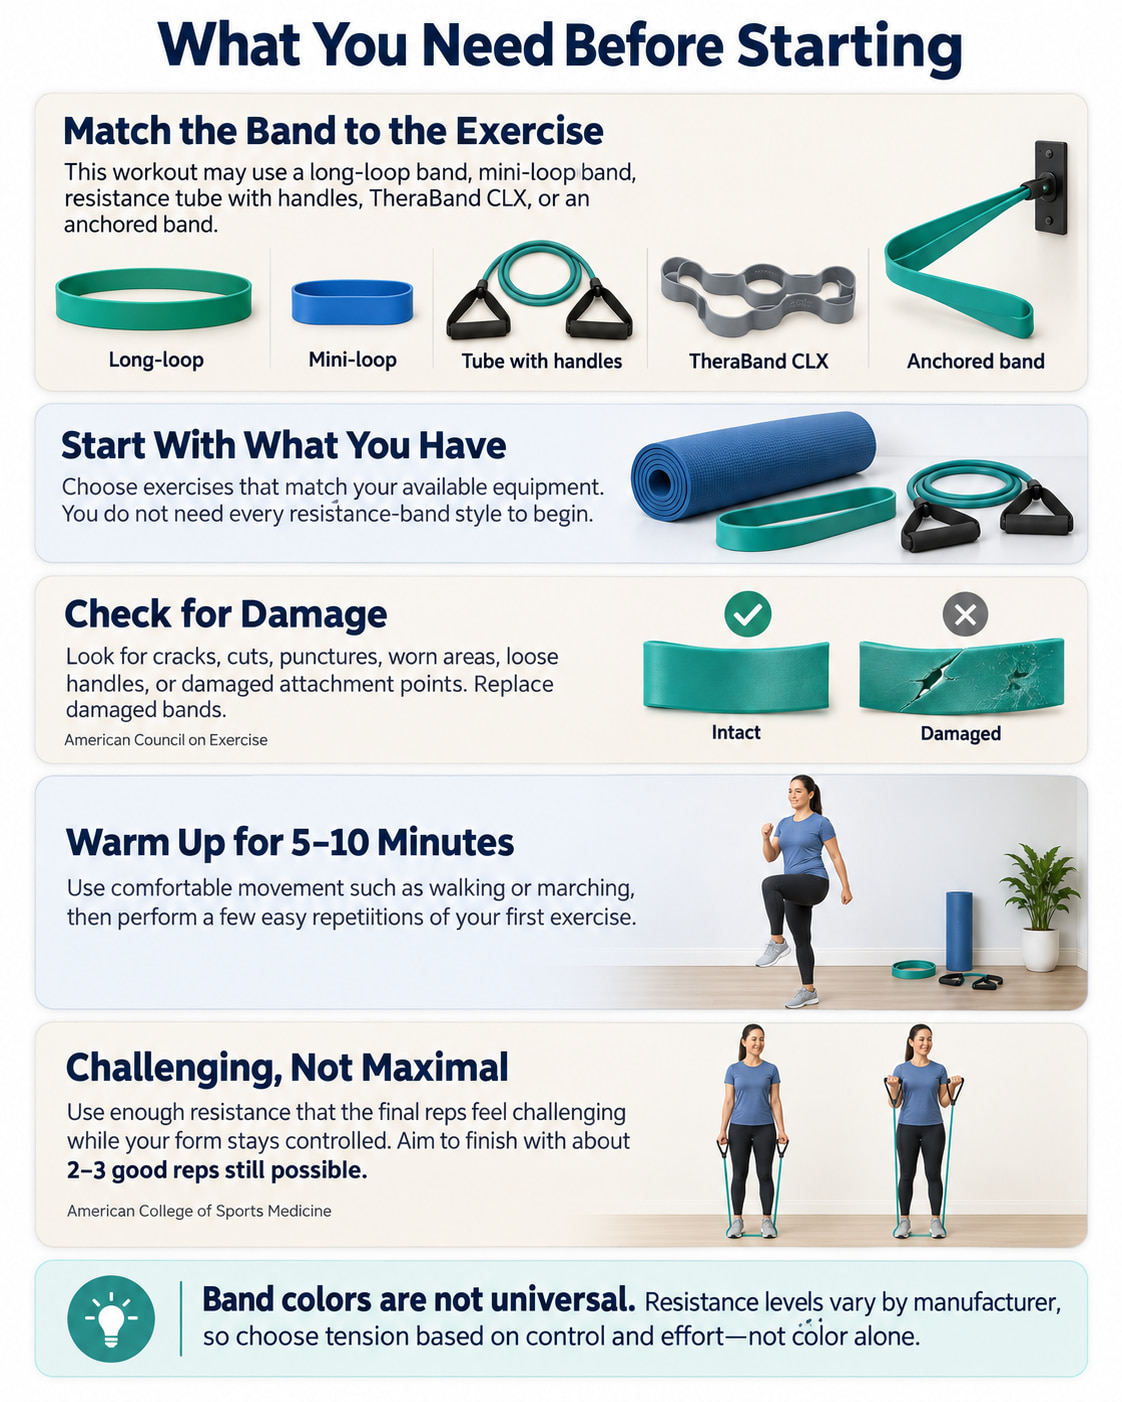
This workout uses several common band styles:
- Long-loop resistance band
- Mini-loop band
- Resistance tube with handles
- TheraBand CLX for the biceps curl
- A secure anchor for the chest press and Pallof press
You do not need every type to begin. Choose the exercises that match the equipment you already own.
Before training, inspect your bands for cracks, cuts, punctures, worn areas, or damaged handles and attachment points. The American Council on Exercise recommends replacing damaged bands, avoiding uncontrolled snap-back, and following the manufacturer’s stretching limits.
Warm up with about 5–10 minutes of comfortable movement, then perform a few easy repetitions of your first exercise before increasing the resistance.
How Much Resistance Should You Use?
Choose a band that lets you complete the planned repetitions with controlled form while making the final few reps challenging.
For most sets in this workout, aim to finish feeling that you could perform roughly 2–3 additional good repetitions if necessary. The American College of Sports Medicine notes that training to complete muscular failure is not required and identifies about 2–3 repetitions in reserve as one practical way to achieve sufficient effort.
Do not choose resistance based only on band color. Resistance levels and color systems vary between manufacturers.
12 Resistance Band Exercises for Women to Build Strength
These 12 resistance band exercises for women target the legs, glutes, back, chest, shoulders, arms, and core for balanced full-body strength.
Use controlled form, choose a challenging band, and progress resistance gradually as the exercises become easier.
1. Resistance Band Squat
Best for: Building foundational lower-body strength.
Muscles worked: Quadriceps and glutes, with assistance from the hamstrings, adductors, calves, and trunk muscles.
Equipment needed: Resistance tube with handles.
Sets, reps, and rest: 2–3 sets of 8–15 reps. Rest 60–90 seconds.
How to Do It
- Stand on the middle of the band with your feet about shoulder-width apart.
- Hold the handles beside your shoulders with the band running behind your arms.
- Brace your core, keep your chest comfortably lifted, and sit your hips down and back.
- Lower through a comfortable squat while keeping your knees tracking in the same direction as your feet.
- Press through your feet to return to standing without leaning backward.
Common mistakes: Avoid allowing the knees to collapse inward, lifting the heels, rounding the torso, or using a band so strong that you cannot squat through a controlled range.
Progression or regression: Start with a lighter band or shallower comfortable squat. Progress by using greater resistance while maintaining the same form and range of motion.
2. Long-Loop Resistance Band Good Morning
Best for: Training the hip-hinge pattern and strengthening the posterior chain.
Muscles worked: Hamstrings and glutes, with the spinal erectors and core helping stabilize the torso.
Equipment needed: Long-loop resistance band.
Sets, reps, and rest: 2–3 sets of 8–15 reps. Rest 60–90 seconds.
How to Do It
- Stand approximately shoulder-width apart on the bottom of a long-loop band.
- Position the upper portion securely across your upper back and shoulders.
- Keep a slight bend in your knees, brace your trunk, and begin pushing your hips backward.
- Hinge forward while maintaining a neutral back until you reach a comfortable hamstring stretch or your torso approaches parallel to the floor.
- Squeeze your glutes and drive your hips forward to stand tall again.
Common mistakes: Do not turn the movement into a squat, round your back, excessively bend your knees, or lean backward at the top.
Progression or regression: Use a lighter loop and a shorter hinge initially. Increase resistance once you can consistently control both the lowering and standing phases.
3. TB12 Resistance Band Reverse Lunge
Best for: Single-leg strength, coordination, and lower-body control.
Muscles worked: Quadriceps and glutes, with assistance from the hamstrings and core.
Equipment needed: Large loop resistance band.
Sets, reps, and rest: 2–3 sets of 8–12 reps per side. Rest 60–90 seconds.
How to Do It
- Position one end of a large loop band beneath the arch of your lead foot.
- Loop the other end around both upper arms at approximately mid-biceps and fold your arms in front of you as demonstrated.
- Brace your core and step the free leg backward.
- Lower under control, allowing the back knee to approach the floor while the front knee remains aligned with the foot.
- Push through your feet to return to the starting position.
- Complete the set before changing sides.
Common mistakes: Avoid letting the front knee collapse inward, losing your torso position, taking an unstable step, or rushing between repetitions.
Progression or regression: Begin with a shallower lunge or lighter band. Progress by increasing the comfortable range of motion or band resistance.
4. Mini-Band Glute Bridge
Best for: Glute strength and learning to maintain hip and knee alignment.
Muscles worked: Gluteus maximus, with assistance from the hamstrings and lateral hip muscles.
Equipment needed: Mini-loop resistance band.
Sets, reps, and rest: 2–3 sets of 10–15 reps. Rest 45–75 seconds.
How to Do It
- Place a mini band just above your knees and lie on your back.
- Bend your knees and position your feet approximately hip-width apart.
- Apply gentle outward pressure against the band so your knees remain aligned.
- Press through your feet and raise your hips into a controlled bridge.
- Finish with your hips extended without excessively arching your lower back.
- Lower slowly while maintaining light outward tension on the band.
Common mistakes: Avoid letting your knees cave inward, turning your feet excessively outward, pushing your hips higher by arching your back, or bouncing through repetitions.
Progression or regression: Use a lighter mini band or bodyweight bridge first. Progress to a stronger band when you can maintain knee position throughout every rep.
5. Mini-Band Side Steps
Best for: Strengthening the lateral hip muscles and improving lower-body control.
Muscles worked: Gluteus medius and other hip abductors, with the glutes and quadriceps assisting.
Equipment needed: Mini-loop resistance band.
Sets, reps, and rest: 2–3 sets of 8–12 steps each direction. Rest 45–75 seconds.
How to Do It
- Place a mini band just above your knees.
- Stand about shoulder-width apart with your toes facing forward.
- Push your hips slightly backward and bend your knees into a shallow athletic stance.
- Maintain gentle outward pressure against the band.
- Take small, controlled steps sideways without bringing your feet completely together.
- Complete the planned steps in one direction, then return the other way.
Common mistakes: Avoid allowing the knees to collapse inward, dragging the trailing foot, standing upright between steps, or turning the toes outward to make the exercise easier.
Progression or regression: Start with a lighter band and smaller steps. Progress by increasing band resistance while preserving the same controlled stance.
6. Long-Loop Resistance Band Bent-Over Row
Best for: Building back strength and balancing pressing exercises.
Muscles worked: Latissimus dorsi, rhomboids, middle trapezius, rear deltoids, and biceps.
Equipment needed: Long-loop resistance band.
Sets, reps, and rest: 2–3 sets of 8–15 reps. Rest 60–90 seconds.
How to Do It
- Stand approximately shoulder-width apart with the center of the band securely beneath both feet.
- Hold the opposite portion of the band with both hands.
- Push your hips backward and hinge forward while maintaining a neutral back.
- Begin with your arms extended toward the floor.
- Drive your elbows upward and back, bringing your hands toward the bottom of your rib cage.
- Briefly squeeze your upper-back muscles, then lower your arms under control.
Common mistakes: Avoid rounding your back, repeatedly lifting and lowering your torso, shrugging toward your ears, or jerking the band to finish each repetition.
Progression or regression: Use less band tension or a lighter band first. Progress by increasing resistance without shortening the rowing range.
7. Standing Resistance Band Chest Press
Best for: Training the chest without dumbbells or a bench.
Muscles worked: Pectoralis major, triceps, and anterior deltoids.
Equipment needed: Resistance band and a stable chest-height anchor.
Sets, reps, and rest: 2–3 sets of 8–15 reps. Rest 60–90 seconds.
How to Do It
- Secure the band to a stable anchor behind you at approximately chest height.
- Face away from the anchor and hold one end or handle in each hand.
- Step forward into a stable staggered stance until there is light starting tension.
- Begin with your hands near chest level and your elbows bent.
- Brace your trunk and press both hands straight forward until your arms extend without forcefully locking the elbows.
- Slowly bend your elbows and return to the starting position.
Common mistakes: Never use an insecure anchor. Also avoid excessively arching your back, leaning forward to move the band, shrugging, or allowing the band to snap backward.
Progression or regression: Move slightly closer to the anchor or use a lighter band to regress. Increase resistance only when you can keep your torso stable throughout the press.
8. Long-Loop Resistance Band Overhead Press
Best for: Building shoulder and triceps strength.
Muscles worked: Anterior and lateral deltoids and triceps, with the upper back and core providing stability.
Equipment needed: Long-loop resistance band.
Sets, reps, and rest: 2–3 sets of 8–15 reps. Rest 60–90 seconds.
How to Do It
- Stand securely on the middle of a long-loop band with both feet.
- Hold the opposite side of the band with your hands at shoulder level.
- Brace your core and keep your ribs controlled.
- Press both hands overhead until your arms extend and your upper arms finish near your ears.
- Keep your torso tall rather than leaning backward.
- Lower the band slowly back to shoulder level.
Common mistakes: Avoid excessively arching the lower back, using leg drive, leaning backward, or allowing the band to pull your arms rapidly downward.
Progression or regression: Choose a lighter band if you cannot press overhead without changing your torso position. Progress to more resistance once every repetition remains controlled.
9. Resistance Band Pull-Apart
Best for: Upper-back and rear-shoulder strength.
Muscles worked: Rear deltoids, rhomboids, and middle trapezius.
Equipment needed: Light resistance band.
Sets, reps, and rest: 2–3 sets of 10–20 reps. Rest 45–75 seconds.
How to Do It
- Stand tall and hold a light band in both hands.
- Extend your arms straight in front of you at approximately shoulder height.
- Keep your shoulders relaxed away from your ears.
- Pull your hands apart by moving your arms outward to the sides.
- Gently squeeze your shoulder blades together without arching your lower back.
- Return slowly to the starting position.
Common mistakes: Avoid shrugging, substantially bending your elbows, using momentum, or selecting so much resistance that you cannot separate your hands through a useful range.
Progression or regression: Widening your starting hand position usually reduces the challenge. Use more resistance or a slightly narrower grip only when you can keep your shoulders controlled.
10. Bilateral TheraBand CLX Biceps Curl
Best for: Direct biceps strengthening.
Muscles worked: Biceps brachii, brachialis, and brachioradialis.
Equipment needed: TheraBand CLX.
Sets, reps, and rest: 2–3 sets of 10–15 reps. Rest 45–75 seconds.
How to Do It
- Stand hip-width apart on the center of the TheraBand CLX.
- Place one end grip loop securely around each hand.
- Stand tall with your palms facing forward and your upper arms beside your torso.
- Keep your elbows near your sides and curl your hands upward by bending your elbows.
- Pause briefly near the top without allowing the upper arms to swing forward.
- Lower your hands slowly until your arms return to the starting position.
Common mistakes: Avoid swinging your torso, allowing your elbows to travel forward, bending your wrists, or dropping quickly into the lowering phase.
Progression or regression: Adjust the CLX resistance according to the manufacturer’s setup. Choose resistance that allows your elbows and torso to remain still.
11. Long-Loop Resistance Band Overhead Triceps Extension
Best for: Direct triceps training.
Muscles worked: Triceps brachii, particularly the long head.
Equipment needed: Long-loop resistance band.
Sets, reps, and rest: 2–3 sets of 10–15 reps. Rest 45–75 seconds.
How to Do It
- Take a staggered stance and secure the bottom of the long-loop band beneath your rear foot.
- Hold the other end with both hands behind your head.
- Point your elbows upward and brace your core.
- Keep your upper arms as still as practical while straightening your elbows.
- Extend your hands overhead without leaning or using momentum.
- Slowly bend your elbows to return your hands behind your head.
Common mistakes: Avoid excessively flaring or moving the elbows, arching the lower back, turning the exercise into a shoulder movement, or letting the band snap downward.
Progression or regression: Use a lighter band if you cannot keep your torso and upper arms controlled. Add resistance only after you can perform the full set smoothly.
12. Standing Resistance Band Pallof Press
Best for: Training the core to resist unwanted rotation.
Muscles worked: Obliques and deeper trunk stabilizers, with the shoulders and glutes contributing to body position.
Equipment needed: Resistance band and secure chest-height anchor.
Sets, reps, and rest: 2–3 sets of 8–12 reps per side. Rest 45–75 seconds.
How to Do It
- Secure the band to a stable anchor at approximately chest height.
- Stand sideways to the anchor with your feet about shoulder-width apart.
- Hold the band in both hands against the center of your chest and step away until you feel tension.
- Brace your trunk and keep your shoulders and hips facing straight ahead.
- Press your hands directly forward until your arms extend.
- Resist the band’s pull without allowing your torso to rotate toward the anchor.
- Slowly bring your hands back to your chest, then complete the set before changing sides.
Common mistakes: Avoid rotating toward the anchor, leaning sideways, using excessive resistance, shrugging, or allowing the band to pull your hands back quickly.
Progression or regression: Stand closer to the anchor for less resistance. Move farther away or use a stronger band once you can keep your torso completely controlled.
Sample Resistance Band Workout for Women
You do not need to perform all 12 exercises every session. Splitting them across two full-body workouts keeps sessions manageable while still training the major muscle groups.
Workout A
| Exercise | Sets | Reps |
|---|---|---|
| Resistance Band Squat | 2–3 | 8–15 |
| Mini-Band Glute Bridge | 2–3 | 10–15 |
| Band Bent-Over Row | 2–3 | 8–15 |
| Band Chest Press | 2–3 | 8–15 |
| Band Pull-Apart | 2 | 10–20 |
| Pallof Press | 2–3 | 8–12/side |
Workout B
| Exercise | Sets | Reps |
|---|---|---|
| Band Good Morning | 2–3 | 8–15 |
| Band Reverse Lunge | 2–3 | 8–12/side |
| Mini-Band Side Steps | 2 | 8–12 steps/direction |
| Band Overhead Press | 2–3 | 8–15 |
| CLX Biceps Curl | 2 | 10–15 |
| Band Overhead Triceps Extension | 2 | 10–15 |
Weekly Schedule
A simple schedule could look like:
- Monday: Workout A
- Thursday: Workout B
Or, if you already recover well from two sessions:
- Monday: Workout A
- Wednesday: Workout B
- Saturday: Workout A
- Switch the starting workout the following week.
The U.S. Department of Health and Human Services recommends muscle-strengthening activity involving the major muscle groups on at least two days each week.
For most exercises, rest approximately 60–90 seconds between working sets. Taking longer is fine when a demanding squat, lunge, row, or press leaves you unable to perform the next set with good technique.
How to Progress With Resistance Bands
Strength training needs to become gradually more challenging.
You can progress an exercise by:
- Increasing repetitions within the prescribed range.
- Moving to a stronger band.
- Increasing starting band tension when the exercise and manufacturer allow it.
- Adding another working set.
- Improving your range of motion.
- Progressing from an easier variation to a more challenging one.
A straightforward approach is to use a double-progression system.
For example, if an exercise calls for 8–15 repetitions:
- Begin with a resistance you can control for around 8–10 reps.
- Gradually work toward 15 controlled reps.
- When you can perform all planned sets at the top of the range while still having roughly 2–3 good reps available, increase the resistance.
- With the stronger band, your repetitions may initially drop toward the bottom of the range again.
The American College of Sports Medicine emphasizes progressive resistance training and reports that elastic-band training can improve strength and muscle size.
Common Resistance Band Training Mistakes
Using a Band That Is Too Light
If you can perform far more than the planned repetitions without meaningful effort, the exercise may not provide enough stimulus to keep building strength. Gradually increase resistance rather than staying with the same easy band indefinitely.
Using Too Much Resistance
More tension is not automatically better. Reduce the resistance when it causes shortened range of motion, poor posture, uncontrolled repetitions, or changes the exercise into a different movement.
Letting the Band Snap Back
Control both directions of every repetition. Do not simply release tension at the end of the lifting phase.
Ignoring Band Condition
Small cuts and worn areas can worsen under tension. The American Council on Exercise recommends inspecting resistance bands before use and replacing damaged equipment rather than continuing to train with compromised bands.
Using an Unstable Anchor
For anchored exercises such as chest presses and Pallof presses, secure the band to an attachment point designed to tolerate the pulling direction and resistance being used. Test the setup gently before beginning the working set.
Never Progressing
Doing the same number of repetitions with the same band for months may eventually become maintenance rather than progressive training. Track your sets, reps, resistance, and exercise variation.
Benefits of Resistance Band Training for Women
Builds Full-Body Strength
Bands provide external resistance to the muscles just as other resistance-training tools do. Research comparing elastic resistance with conventional resistance methods has found that both can improve upper- and lower-body strength.
Makes Home Strength Training Practical
Resistance bands require little storage space and can provide exercises for nearly every major muscle group. The American College of Sports Medicine recognizes both elastic-band and home-based resistance training as useful approaches for improving strength and physical function.
Provides Multiple Resistance Levels
Changing bands or altering an appropriate setup makes it possible to scale the same movement for beginners and more experienced exercisers.
Supports Strength Across Adulthood
Research in women has found meaningful strength improvements in both premenopausal and postmenopausal adults, reinforcing the value of resistance training across adulthood.
Safety Tips
- Inspect bands before every workout.
- Follow the manufacturer’s instructions and stretching limits.
- Keep bands away from sharp or abrasive surfaces.
- Test anchors before applying substantial resistance.
- Never intentionally release a stretched band.
- Use controlled repetitions instead of jerking against the resistance.
- Keep breathing during each exercise rather than deliberately holding your breath.
- Reduce resistance if you cannot maintain the intended setup and range of motion.
- Stop exercising if you experience sharp pain, numbness, dizziness, chest pain, or other unusual symptoms.
If you have an injury, have recently had surgery, are pregnant or recently postpartum, or have a health condition that affects exercise, get individualized guidance when needed.
Frequently Asked Questions
Can women build muscle with resistance bands?
Yes. Resistance bands provide external resistance and can support muscle and strength development when training is challenging enough and progressively overloaded. Current American College of Sports Medicine guidance recognizes elastic resistance as a useful way to improve strength and muscle size.
Are resistance bands good for beginners?
Yes. Bands are particularly useful for beginners because resistance can be adjusted and many movements can be practiced at home. Start with a level that lets you learn the movement without fighting the band.
How often should women use resistance bands?
For a full-body program, 2–3 strength sessions per week works well for many people. At minimum, U.S. physical activity guidance recommends strengthening the major muscle groups on at least two days each week.
How many resistance band exercises should I do in one workout?
Around 5–7 well-chosen exercises can cover a full-body session efficiently. You do not need to perform all 12 movements every time. Prioritize exercises for the legs or hips, a push, a pull, and core work, then add smaller accessory movements if useful.
How do I know when I need a stronger band?
Consider increasing resistance when you can repeatedly perform the top end of your prescribed repetition range with full control and several additional repetitions still feel possible.
Do not upgrade simply because a certain number of weeks has passed. Your actual performance should determine progression.
Are resistance bands as good as weights?
They can be very effective for strength training. Research comparing elastic resistance with conventional resistance equipment has found similar improvements in upper- and lower-body strength.
Free weights and machines still have advantages for precisely measuring and progressively loading heavier resistance, so bands do not have to replace them if you enjoy gym-based training.
Conclusion
Resistance band exercises for women can provide a practical full-body strength workout without requiring a large amount of equipment. Focus on the basic training principles that matter most: use enough resistance, perform each exercise through a controlled range, train consistently, and gradually progress the challenge.
Start with six or so exercises from the routine, master the technique, and record your sets, reps, and band resistance. Once the current workload becomes comfortable, progress one variable at a time instead of simply rushing through more repetitions.
This content is for informational purposes only and is not a substitute for medical advice.