The dumbbell glute bridge is a floor-based hip-extension exercise that strengthens the glutes by adding external resistance across the hips. To perform it correctly, brace your midsection, keep both feet firmly planted, lift until your shoulders, hips, and knees form a straight line, and stop before your lower back arches.
This exercise is a practical step up from the bodyweight bridge. It requires only a dumbbell and an optional exercise mat, making it suitable for home and gym workouts.
This guide explains proper form, dumbbell placement, muscles worked, common mistakes, useful variations, and how to program the movement safely.
What Is a Dumbbell Glute Bridge?
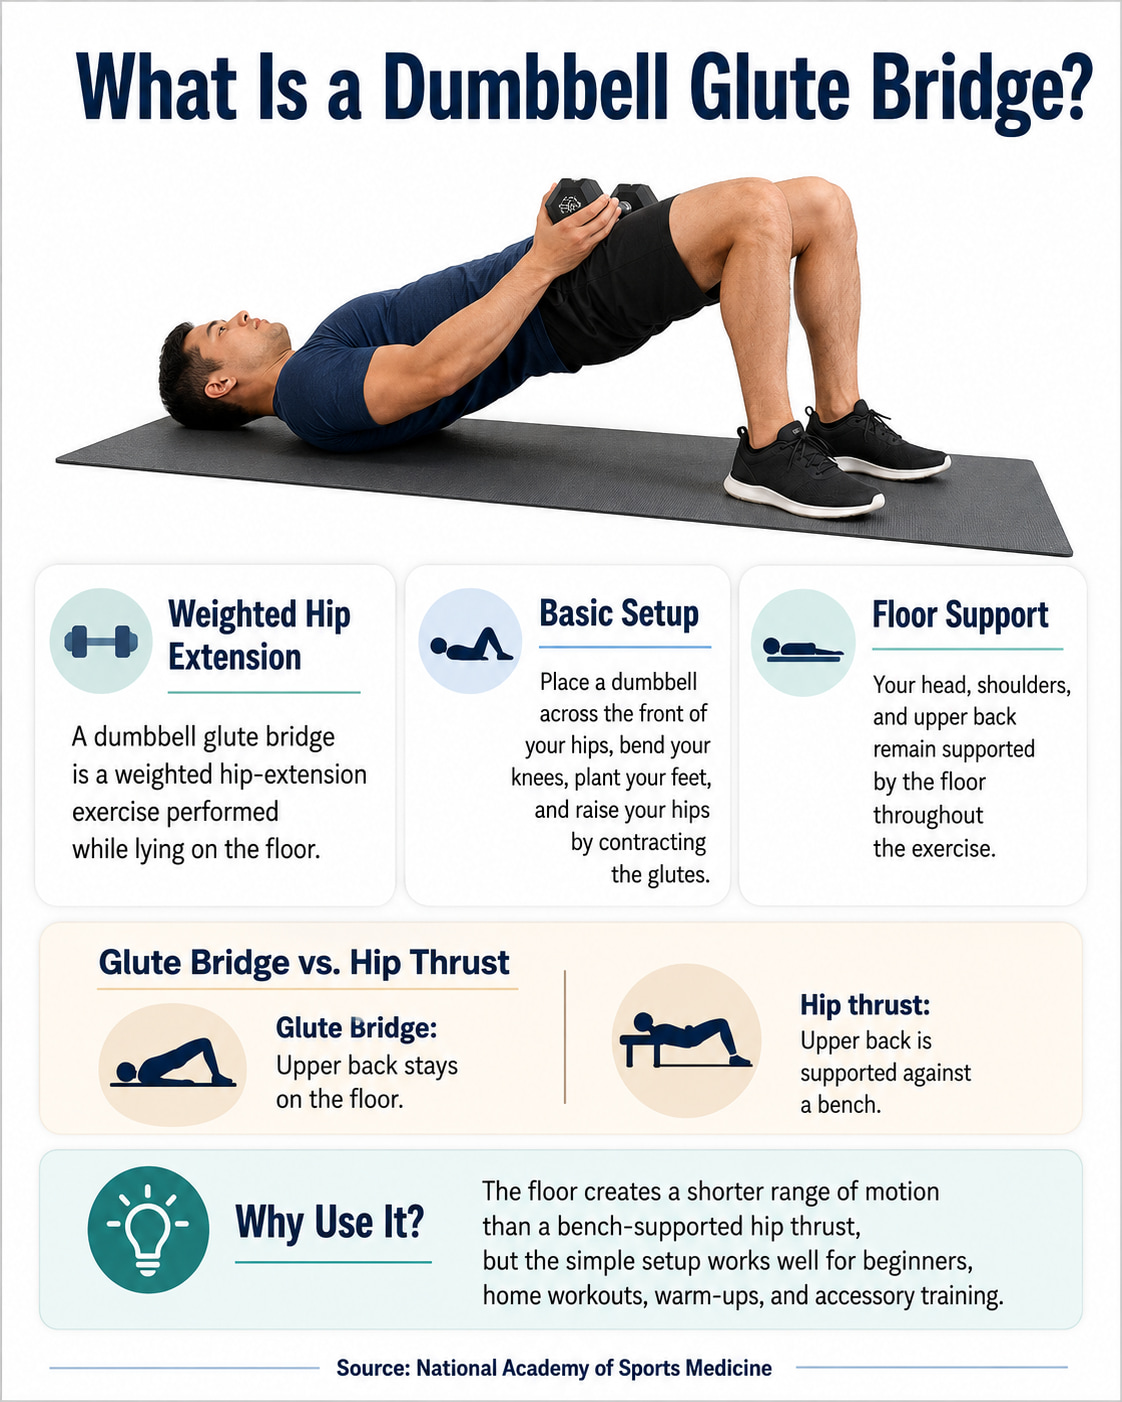
A dumbbell glute bridge is a weighted hip-extension exercise performed while lying on the floor. You position a dumbbell across the front of your hips, bend your knees, plant your feet, and raise your hips by contracting the glutes.
Your head, shoulders, and upper back remain supported by the floor throughout the exercise.
The floor position separates the glute bridge from the hip thrust. According to the National Academy of Sports Medicine, a glute bridge is performed on the ground, while a hip thrust is performed with the upper back supported against a bench.
The floor limits how far your hips can descend, so the dumbbell glute bridge generally has a shorter range of motion than a bench-supported hip thrust. However, its simpler setup makes it useful for beginners, home workouts, warm-ups, and accessory training.
Dumbbell Glute Bridge at a Glance
| Category | Details |
|---|---|
| Main purpose | Glute strength and muscle development |
| Primary muscle | Gluteus maximus |
| Assisting muscles | Hamstrings and other hip extensors |
| Stabilizing muscles | Abdominals and pelvic stabilizers |
| Equipment | One dumbbell, exercise mat, optional padding |
| Difficulty | Beginner to intermediate |
| Recommended sets | 2–4 |
| Recommended reps | 8–15 |
| Rest | 60–120 seconds |
| Main form cue | Lift with the glutes, not the lower back |
Dumbbell Glute Bridge Muscles Worked
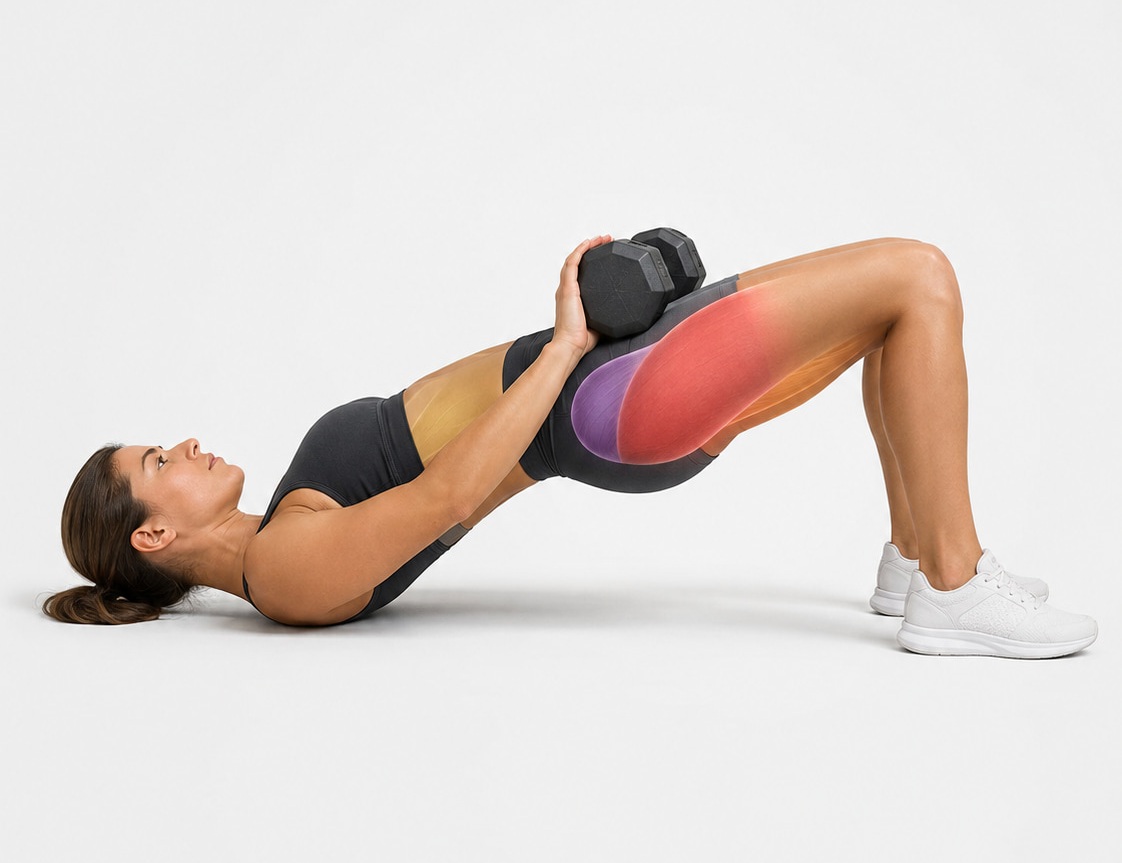
1. Gluteus Maximus
The gluteus maximus is the main muscle trained during the dumbbell glute bridge.
Its primary roles include extending and externally rotating the hip. During the bridge, it contracts to move the hips from a flexed position toward full extension.
The NCBI Bookshelf overview of gluteus maximus anatomy identifies hip extension as one of the muscle’s main actions.
2. Hamstrings
The hamstrings assist the gluteus maximus with hip extension.
They should contribute to the exercise, but they should not consistently feel like the only muscles doing the work. Excessive hamstring involvement may indicate that the feet are too far from the hips or that the glutes are not maintaining tension.
The hamstrings also bend the knees, which is why their contribution changes when you adjust your foot position.
3. Abdominal Muscles
The abdominal muscles help stabilize the trunk and pelvis while the hips move.
Keeping the abdominals braced can help control the ribs and limit excessive lower-back arching at the top of the bridge.
The abdominals are stabilizers in this exercise rather than the main muscles producing the movement.
4. Gluteus Medius and Minimus
The gluteus medius and minimus may help stabilize the pelvis and keep the thighs aligned, but they are not the main hip extensors during a standard two-leg bridge.
Their primary anatomical role is hip abduction. Adding a resistance band around the thighs can increase the demand on the muscles that help keep the knees from collapsing inward.
How to Do a Dumbbell Glute Bridge With Proper Form
Equipment needed: One dumbbell, an exercise mat, and optional padding for the hips.
Sets, reps, and rest: Perform 2–4 sets of 8–15 controlled repetitions. Rest for approximately 60–120 seconds between sets.
Setup
- Sit on the floor with your knees bent and the dumbbell close to your hips.
- Position the dumbbell horizontally across the front of your hips.
- Lie back so your head, shoulders, and upper back rest comfortably on the floor.
- Place your feet approximately hip-width apart with the toes pointing generally forward.
- Start with your heels about 6–8 inches from your glutes, then adjust the distance for your proportions.
- Hold the dumbbell securely with both hands so it cannot roll.
- Brace your abdominal muscles and gently bring your ribs toward your pelvis.
Movement
- Exhale and press both feet firmly into the floor.
- Contract your glutes and raise your hips in a controlled motion.
- Continue until your shoulders, hips, and knees form an approximately straight line.
- Keep your ribs controlled and avoid pushing your stomach upward.
- Pause for one or two seconds while maintaining glute tension.
- Lower your hips slowly until they lightly touch the floor.
- Reset your brace before beginning the next repetition.
The American Council on Exercise recommends maintaining abdominal tension, lifting through hip extension, and avoiding excessive lower-back arching.
Coaching cue: Keep your ribs down, squeeze your glutes, and lift your hips—not your lower back.
Where Should the Dumbbell Sit?
Place the dumbbell across the front of your hips, near the hip crease and below your abdomen.
It should not rest high on your stomach. It also should not press directly into a sensitive bony area.
Center the weight so one side is not carrying more pressure than the other. Hold both ends of the dumbbell throughout the set.
A folded exercise mat, towel, or purpose-made pad can reduce discomfort. Padding should make the exercise more comfortable without making the dumbbell unstable.
Consider using a lighter dumbbell when:
- You cannot position it without struggling
- It rolls despite being held
- The pressure is uncomfortable even with padding
- You lose control during the lowering phase
- You cannot remove it safely after the set
A hexagonal dumbbell may remain steadier than a round dumbbell, but it still needs to be held securely.
How High Should You Lift Your Hips?
Lift only until you reach full hip extension without arching your lower back.
At the top, your body should form a fairly straight line from the shoulders through the hips to the knees. Your ribs should remain controlled rather than flaring upward.
Do not try to force your hips as high as possible.
Raising the hips beyond your available hip extension often causes the pelvis and lower back to compensate. A higher position is not automatically a better repetition.
Stop the upward phase when:
- The glutes are fully contracted
- The front of the hips feels extended
- The ribs remain controlled
- The lower back remains comfortable
- The knees, hips, and shoulders are approximately aligned
What Should a Dumbbell Glute Bridge Feel Like?
You should feel the strongest muscular effort in your glutes. Some hamstring involvement is normal because the hamstrings assist with hip extension.
You may also feel your abdominals working to keep your torso stable.
You should not feel sharp pain, pinching in the hips, or strong compression in the lower back.
If You Feel Mostly Hamstrings
Your feet may be too far from your hips.
Try moving both feet slightly closer, reducing the dumbbell weight, and using a shorter range of motion until you can maintain glute tension.
Make small adjustments. Bringing the heels extremely close may shift more work toward the front of the thighs or make the position uncomfortable.
If You Feel Mostly Lower Back
You may be lifting too high, flaring your ribs, or losing abdominal tension.
Before lifting:
- Exhale gently
- Brace your abdominals
- Use a small pelvic tuck
- Keep your ribs from rising
- Stop the repetition earlier
Return to a bodyweight bridge if you cannot maintain this position with the dumbbell.
If You Feel Mostly Quadriceps
Your feet may be too close to the hips.
Move them slightly farther away while keeping the heels planted. The ideal distance depends on your leg length and mobility, so adjust gradually.
If the Knees Move Inward
Reduce the weight and focus on keeping the knees tracking in the same general direction as the toes.
Do not force the knees excessively outward. Maintain a comfortable hip-width stance and stable foot pressure.
Benefits of Dumbbell Glute Bridges
Add Resistance Without Complex Equipment
A dumbbell allows you to increase resistance beyond the bodyweight bridge without needing a barbell, rack, or bench.
This makes the exercise practical for small home gyms and busy training spaces.
Provide Direct Hip-Extension Training
The dumbbell rests over the hips, placing external resistance against hip extension.
This allows the gluteus maximus and assisting hip extensors to be trained without balancing a weight in a standing position.
Offer a Stable Starting Position
The floor supports the head, shoulders, and upper back. This provides a stable base from which beginners can practice controlling the hips and pelvis.
The exercise still requires proper technique, but it involves less balance than single-leg or standing movements.
Allow Straightforward Progression
You can progress the dumbbell glute bridge by:
- Performing more repetitions
- Adding dumbbell weight
- Pausing longer at the top
- Slowing the lowering phase
- Adding a resistance band
- Moving to a more difficult bridge variation
Fit Easily Into Lower-Body Workouts
Dumbbell glute bridges can be used as:
- A glute-focused accessory after squats or deadlifts
- A main hip-extension exercise in a home workout
- A controlled movement for beginners learning to use the glutes
- A higher-repetition finisher
- Part of a general lower-body strength routine
Common Dumbbell Glute Bridge Mistakes
1. Resting the Dumbbell on the Abdomen
Placing the dumbbell too high can make it unstable and uncomfortable.
Correction: Position it across the front of the hips, below the abdomen, and hold it with both hands.
2. Using a Dumbbell That Is Too Heavy
A load that is difficult to position often leads to poor setup, shortened repetitions, and uncontrolled lowering.
Correction: Choose a weight you can place, stabilize, lift, and remove safely. Increase the load only after mastering the current weight.
3. Arching the Lower Back
The goal is hip extension, not spinal extension.
Correction: Brace your abdominals, control your ribs, use a gentle pelvic tuck, and stop lifting when the hips are fully extended.
4. Lifting the Hips Too High
Trying to maximize height can shift tension away from the glutes and into the lower back.
Correction: Finish when your shoulders, hips, and knees form an approximately straight line.
5. Bouncing Off the Floor
Using momentum reduces muscular control and can cause the dumbbell to shift.
Correction: Lower for approximately two seconds, lightly touch the floor, reset, and begin the next repetition without bouncing.
6. Allowing the Knees to Collapse Inward
Knees that move inward may indicate that the weight is too heavy or that lower-body alignment is being lost.
Correction: Keep your feet stable and guide the knees in the same general direction as the toes.
7. Pushing Through an Unstable Foot
Letting the heels, toes, or edges of the feet lift can reduce stability.
Correction: Keep the heel, base of the big toe, and base of the little toe in contact with the floor.
8. Relaxing at the Top
Reaching the top position without actively contracting the glutes reduces the purpose of the pause.
Correction: Hold the top position for one or two seconds while keeping the ribs down and the glutes engaged.
9. Lowering Too Quickly
Dropping the hips removes control from the eccentric, or lowering, phase.
Correction: Lower smoothly while keeping both hands on the dumbbell.
Dumbbell Glute Bridge Sets, Reps, and Rest
Use a repetition range that matches your experience and training goal.
| Goal | Sets | Reps | Rest | Effort |
|---|---|---|---|---|
| Learn the exercise | 2 | 10–15 | 60–75 seconds | Stop with 3–4 good reps remaining |
| General glute training | 3–4 | 8–15 | 60–120 seconds | Stop with 1–3 good reps remaining |
| Higher-rep accessory work | 2–3 | 15–20 | 45–75 seconds | Maintain control throughout |
The dumbbell glute bridge does not need to be taken to complete muscular failure. End the set when you are close to your limit but can still maintain stable feet, controlled ribs, and a slow lowering phase.
The American College of Sports Medicine’s 2026 resistance-training guidance emphasizes consistent training, appropriate effort, sufficient weekly volume, and individualization rather than unnecessary program complexity.
How to Choose the Right Dumbbell Weight
Choose a dumbbell that allows you to complete the planned repetitions without:
- Arching your lower back
- Shortening the range of motion
- Bouncing between repetitions
- Losing control of the dumbbell
- Allowing the knees to collapse inward
- Rushing the lowering phase
For your first weighted session, use a load that feels easier than you think you need. Learn how to position and stabilize the dumbbell before making the exercise challenging.
A suitable working weight should allow you to finish the set with approximately one to three technically sound repetitions remaining.
How Often Should You Do Dumbbell Glute Bridges?
Most people can include the exercise one to three times per week, depending on their total training plan and recovery.
You do not need to perform this exact movement every time you train your glutes. Squats, lunges, Romanian deadlifts, step-ups, hip thrusts, and other exercises can also contribute to lower-body training.
Consider the total amount of glute work in your program rather than counting only glute-bridge sessions.
For example:
- One day per week: Useful when your program already contains several glute-focused exercises
- Two days per week: A practical starting point for most general strength programs
- Three days per week: May work when some sessions use lighter resistance or fewer sets
Leave at least one recovery day between demanding weighted glute sessions when needed.
How to Progress the Dumbbell Glute Bridge
Use a simple double-progression method:
- Select a target range, such as 10–15 repetitions.
- Begin with a weight you can control for approximately 10 repetitions.
- Gradually add repetitions while maintaining the same form.
- Once you complete 15 repetitions in every set with one or two good repetitions remaining, continue with that weight for another session.
- Add the smallest practical amount of weight.
- Return to the lower end of the repetition range and repeat the process.
You can also progress without immediately adding weight by:
- Holding the top position for two or three seconds
- Taking three seconds to lower
- Adding one set
- Reducing momentum
- Improving your usable range of motion
- Using a resistance band above the knees
Progress only one or two variables at a time. Adding weight, repetitions, sets, and longer pauses simultaneously can make it difficult to identify what is causing your form to change.
Dumbbell Glute Bridge Regressions
Bodyweight Glute Bridge
Remove the dumbbell and practice the same movement with bodyweight.
This is the best starting variation for learning foot position, abdominal bracing, and controlled hip extension.
Short-Range Glute Bridge
Lift only as high as you can while keeping the lower back comfortable and the ribs controlled.
Gradually increase the range as your control improves.
Glute Bridge Hold
Raise the hips to a comfortable position and hold for 10–20 seconds.
This can help you practice maintaining glute and abdominal tension before performing repeated weighted lifts.
Dumbbell Glute Bridge Progressions
Paused Dumbbell Glute Bridge
Hold the top position for two or three seconds without relaxing or arching the lower back.
This increases the difficulty without requiring a heavier dumbbell.
Slow-Eccentric Dumbbell Glute Bridge
Take three or four seconds to lower the hips.
The slower lowering phase increases time under tension and makes light-to-moderate dumbbells more challenging.
Banded Dumbbell Glute Bridge
Place a small resistance band above the knees and maintain gentle outward pressure while bridging.
Keep the movement controlled. Do not force the knees excessively wide.
Feet-Elevated Glute Bridge
Place the feet on a secure low platform or step.
The elevated position changes the movement and may increase the challenge, but it can also increase hamstring involvement. Use a stable surface that cannot slide.
Single-Leg Glute Bridge
Perform the bridge with one foot supporting the body.
This increases unilateral strength and stability demands. Master the two-leg bodyweight and weighted versions before progressing to a single-leg bridge.
Dumbbell Hip Thrust
Support your upper back against a stable bench and perform the movement through a greater range of motion.
The bench must be secure and positioned so it cannot move during the exercise.
Dumbbell Glute Bridge vs. Dumbbell Hip Thrust
| Feature | Dumbbell glute bridge | Dumbbell hip thrust |
|---|---|---|
| Upper-body position | Head, shoulders, and back on the floor | Upper back supported on a bench |
| Range of motion | Usually shorter | Usually greater |
| Setup | Simple | Requires a stable bench |
| Typical loading | Light to moderately heavy | Often allows heavier loading |
| Stability | High | Requires more setup control |
| Best for | Beginners, home workouts, accessory work | Progressive loading and larger hip movement |
Neither exercise is automatically better for every person.
The glute bridge may be the better choice when you want a simple setup, are learning the movement, or do not have a stable bench. The hip thrust may be more useful when you want a larger range of motion and have outgrown the amount of weight that can be positioned comfortably for a floor bridge.
A PubMed-indexed study comparing barbell versions found differences in muscle activity between bridges and hip thrusts under the tested conditions. However, acute muscle-activity measurements do not establish that one exercise will always produce better long-term results.
Choose the variation that allows you to train consistently, progress the resistance, and maintain proper form.
Sample Lower-Body Workout With Dumbbell Glute Bridges
Perform this routine one or two times per week, depending on the rest of your training schedule.
Before starting, complete 5–10 minutes of easy activity and one light set of bodyweight glute bridges.
| Exercise | Sets | Reps | Rest |
|---|---|---|---|
| Goblet squat | 3 | 8–12 | 90–120 seconds |
| Dumbbell Romanian deadlift | 3 | 8–12 | 90–120 seconds |
| Dumbbell glute bridge | 3 | 10–15 | 60–90 seconds |
| Reverse lunge | 2 | 8–10 per leg | 75–90 seconds |
| Side plank | 2 | 20–30 seconds per side | 45–60 seconds |
Use weights that leave approximately two good repetitions in reserve on most sets.
For the dumbbell glute bridge, pause briefly at the top and lower under control. Once you can complete 15 clean repetitions in every set, increase the dumbbell weight slightly.
Dumbbell Glute Bridge Safety Tips
- Warm up before performing demanding weighted sets.
- Master the bodyweight bridge before adding substantial resistance.
- Use padding if the dumbbell creates uncomfortable pressure.
- Keep both hands on the dumbbell throughout the set.
- Do not use a weight you cannot position or remove safely.
- Keep your head and shoulders relaxed on the floor.
- Avoid forcing your hips higher than your controlled range.
- Stop the set when your lower back begins to arch.
- Use a mat or non-slip surface to prevent your feet from sliding.
- Stop exercising and seek professional help if you experience sharp pain, numbness, dizziness, chest pain, or unusual symptoms.
The American Academy of Orthopaedic Surgeons recommends warming up with 5–10 minutes of low-impact activity and advises against ignoring pain during exercise.
Frequently Asked Questions
Do Dumbbell Glute Bridges Build the Glutes?
Dumbbell glute bridges can contribute to glute strength and muscle development when they are performed with sufficient resistance, controlled technique, and gradual progression.
They work best as part of a complete lower-body program that may also include squats, hinges, lunges, and other hip-extension movements.
How Heavy Should the Dumbbell Be?
Start with a weight that allows at least 10 controlled repetitions without arching your lower back or losing control of the dumbbell.
The correct weight depends on your experience, strength, body proportions, and ability to position the dumbbell safely. Form should determine the load—not an arbitrary number.
Why Do I Feel Dumbbell Glute Bridges in My Hamstrings?
The hamstrings naturally assist with hip extension, so some involvement is expected.
When they dominate the exercise, the feet may be too far from the hips. Move your heels slightly closer, reduce the weight, and focus on maintaining abdominal and glute tension.
Should I Squeeze My Glutes at the Top?
Yes. Briefly contract the glutes at the top while keeping your ribs controlled and your lower back neutral.
Do not force the hips higher after reaching full extension. The squeeze should come from the glutes rather than from arching the spine.
Can I Perform Dumbbell Glute Bridges Every Day?
Daily practice may be unnecessary, especially when you use challenging resistance.
Most people can train the glutes effectively with several weekly sessions that allow enough recovery between demanding workouts. Light bodyweight practice may require less recovery than heavy weighted sets.
Are Dumbbell Glute Bridges Better Than Hip Thrusts?
Neither exercise is universally better.
Dumbbell glute bridges provide a simple, stable floor setup. Hip thrusts offer a greater range of motion and may allow more external load. Your best choice depends on your equipment, comfort, experience, and training goal.
Conclusion
The dumbbell glute bridge is a simple way to add resistance to a basic hip-extension movement. Position the dumbbell securely across the hips, brace your midsection, keep your feet stable, and lift only until your body forms a controlled line from the shoulders to the knees.
Begin with a manageable load and progress through better repetitions before adding more weight. The glutes—not the lower back—should remain the main source of the movement.
References
- National Academy of Sports Medicine: How to Do a Glute Bridge
- American Council on Exercise: Glute Bridge Exercise
- American College of Sports Medicine: Updated 2026 Resistance-Training Guidelines
- American Academy of Orthopaedic Surgeons: Hip Conditioning Program
- NCBI Bookshelf: Gluteus Maximus Anatomy
- NCBI Bookshelf: Hamstring Muscle Anatomy
- PubMed: Glute Bridge and Hip Thrust Muscle-Activity Comparison
This content is for informational purposes only and is not a substitute for medical advice.